|
||||||
|
Welcome to the second article in our series about acoustical room treatment (the first article was on Treating the Secrets Lab). This article will be reviewing some fundamental ideas of acoustic room treatment and showing you how to get started in applying treatments in your own rooms. We will be concentrating on the most effective locations for material so that you won’t have to worry about covering your rooms wall to wall with acoustic products. At the end of the article is a survey of samples sent to us from many manufacturers of acoustical products, including commentary on their characteristics. As each person's rooms and home theater systems are different, the focus of this project is not going to be on displaying the ideal room but rather it will be on the reasoning that goes behind placing absorption and diffusion material and optimizing bass response with bass traps.
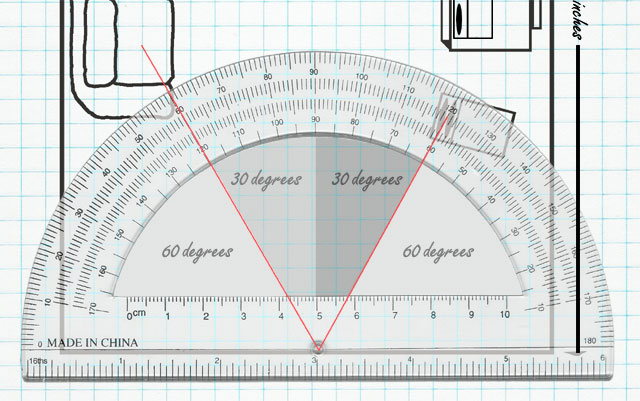
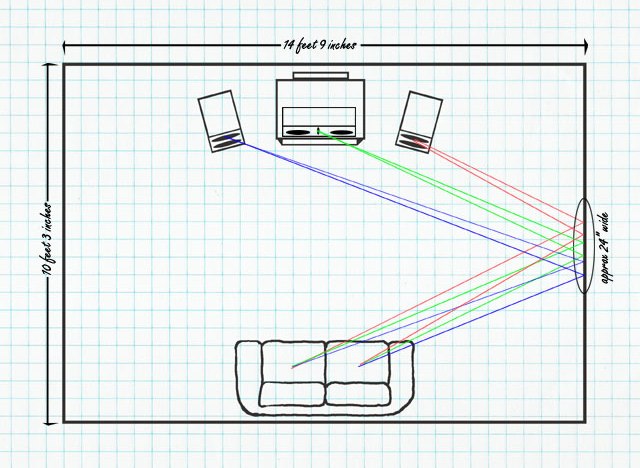
So, let’s get going! To use an extreme example, imagine having your home theater in a cathedral, which usually does not have room absorption on the walls. You press Play, and the sound begins. The first note comes out of the speakers and makes its way to your ears. But, it also begins bouncing off the walls, columns, and ceiling, and then to your ears. Since the reflection path is longer than the direct path to your ears, the reflected sound arrives later than the direct. It would be fine if there were only one musical note. But, of course, new sounds keep coming out of the speakers. The new sounds arrive at your ears along with reflected sound that came out of the speakers earlier in time. This produces "smearing", which is a hodgepodge of different sounds. Bottom line is that you cannot distinguish the details in all that mess. Hallelujah Keep in mind that the goal is to reduce the reflections, not eliminate them, because having an acoustically "dead" room is uncomfortable. You can reduce reflections by using professional materials such as those shown below, but you can also use curtains, wall hangings, rugs, couches, and other things that would be part of the room's decor. The First or Early Reflection Although sound coming from a speaker bounces from wall to wall, ceiling to floor, back and forth several times, it is the first or early reflection that has the most energy (since it decreases with each subsequent reflection), and is the one we are most concerned with. If we can reduce the energy of the first reflection, we reduce all subsequent reflections. The reflections work similar to light being reflected by a mirror, with angles of incidence (arrival) and angles of reflection (departure). You can keep some of the reflection, for the sake of having the room still be "alive", but reduce the smearing, by using "Diffusors" which make the reflected sound leave at multiple angles. Diffusors will be discussed below. Here are some methods for determining the first reflection: The Hand Mirror Method With a hand mirror and the help of an assistant, sit in a listening position and ask your assistant to hold up the hand mirror along the wall, at ear level. While your assistant moves the hand mirror along the wall, look for the reflection of the speaker’s tweeter. When you see it, mark the hand mirror’s location on the wall with some masking tape. This marking is the relevant early reflection point for the chosen listening position. Do this for the left, right, and center channel speakers. Mark the tape "LS- R1" for Left Speaker-Reflection 1, and so on for each speaker. A Scale Drawing and a Protractor. With this method, a scale drawing is made of your room, including seating positions and speaker positions. A protractor is then used to determine the relevant reflection points. This method has the advantage of giving you a clear visual indication of all your seating, your speakers, and the paths of all the relevant sound waves from each speaker. This makes it perfect for determining placement of alternative objects when affixing absorption material is not an option. You will find that, under most circumstances, the markings will be within a 24" of each other for all three speakers. After measuring the dimensions of your room, draw the room on graph paper using the squares to create a scaled drawing. I chose one square to represent six inches for the example in this article. Plot out your seating arrangement and locations of the speakers, measuring the speaker’s position relative to the wall from the front of the speaker. Sliding the protractor back and forth along the wall in the drawing, look for a point on the wall where a line drawn from the center of the protractor directly to the face of the speaker shares the same proportional angle as a line drawn directly towards the listening position. The angles are measured from the 90 degree mark, which is the middle point of the length of the protractor.
Here is a look at all the relevant reflections for one side of my home theater room. Converting from the graph paper squares back into feet, a two foot section of acoustic material would be centered on the wall about five feet forward from the back wall. Notice how all the reflection points covered an area of the wall that is approximately two feet wide. Depending on their size, this makes one or two panels of acoustic material perfect for covering this area (many of the panels are 24" wide). Repeat for the other side.
There is a vertical component of the reflection as well, and absorption panels are typically 48" high. So, you would place the panel such that its vertical center is at the position of the masking tape.
|
||||||


Magazine Publishing Solutions by