|
||||||
|
Speakers typically radiate sound forward, but they will radiate some sound
in all directions. Very often speakers are placed close to walls and its
best to get rid of any unnecessary sound coming from behind the speaker
before it can bounce around the room. If possible, place absorption material
on the walls behind the front and center speakers. This obviously doesn’t
apply to speakers that intentionally radiate sound in all directions
(electrostatics, ribbons, planar-magnetic). Diffusors are objects with surfaces that intentionally reflect the sound waves into many different random directions. While absorbers remove some sound energy, diffusers simply redirect it. The many surfaces of the diffuser ensure that the most of the sound wave won’t reflect directly towards the listener. The advantage is that the room will sound more live than if wall to wall absorption were used. There are many opinions on where to use diffusers, and it is a good point of discussion. Most companies recommend using diffusors on the ceiling with a combination of absorption material on the side walls. This is the method in which the Secrets Lab was treated and is detailed here. Another popular choice for using diffusers is placing them on the wall behind the listener if the listening position is more than a few feet from a wall.
Besides the professional diffusors, you can use such things as bookcases to
provide diffusion. Foam-based acoustic wall absorption products are most successful above 500 Hz, which leaves the lower frequencies still needing attention. Bass response in a room is directly related to the dimensions of the room, as well as the placement of both the subwoofer and the listener. Bass traps help reduce the problems of standing waves by absorbing some of the energy of the reflecting low frequency sound waves. Bass energy is maximized in the corners of the room and thus we find bass traps designed for corner placement. Placing bass traps in all the corners of the room will improve bass response. In addition to the vertical corners, placing bass traps in the ceiling corners and angles where the ceiling meets the walls will give further improvement. Note that the treated room bass will not sound as loud, because the room is no longer augmenting it. But, it will sound more natural.
You can use professional bass traps, but also such things as a chair with
big fluffy cushions placed in the corner. Sound travels through the air, but the energy of a speaker also passes through the surface the speaker rests on (the floor), all the way to the listener. When this energy from the speaker reaches the listener at a different time than the sound wave traveling through the air, the two energies are said to be out of phase. Isolation devices address this problem by absorbing the speaker’s energies before they can travel through the physical objects of the room.
Spiked feet are provided by many speaker manufacturers to isolate the
speaker from the floor, but simply placing the speaker on a rug will achieve
similar results (especially if you don't want the spikes to punch holes in
your hardwood floor).
Here is a brief recap of where room treatments should be placed. Absorbent material goes
primarily on first reflection points, diffusers go on the ceiling, and bass
traps go in the corners of the room, ceiling corners, and wall-to-wall
corners. If placing absorbent material is impossible, attempt to diffuse or
absorb the sound waves' reflections with objects that have good absorbency,
or complex surfaces (like bookshelves or heavy curtains). Use the methods
talked about in this article to determine the paths of the most relevant
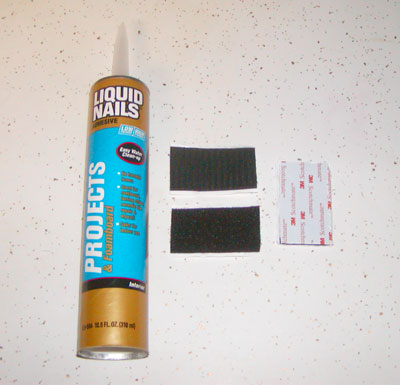
reflected sound waves. Now that we know where to put everything, let's talk about permanent and temporary methods of affixing this material to the walls. Permanent Method The most permanent method to place absorption panels and diffusors on walls or ceilings would be to use construction adhesive such as Liquid Nails. There are a few variations of the product and it is available in small squeeze tubes or larger caulking tubes which require a caulking gun for usage. Liquid Nails for Projects and Foam Board works very well for acoustic foam and is also said to carry less of an odor than some of the other Liquid Nails products. Caution: Removing acoustic material after it has been affixed with construction adhesive is going to destroy either the acoustic material, the wall’s decorative finish, or both. So, make sure of the placement location. Mark the position where the panel will go using a pencil or marking pen. On the back of the acoustic material, apply a zigzag pattern of adhesive, covering the material with quarter inch thick beads that are spread a few inches apart from each other. Make sure you apply it to within one and one half inches from any edges. Press the material up into place. You will only have about 1 minute to finalize the position, after which the panel will be very difficult to move. With diffusor panels, which are heavier and more solid, place them (with adhesive on the back) into position for a couple seconds and then remove. Let the adhesive stand for about two to four minutes and then reapply the diffusor to the wall adjusting it to the correct final position. A level can be used to insure accuracy. Watch to see that the diffusor does not slide down the wall. If it moves, slide it back into place and hold it against the wall until it does not move when you remove your hand. Temporary Methods Placing material on the walls using temporary methods is my preferred choice for this project. This allows for repositioning the material if the seating arrangement changes, and it preserves both the walls and the material if the acoustic material needs to be removed. Velcro strips can easily be used to place any light weight diffusors up, but the adhesive used on the strips may not bond well with soft foam absorbers. One idea is to use epoxy to create a stronger bond between the foam and the Velcro’s adhesive backing. Velcro strips usually adhere to walls without any problems and the adhesive can be cleaned up if the Velcro strips are removed. Use enough Velcro strips to ensure the material will stay firmly in place (one in each corner of the panel and one in the center of the panel). Making the acoustic material into a hanging fixture is another method which is excellent for temporary placement. Glue the acoustic material to a backing made of light, rigid material, such as a sheet of styrene or corkboard. This material can easily be cut to size, and once glued together, you can hang the acoustic material up in the same way a picture frame is hung. Use construction adhesive as previously described, to bond the acoustic material to the rigid backing of choice. Ensure your adhesive is appropriate for the materials you choose.
|
||||||
 Getting
it Up on the Walls
Getting
it Up on the Walls

Magazine Publishing Solutions by