|
|
|
|
Specifications:
● EPSON
Native 16:9 LCD Panels
● 700 ANSI
Lumens
● 600:1
Contrast Ratio
● Faroudja's DCDi Advanced Image Processor
● 30 dB
Fan Noise
● Bulb life: 3000 hours
● Manual
Zoom/Focus, f1.74-2.06, f28.3-38.0mm
● ±15
Degrees Digital Keystone Correction
● Weight: 9.3 lbs.
● Dimensions: 13.7" W x 10.9" D x 4.5"
H
MSRP USA $4,999
($4,049 at
ProjectorPeople.com)
http://www.epson.com
|
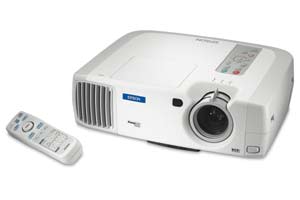
Introduction
The Epson PowerLite TW100 is a very nice little projector. In this case, the
use of the diminutive is in no sense derogatory, because the TW100 is a very capable
projector for Home Theater (“HT”) usage. It achieves a high level of
performance but has a small lightweight packaging. Other projectors with
16x9 LCD panels aimed at the HT market, such as the PLV-70 and Sony 12HT
tend to be larger. While this is not a problem for a fixed projector setup,
say in a ceiling mount, the small size of the TW100 makes it much more
amenable to table placement, a necessity in some situations were a dedicated
HT is not feasible. At the end of the movie, the TW100 can be easily
stored away till needed again.
The TW100 achieves this level of performance with minimal effort on the
part of the user. When you unpack the TW100, you will find manuals and other
documentation that are very well written, and are at a appropriate level for
someone new to using video projectors.
As can be seen in the full specifications, the TW100 has three 16x9 LCD
panels with 1280 x 768 pixels. The specified 700 Lumens of brightness, and a
contrast ratio of 600:1, may seem less than competitive in today's market,
but let's just say that Epson's specifications are somewhat more realistic
than those of most other manufacturers. This is a good thing. The lamp life
is specified at an exceptionally long 3,000 hours.
Inputs and Connectivity
The TW100 can easily connect with any input you are likely to give it.
Besides the now common composite, S-Video, and RCA-based component
connections, the TW100 has a VGA connector that can either be used as a VGA
input or as a second component input via the use of a component-to-VGA
converter cable (not supplied). It also has a DVI port that supports both
analog and digital DVI signals. There is an RS-232 port, the use of
which is unspecified in the manual.
Controls
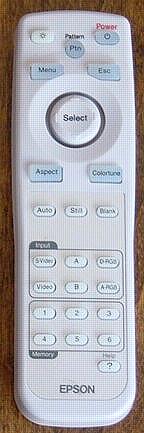 The
controls for the TW100 are simple, but well thought out. While there are no
power features, like zoom and focus, all of the controls to select inputs,
aspect ratios, and video memories, as well as tweak the projector via the
on-screen menu system, are available on the remote control. There are also
several other buttons on the remote: ‘pattern' selects a pattern for focus
or color adjustment; ‘Auto' automatically adjusts synchronization with
computer sources; ‘Still' freezes the picture; ‘Blank' mutes both the sound
and picture, and Light illuminates the button on the remote. ‘Colortune'
toggles between five different ‘color' modes: ‘Dynamic', ‘Theater', ‘Natural,
‘PC' and ‘sRGB' (more about what these modes control in the measurements and
viewing sections). There is also a help button that brings up what to many
may be a useful series of suggestions on how to solve various problems,
e.g., “My picture is too dark”. The
controls for the TW100 are simple, but well thought out. While there are no
power features, like zoom and focus, all of the controls to select inputs,
aspect ratios, and video memories, as well as tweak the projector via the
on-screen menu system, are available on the remote control. There are also
several other buttons on the remote: ‘pattern' selects a pattern for focus
or color adjustment; ‘Auto' automatically adjusts synchronization with
computer sources; ‘Still' freezes the picture; ‘Blank' mutes both the sound
and picture, and Light illuminates the button on the remote. ‘Colortune'
toggles between five different ‘color' modes: ‘Dynamic', ‘Theater', ‘Natural,
‘PC' and ‘sRGB' (more about what these modes control in the measurements and
viewing sections). There is also a help button that brings up what to many
may be a useful series of suggestions on how to solve various problems,
e.g., “My picture is too dark”.
Focus and Zoom are adjustable through the typical arrangement of two
rotating rings on the lens assembly. The TW100 is a bit unusual in that the
lens is largely recessed in the projector's case, and one rotates the rings
using two protruding knobs. I found the arrangement quite handy.
User-Level Adjustments
The menu system and user level controls are probably the best I have
encountered in a video projector. Not only can the user adjust the
brightness and contrast, as well as color, hue, and sharpness using a test
disk such as Avia, but one also has access to grayscale tracking-related
controls. Having these controls as a second level of the user menu makes
great sense to me, as it allows the user access to the most useful controls
for setting up the projector for maximum performance without the need to
enter the service mode and risk unknowingly changing one of the many other
controls typically also found there.
There are two ways of using the menu system, the Full Menu mode and a very
welcome Line Menu mode. The Full Menu mode is obtained by pressing the
“Menu' button which brings up a full-page menu display. The most relevant
for tweaking is the video page where ‘Black Level.' ‘White Level,' ‘Color,'
‘Tint,' and ‘Sharpness' can be seen and adjusted as plus and minus values
around the default of 0. Of course, ‘Black Level' and ‘White Level' are much
more descriptive names for the more common and often confusing, ‘Brightness'
and ‘Contrast' labels for these same functions. The video page also allows
selection of one of the five Color Modes mentioned above and one of six
Video Memories.
Setting the ‘Black Level' (using the Brightness control) accurately is essential, as it assures a consistent
definition for black between the source and the projector. If the ‘Black
Level' is set too high, then the black level is not as good as the projector
is capable of producing. If ‘Black Level' is set too low, then parts of the
image that are intended to be shadows or details in dark scenes are lost.
Setting the ‘Black Level' accurately can be done either by using the Avia
‘black bars', or using a light meter sensitive to low light levels, and a
black screen. With Composite, S-Video or other input sources that use IRE
7.5 for the black level, it is important to enter the ‘Advanced' menu page
and enter the appropriate setup level there so that the ‘Black Level'
control operates in its normal range.
Setting the ‘White Level' (using the Contrast control) is exactly the same
thing, but for white. Set it too low and you will lose image brightness and
contrast ratio. Set it too high and you will lose details in the highlights
of the picture.
The ‘Color Adjustment' mode on the video page is where things really get
interesting. When you enter the color adjustment mode, there are actually two
modes, a 'Color Temp' mode and an 'RGB' mode. 'Color Temp' mode allows the
user to select a color temperature from 5000K to 10,000K in quite a
reasonable number of steps. The 'Color Temp' mode also allows the user to
select a ‘Flesh Tone' setting from 1 to 6. The interaction of these controls
will be discussed further in the measurements section. When the RBG mode is
entered, the user can adjust the gain, offset, and gamma for Red, Green and
Blue separately – exactly what is needed for tweaking grayscale tracking. I
wish that all manufactures allowed this level of flexibility in the user
accessible menu system!
The second mode of menu operation is the 'Line Menu' mode that is accessed
by pressing the ‘Select' button rather than the 'Menu' button. What now
appears on the screen is a single line, i.e., "Black level – 0," displayed
with white letters on a black background. Other parameters are accessed
using the up and down arrows on the remote. This is ideal for tweaking
'Black Level' or 'White Level' during a movie, without unduly interrupting
the flow of the movie for others. The 'Line Menu' mode is also important for
tweaking black levels and using a meter to monitor the changes as a function
of the 'Black Level or 'Offset' adjustments. Typically, 'Full Menu' modes
disturb enough of the screen to make both the display of values and
simultaneous measurement impractical. For this reason, I really appreciate
the 'Line Menu' mode.
Placement in the Room
The TW100, like my reference projector, has a relatively short-throw lens, and
so I placed it 12 feet away from my 102” diagonal 16x9 DaMatte (gain=1)
screen, and at the height of the bottom of my screen. This way, I could avoid
using any keystone correction. (The TW100 does have vertical keystone
correction, which can be used if needed, but I avoid keystone corrections if
at all possible, because it does waste pixels.) The fan noise on the TW100 is
specified at 30 dB, and it seemed reasonable quiet, especially if one sat
behind the projector. The cooling air exit is from the right side of the
front of the table-mounted projector, and let's just say that would not be a
good place to put a cold glass of beer. Nevertheless, the TW100 should work
fine in most installations, either ceiling mounted, or placed for occasional
use on a table. The TW100 seems particularly suited for occasional use, as it
is very small, light, and easy to setup.
Measurements and Viewing
Measurements
When I evaluate a projector, I not only look at images, I measure the color
balance of the projector at various light intensity levels and determine the
quality of what is called ‘grayscale tracking'. The idea is that black,
white, and all shades of gray, should have the correct ratio of the three
primary colors used in video projection, Red, Green and Blue.
Projector meant for HT usage, typically make white by shining just the right
proportion of red, green, and blue light on the screen. Ideally shades of gray
should have the same proportion of red, green and blue as white, but less of
each color. What's important is that this RGB ratio be the ‘corect' ratio,
and that this ratio remains constant as the intensity of the light in the
image changes. This ability for the color balance to track properly with the
different levels of light intensity is therefore what is called ‘grayscale
tracking'.
Why is this so important? Well, imagine watching a black and white movie on
your color projector. Ideally whites should look white, blacks should look
black and all the shades of gray should look, well gray. If the projector in
the darker part of the image, used too much green, the shadows would seem a
bit greenish, and that would be distracting. If the highlights looked
yellow, that would also be distracting. So, it is important that all light
intensity levels of ‘gray' have the same ratio of all three colors to
achieve a good black and white image on a color projector. Grayscale
tracking is also important with color images, as one does not want the color
of an object to change as the level of illumination changes, or is in a
shadow. Good grayscale tracking, however, requires careful calibration –
typically beyond that done by the manufacturer or easily done by a user
without test equipment.
When testing projectors, I use a system I developed called “SMART”, which
measures the intensity of the three primary colors using test images and
shows the results in several types of graphs. In particular, SMART uses the
Avia disc to display a series of images in which windows appear in the
center of the screen, against a black background, that represent black and
white and various shades of gray in linear steps of 10 IRE units. (IRE is
term use to represent the video input voltage level with black represented
by IRE 0, and white by IRE 100.) With each of these IRE windows, SMART uses
a highly sensitive light meter (SMART III) and colored filters to measure
the light intensity of each of the primary colors at each IRE level. To
learn more about SMART, visit
http://www.smartavtweaks.com.
The Light Intensity data from the TW100 (with its initial settings) as a
function the video input signal, or IRE level, is shown in the chart above,
indicating the light intensity for each of the three color panels.
In this case, the color temperature setting in the menu was 6,500K and the
Flesh Tone, 2. Using Avia, I determined that the proper ‘Black Level'
setting was, in fact 0, and that the proper ‘White Level' setting was –6.
The 'Color Mode' was set to ‘Theater.' 'Color' and 'Tint' were both 0 using
the standard tests. The measured light level at the screen with an IRE 100
window was 20.6 ft-L, which corresponds to 637 lumens. The measured contrast
ratio (IRE 100 window vs. black) was 450:1.
Note that the response function of the projector is not linear, i.e., the
output light level is not linearly proportional to the input level, but
follows a curve. This is, in fact, the expected behavior, as we will discuss
in more detail below in the section on ‘gamma tracking'.
What we also see in the above graph, are traces for red, green, and blue,
which all rise along pretty much the same curve, although the red curve lies
a bit above the others. This indicates that with the initial setting I chose, the
color temperature of the projector is a bit below the desired color
temperature of 6500K. (Too much red lowers the color temperature, while too
much blue raises it.) As we shall see, this is easy to fix.
As discussed above, a consistent ratio of colors as a function of IRE level
is perhaps equally important to overall picture quality as having an
absolutely correct color temperature. In the color intensity chart above, it
is difficult to see the details of the color balance at the low IRE level, or
how the overall color intensity compares to the ideal for that IRE level.
For these purposes, SMART uses two different charts: one for color balance
and one for gamma tracking.
In the color balance chart generated by SMART, we can compare the ratios of
the various colors at the various IRE levels. In this case, the intensity
for the individual colors is compared to the average intensity for that IRE
level.
In the color balance chart, ideally all three curves would stay very close
to 1 at all IRE levels, indicating that the color balance was the desired
one, and did not change as a function of IRE level.
As can be seen in the above Color Balance graph, the TW100, out of the box,
shows exceptionally consistent color balance over the entire IRE range! This
chart also shows that the color temperature is a bit low (red is too high)
using the initial setting, but that is fairly easily corrected.
(Often in reviews, one will see plots of Color Temperature vs. IRE level as
a way of showing the quality of a projector's grayscale tracking. Color
temperature tells you about the ratio of blue to red in the image. SMART
uses a similar display to show the behavior of all three colors.)
Gamma tracking
The other thing we need to look at in more detail is gamma tracking, or how
the light output of the projector responds to the input signal. As mentioned
above, the relationship between input signal level and light output is not
linear, as one might expect, but follows an exponential function. The
exponent of this function is referred to as gamma for the display. If the
projector tracks the desired function properly, then the image will appear
as the director intended with shadow details preserved at low IRE levels, and
highlight detail maintained at the high IRE levels. If the projector's gamma
tracking is off, then details in the image will either be lost or the image
may look flat and have little contrast.
Gamma tracking can be graphed for red, green, and blue separately, or as shown
below, for the overall light intensity where the color intensities of red,
green, and blue are combined in a manner similar to how the human eye sees
light intensity.
In particular, the gamma tracking graph shows the ratio of the measured
combined light level to a theoretical level calculated, in this case,
calculated using a target gamma value of 2.5. If the projector is accurately
producing the intended light intensity level as a function of IRE level.
then the gamma tracking graph will show ratios at all IRE levels that are
close to 1. If the projector is putting out less light than the ideal, then
the gamma tracking chart will proportionally show a value of less than 1.
In the Gamma Tracking graph we can see that the TW100, with the iniital
settings, shows less light, or a darker image at the lower IRE levels than
the ideal. While such gamma behavior will make for a dramatic dark image, it
will, in fact, cause some loss of shadow detail. I very quickly traced this
behavior to the 'Theater' 'Color Mode' setting and found that with a setting
of ‘Natural', the gamma tracking was quite well behaved, as I will show
later in this article.
Tweaking the TW100
One of the real advantages of accurately characterizing a projector's
performance is that you can then use the same measurement system as a guide
to tweaking or improving the projected image. Tweaking typically involves
changing various control parameters in the projector, such as those that
allow adjustment of drive or gain levels, offsets, and gamma controls for the
primary colors. As previously mentioned, in the Epson TW100 these controls
are readily accessible in the user menu. This, plus the excellent performance
of the projector in general, made tweaking the TW100 exceptionally easy.
Basically the TW100 offers two ways to adjust the color balance. I started
in the 'RGB' mode and found that by decreasing the red gain, along with decreasing
the blue gain and bias relative to zero, I could easily achieve excellent
color tracking and the desired color temperature as shown above. The
contrast ratio remained at 450:1. It is noteworthy that the TW100 achieved
this excellent performance without the use of a CC filter, a tool I have
often needed to get the most out of other projectors.

Use of the ‘Natural' setting for the color mode also gave good gamma
tracking with these settings, as can be seen above. In this case, I had set
the gammas for the three colors to 2.4 in the 'Color Adjustment' 'RGB' mode
and the resultant gamma tracking follows the theoretical curve very well,
plotted in this case with a reference gamma of 2.45. (The graph value of "1"
represents being right on the reference gamma value of 2.45.)
I then used SMART to explore the ‘Color Temperature' and ‘Flesh Tone'
settings as I was a bit surprised that my starting setting were not closer
to the desired color temperature. It turned out that as I varied the 'Flesh
Tone' setting for a given 'Color Temp' setting, e.g. 6,500K the blue/green
ratio stayed about the same, but the red level decreased significantly as
the ‘Flesh Tone' value was increased. I got very close to my target color
balance somewhere between a selected Color Temperature of 6,700K and 7,000K
and a Flesh Tone Setting of between 3 and 4. Either method of adjustment
should work, but using the various setting in the 'RGB' mode seemed more
flexible and straightforward.
Color Decoder Accuracy
At this point, it is very important to understand the difference between
grayscale tracking accuracy and color decoder accuracy. As discussed above,
grayscale tracking has to do with the proportion of red, green, and blue in
black and white and all the shades of gray. If all we watched were black and
white (and gray) movies, this would be sufficient. With color images, we also
care how accurately colors are made. Red is red, of course, but we want to
have reds of various levels of saturation or ‘redness', and we want
combinations of the primary colors to make all the other colors in all their
various levels of saturation. Making accurate colors is the job of the color
decoder. When someone says that a projector has ‘red push' they mean that
red is more saturated in the image than was intended, not that there is too
much red in the white and gray parts of the image. These are separate issues
and should not be confused.
When we use the blue filter and a color bar test image to set up the color
control using a test disc, we are controlling the level of saturation of
blue. The Avia disc has another very useful test image called the Color
Decoder test in the Special Tests menu that tests the level of saturation
for all three primary colors. Hence, the Avia disc comes with a green and
red filter to use in this test, as well as the more common blue one. In the
Color Decoder test, the appropriate filter is used to check the color decoder
accuracy for that primary color. The image contains a gray background and a
series of red, green, and blue colored squares of differing levels of
saturation. If you had previously set the color control accurately using the
color bar test and now use the blue filter to look at the Color Decoder
image, you should see that the blue square labeled 0% is about the same
level of intensity as the gray background. This would indicate that the
color decoder is set up accurately for blue. With an accurate color decoder,
one would get a match at 0% for the other two colors as well, using the
other two filters and looking at the red and green squares. If, on the other
hand, the red square labeled 20% matched the gray background, then you could
conclude that that the projector had 20% red “push”.
With the TW100, the ‘Color' setting using the color bars went was at 0, and
the ‘Tint' ‘control stayed at 0 as well. These settings did show a good
match at 0% for blue as expected with the color decoder test, but red showed
matched intensities at about +5%, indicating a negligible red push, and
green at –15%, indicating a slight negative green push. While most
projectors allow service mode tweaking of grayscale tracking, few allow
color decoder errors to be fixed.
Scaler and Deinterlacer
The TW100 has three 16x9 LCD panels, each containing 1280 x 768 pixels, and
this pixel grid determines the resolution of the display. Virtually all
video input sources, however, have a different resolution than that of the
display, and it is the job of a scaler to convert, either via expansion or
compression, the input signal to the appropriate resolution ("Native
Resolution") for the display panels. Furthermore, many current sources for
video are interlaced, and a deinterlacer is needed to intelligently combine
the appropriate fields of the interlaced signal to make complete frames for
the inherently progressive LCD display. Combine all this with the need to
support different display modes, aspect ratios for 4x3, 16x9, and letterboxed
images, and you have quite a complex problem.
Not too many years ago, one could have paid far more than the cost of this
projector for a scaler and deinterlacer to perform just these tasks,
especially if you wanted a name like Faroudja on the label. Fortunately,
today, most of the projectors aimed at the HT market have scalers and
deinterlacers built-in, and the TW100 is no exception; it actually has a Faroudja's DCDi Advanced Image Processor
inside. This is essentially the
same processor I have in my reference DVD player, and I have found it capable
of producing very clear, artifact-free images.
When viewing the TW100, with DVDs (480i and 480p), and with HDTV (1080i),
images are clean and without noticeable artifacts when viewed via the
component inputs. Standard Definition digital broadcasts from the DISH 6000
also looked as expected via the S-Video input.
Given the TW100's Faroudja deinterlacer and scaler, even if you have a DVD
player with a progressive output option, it is worth checking the image on
the TW100 using both the progressive and interlaced modes, to see which
deinterlacer - the one in the DVD player or the one in the projector - gives
the best looking image. Chances are that unless you have a very high-end DVD
player, the deinterlacer in the TW100 will do the better job.
Needless to say, the TW100 has all the necessary aspect ratio modes to
support 4x3 images (Normal), Enhanced for 16x9 or Anamorphic (Squeeze), and
a (Zoom) mode for letterboxed images. These can be selected (toggled) using
the ‘Aspect' button on the remote.
There are also six video memories where the user can store aspect ratios,
contrast, and brightness settings, etc. These memories can be easily recalled
via specific buttons on the remote.
Viewing
I started my viewing by selecting a Color Temperature of 6,500K and a Flesh
Tone of 2. I got a general impression of the projector before any
measurements by watching a bit of "Lord of the Rings, Fellowship of the
Rings", (“LOTR”) which for all practical purposes has become my reference DVD
and the DISH Demo loop in HTDV. The image was bright and had plenty of
contrast, but a seemed bit too red. Shadow detail were also missing in the
darker scenes. Both of these turned out to be very easy to solve through the
use of the measurements and adjustments described above.
Once tweaked, the picture looked great, very similar to my reference
projector, a Sony 11HT, tweaked with SMART and a CC filter. The picture
appeared a bit brighter, as it measured so, and the black level and shadow
details looked excellent. One scene I use for testing shadow details is in LOTR near the beginning of Chapter 7: a view of Mt. Doom with an ominous,
dark cloudy sky, and a ridge or hill in the lower left foreground. If the
black levels are at all crushed or compressed, then the details on that
ridge disappear into the black background. With the ‘Color Mode' on the
TW100 set to ‘Theater,' those details were gone. With the ‘Natural' setting
that gave the proper gamma tracking, those shadow details were clearly
discernable. I also tried watching a bit of the movie with the ‘Dynamic'
setting, and the results were, well, dynamic. It was like the brightness or
black level adjustment was constantly being adjusted - up for the dark
scenes, down for the bright scenes; not good for serious viewing. Why Epson
included these modes on an otherwise very sensible projector, I am not sure.
I recommend the ‘Natural' mode for all HT viewing.
I also used the TW100 for HDTV viewing, including "Odyssey 5" a weekly Sci-Fi
series shown on Showtime in High Definition. Although I have had access to
Hi Def programming for quite some time now, the clarity, brightness, and
color pallet of High Def programming always produces that "Wow"
factor, compared to DVDs. So it was with the TW100 – it is worthy of being
called a high definition projector.
The screen door effect is a term often used to describe a potential issue
with digital projectors, one in which the darker grid between the individual
pixels of the projected image are noticed by the viewer. The screen door
effect is a potential issue with all digital projectors, but is generally
considered to be more of an issue with LCD-based systems. The question is
whether one can see the pixel grid or screen door effect at the normal
viewing distance – it easy to see if you walk up to the screen. For
reference I usually sit 14 feet back from the screen, which puts me at a
ratio of 3.35 relative to the height of the screen.
With the TW100, as with my reference projector, I often am aware of the
pixel grid in brighter scenes with uniform colors. It's not a real problem,
but it is there if you want to see it. A good example is when Arwen first
appears in LOTR riding a white horse - the screen turns a very bright almost
blinding white. In this scene, the screen door effect was slightly more
noticeable with the TW100 than with my reference projector. Perhaps this was
simply because the image was a bit brighter and one's eyes are more
sensitive to details with the brighter image, or perhaps it was because my
reference projector has a slightly higher pixel density than the TW100,
(1,366 x 768 vs. 1,280 x 768). I don't consider this a serious issue with either
projector, however, as it is typically only apparent in a small percentage
of the scenes in any given movie.
I had experimented with defocusing with my 10HT and 11HT and decided that in
general, it was not worth it. I lost detail, especially in High Def images,
at about the same time I improved the screen door. My feelings about
defocusing the TW100 were similar. You will need to come to your own
conclusion on the screen door issue based on your own situation, e.g.,
seating distance, visual acuity, etc. In other words, in my opinion, it is
better to see the screen door effect and keep the overall sharpness of the
picture, rather than decrease both of them.
Conclusions
As I said at the beginning of this review, the Epson TW100 is a very nice
little projector. It has performance similar to some of the larger, more
expensive units, but with its lower price, and convenient size, it could
well fit into budgets and rooms where the larger systems don't. There have
been other lower-cost projectors aimed at the budget HT market, but they
typically haven't had the resolution to properly display High Definition
images. The TW100 is probably the first lower-cost projector to offer this
level of performance and resolution, but there are others projectors
available today that should also be considered. No projector, especially in
this price range, is without its limitations. At this time, I think that the
major limitation in LCD-based projectors is the screen door effect and, in
this respect, the TW100 is no exception. On the other hand, the unit I
tested had no quality issues, that is, it had no dead pixels, and it had excellent
convergence and good color uniformity. Given the performance of the TW100
and Epson's excellent reputation for quality products and customer support,
I certainly recommend this projector to those looking for a small, easy to
install, easy to use projector for their Home Theater.
- Steve
Smallcombe -
Reference Equipment:
Denon 1600 DVD player B&K Ref 30 preamplifier
Theta Dreadnaught 5x225 amplifier
Acurus 200x3 amplifier (two channels used for rear speakers)
Adcom Power Center
KimberCable interconnects and speaker wire
DISH 6000 HDTV receiver
Velodyne DF-661 front speakers (modified crossover) - 3
Definitive Technology surround speakers - 4
Velodyne 15" subwoofers - 2
SONY VLP-VW11HT video projector (reference projector, tweaked with CC40R filter)
|
Related to the article above, we
recommend the following: |
|
Primer - TVs |
|
|
|
|
Terms and Conditions of Use

|