Product Review - Is CRT
Projection Dead? Experiences with the Zenith Pro 1200X CRT Front Projector - November, 2001
John E. Johnson, Jr.
![]()
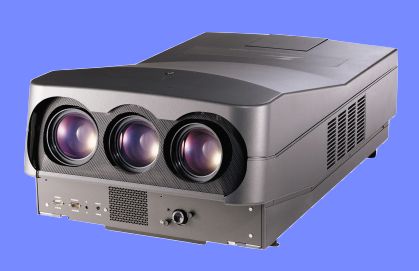 |
Specifications: CRTs: 8" Red, Green, Blue; Liquid-Coupled Resolution: SXGA (1280 x 1024) High Definition Lenses Automatic Convergence (ProVerge) Using Built-In TV Camera Inputs: Component (RGB-HV, BNC), S-Video, Composite (BNC) Size: 14" H x 24" W x 41" D Weight: 155 Pounds MSRP: $30,000 USA
|
|
Zenith Electronics Corporation; http://www.zenith.com |
Introduction
Most of us are familiar with the marketing bombardment of digital projectors now on the street. LCD, DLP, D-ILA are all over the place. And, they are relatively inexpensive, particularly LCD. They project a bright image, so you can use a big screen, even 10 feet wide if you like. All over the Internet, I see people talking about this and that projector that they bought at a discount price, and how they installed them. The fact that they seem to be pretty happy overall is brought home by the kind of comments they make, namely that they are bothered by a dead pixel over in one corner, or that they have a dust blob here and there. Not very serious issues.
So, what happened to CRT projectors? I have seen very little discussion of that antiquated technology. They are big, heavy, very time consuming to install, they need constant touch up with convergence, and . . . they are really expensive. I guess that is a long list of why they seem to be going the way of the Dodo bird.
Well, do you remember when CDs first came out and everyone abandoned LPs? And then, after a while, all of a sudden, many audiophiles said, "Wait a minute. CDs don't sound as good as LPs." I am still kicking myself for giving away a complete set of Beethoven's symphonies on Deutsch Grammophone LPs, most of them never played.
I decided it was time to revisit the CRT front projector to see if we are getting ahead of ourselves with digital projection. I chose the relatively new design, Zenith's Pro 1200X, which has 8" liquid-coupled CRTs.
The Installation
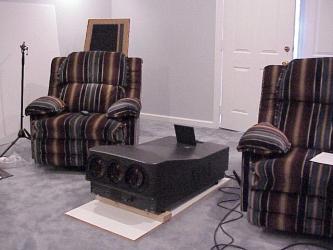
Compared to the Sony 10HT LCD projector which I put on my coffee table, turned it on, and started watching movies, the 1200X began its trip to my lab strapped to a hand cart. It weighs nearly 200 pounds in the box. I had to have a couple of strong fellows lift it out of the carton and onto a 24" x 48" board that I placed on the floor between two chairs in the lab.
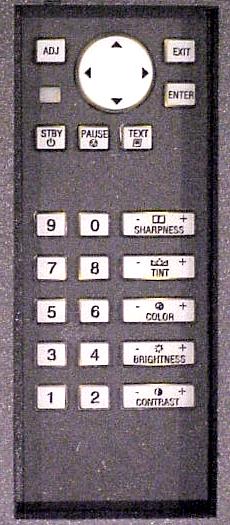
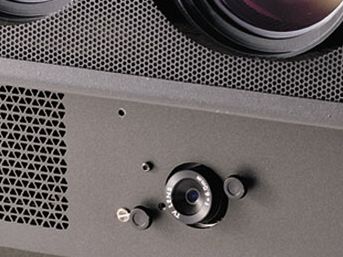
I then plugged it in and turned it on (pressing the Stby button on the projector control pad, shown in the photo below; the pad is similar to the remote control). A message was projected on the wall (no screen yet) that said it was taking a 20 minute warm-up period in order that the CRTs would be the proper color temperature. So, I waited.
After warm-up, I turned on our Toshiba SD-6200 DVD player, which was routed through a Faroudja Native Rate Digital Processor, to the projector, using a set of BetterCables Silver Serpent Video Cables (RGB-HV). This involves three component video cables from the player to the Faroudja, and five cables from the Faroudja to the projector. Besides RGB (Red, Green, Blue), the projector has a cable for Horizontal sync and Vertical sync (similar to what your PC monitor uses). The Faroudja requires an interlaced input, and it de-interlaces the signal, then outputs the progressive component video to the projector. The reason I am mentioning the Faroudja now is that it made a fabulous difference in the image. Much better than just using the progressive output from the player directly to the projector. I will be discussing the Faroudja in its own review shortly.
Mr. William Phelps came over to do the calibration. William sets up all of Sony's projectors at shows like CEDIA and CES, so we were very fortunate that he lives only about 5 miles from our lab.
Because I was not sure what size and gain screen I needed, I used two 40" x 60" white foam boards, taped in the center from the rear. This turned out to work very well, and we calculated that it has a gain of about 1.5. The reason this is important is that one of the problems CRT projectors have is that they don't put out much light. Following calibration, we measured 13.4 foot lamberts from the screen, which translates to about 280 lumens of projector light output, with the gain taken into account. That is not much compared to the 1000, 2000, and 3000 lumen digital projectors out there.
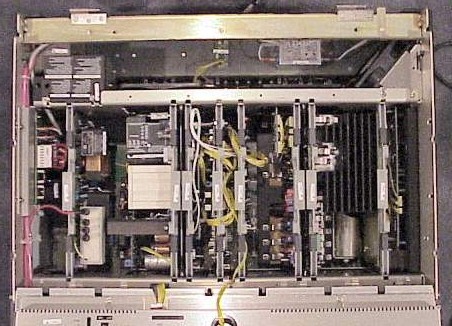
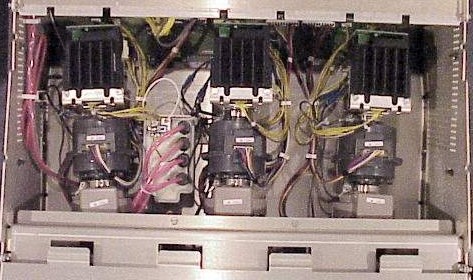
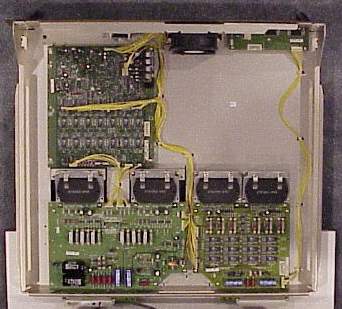
Photos below show the inside of the rear chassis, the middle of the chassis, and the tray that slides out from underneath the front of the chassis. The rear chassis contains IC cards that go into slots and are locked down. Power supplies and other things are located there. The mid-chassis holds the CRTs. The tray holds the deflection circuits.
The lenses will focus on a screen from about 5 feet out to large distances. Our lab, with its layout, including placement of speakers, meant we had the screen about 8 feet away. Even though this is not very far, the image filled the 80" x 60" screen.
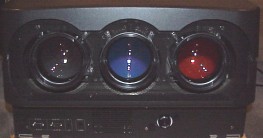
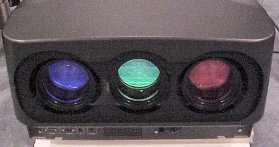
With changes in screen distance, the lenses have to be converged appropriately, so that they are all pointing at the same position on the screen. From right to left, looking at the projector, the CRTs are red on the right, green in the center, and blue on the left. In order to get the correct color (NTSC) output, the blue phosphor is fine as is, but the others need filters to be added in the lenses. So, for the red and green CRTs, the phosphors are red and green, but you can see in the first photo below that there are color filters in the lenses for color correction. I used a flash camera looking into the lenses, with the projector turned off. The second photo was taken with the projector powered on, with an image being projected, and with no flash. They are red, green, blue from right to left.
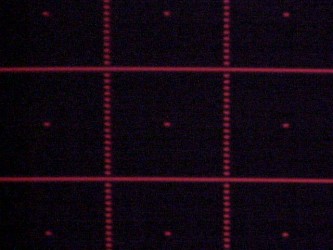
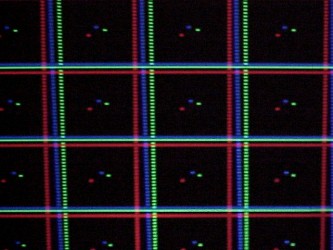
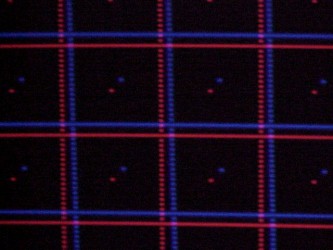
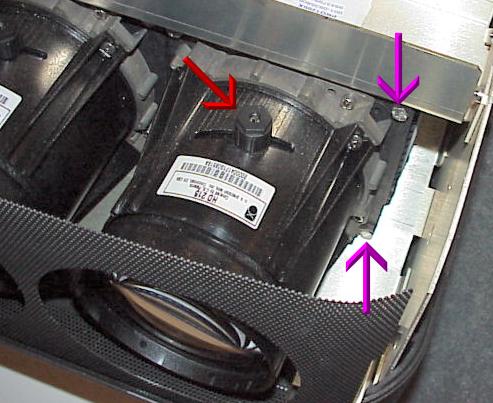
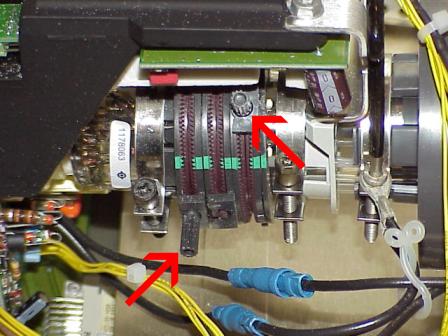
When the projector is turned on before convergence, separate red, green, and blue images are seen, and they are not lined up together at all. First, the lenses are focused mechanically by twisting a dial attached to each lens (red arrow in photo, below). Then, "static" convergence of the lenses is done by loosening some bolts that hold the lenses in place, centering the green image (center lens in the photo above), and then moving the red and blue lenses (the right and left lenses respectively in the photo above) until they line up with the green image. But this only produces a roughly aligned picture. The fine tuning has to be done electronically, which is performed by going through the convergence menu on the projector and various patterns, such as dots and lines of the three colors. Each corner can be converged separately, as well as vertical edges, right and left, and horizontal edges, top and bottom. Even bowed lines can be straightened. There is also a convergence procedure that begins in the middle and works its way out to the right and left. For example, below are three photos. The first one shows the red CRT on, for focus. The second photo shows all three CRTs on, for convergence. The third photo shows the red and blue CRTs on, for alignment check of two CRTs at at time.
There is another procedure that has to be done, called the Scheimpflug adjustment. Because the lenses are aimed at angles towards the screen rather than perpendicularly, if you did not make this adjustment, the image would be in focus only in one spot. For example, it would be in focus at the center, but not at the left and right edges or at the top and bottom. The Scheimpflug adjustment is made by turning the bolts indicated by the purple arrows in the photo below. These bolts tilt the CRT face in relation to the rear lens element (there are two more bolts on the left side of the lens, out of the field of view in the photo). By tilting the CRT face in relation to the lens, all parts of the image can be in focus on the screen, even though the lens is pointed at vertical and horizontal angles to the screen.
The CRTs in the Pro 1200X are liquid coupled. This means that the front of the CRT face and the rear lens element are contained inside a bellows with liquid (the CRTs are also liquid cooled so that the phosphors don't melt, but that is a different thing). The result of liquid coupling is that the amount of light scattering between the CRT and lens is reduced from about 4% to less than 1%, and this improves the contrast. This is just one of the reasons why the Pro 1200X is $30,000.
The Zenith Pro 1200X has a feature called ProVerge. This involves a small CCD camera on the front of the projector that looks at the screen (shown below). Once rough alignment is set, the ProVerge feature is activated from the remote control (included). The projector generates numerous vertical and horizontal patterns, reads the patterns, and adjusts the convergence of the three colors. It works very well.
The electron guns of the CRTs have to be focused and centered. There are small adjusting rods along the sides of the CRTs for this (red arrows in photo below; the front of the CRT and lens are to the right). Each color CRT is done in turn. If it is not done properly, astigmatism results. Because the CRTs operate by using electromagnets to focus and move the electron beam, the earth's magnetic field has to be accommodated, so there are N-S (North-South), and E-W (East-West) adjustments. The whole idea is to make sure that each color sends its part of the image to the same spot on the projection screen as the other colors do. This is not an easy task, and it took us several hours to get everything converged properly.
The raster (the lines that make up the picture) has to be centered on the CRTs. This is done electronically. Then, the shape of the raster is adjusted for the aspect ratio that you want. In our situation, it is 16:9. 4:3 is default, so the top and bottom were moved closer together, using a 16:9 test pattern with a circle in the center. By adjusting the top and bottom so that the circle was round, 16:9 was achieved. Changing the raster shape does not eliminate any scan lines, which in the case of the Faroudja processor, was 720p.
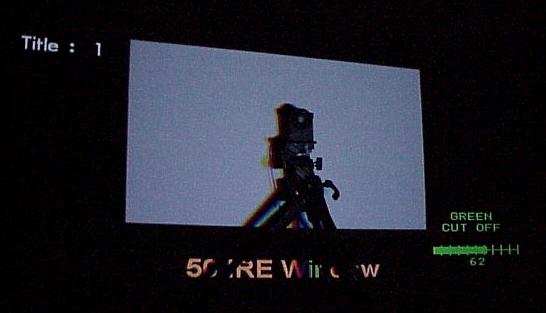
Once it is all done, a dot and cross hatch test pattern looks black and white across the entire screen, with no blue, green, or red edges to the dots or lines anywhere. Below is shown this test pattern at 50 IRE (mid-level brightness). Tall ribbon speakers are to the right and left of the screen, and low-level lights are on in the corners behind the screen to minimize eye strain. Directly behind the screen is a sound absorption wall treatment.

Color balance in relation to brightness (gray level) was done using a color analyzer in front of the center part of the screen. A rectangular area in the center was illuminated and measured at 10 IRE up to 100 IRE in 10 IRE increments. The color temperature was plotted as a function of brightness. We found a blue hump at about 40 IRE. So, red, green, and blue "gain" were adjusted at a bright setting (90 IRE) and the "cut off" was adjusted at low brightness (30 IRE). The cut off was a value at low brightness, at which the specific color just turned off altogether. The result was as even a color temperature across the entire brightness range that we could obtain. There was still a little blue hump, but it was better than it was to begin with. Below, is shown a photo of the analyzer sensor and testing at 50 IRE. The green cut off is seen in the bottom right corner. Gamma correction is another adjustment that is used to control the brightness of the three colors at different parts of the scale. Between all the adjustment features, the gray level can be kept pretty well under control. We used the Avia Test DVD and projector's internal test patterns for the various tests. CRT color drift can be 300 K in ten minutes, so even though the color balance is adjusted using standards, you still might have to touch it up from time to time.
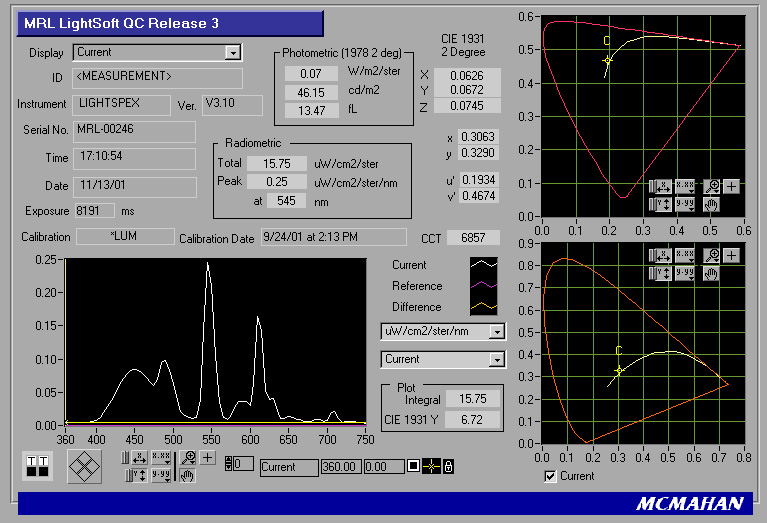
A Lightspex measurement indicated the accuracy of the individual CRT colors, shown in the graph below.
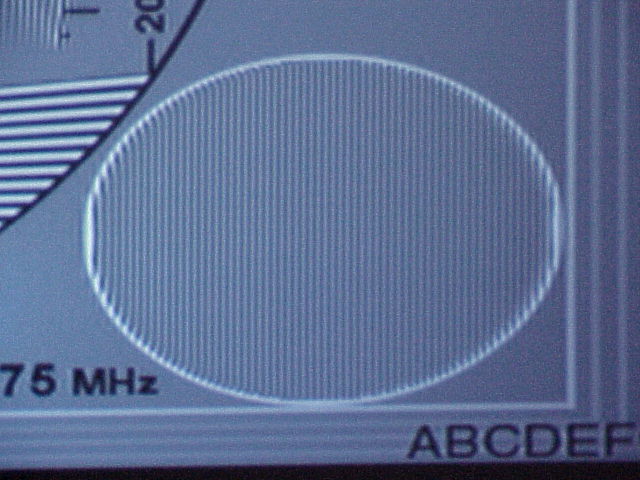
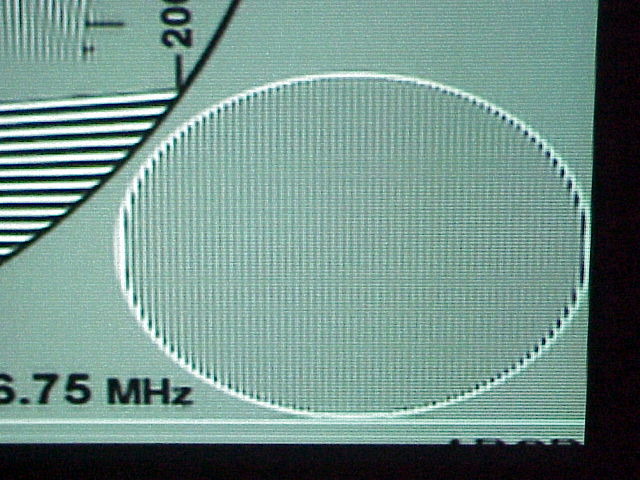
One last test pattern, using Avia, shows the image resolution up to the full 6.75 MHz bandwidth of DVD (first photo shown below; 4:3 pattern shown in 16:9). This photo is a close-up of the right hand lower corner of the test pattern. The texture of the background is very smooth. Now compare that with the second photo below, a screen shot from the Sony 10HT LCD projector, of the same test pattern. You can see the pixels in the background, which give it a grainy appearance. Of course, both projectors will resolve more than what DVD is capable of, i.e., HDTV, but the 6.75 MHz image serves to illustrate the grain problem with LCD projectors. The two photos have a different tint to them because my digital camera tries to white-balance the scene.
The Performance
OK, so we spent all afternoon and into the early evening aligning the projector. So, how did it perform? In a word, spectacular! Colors were rich and deep. The image had a three dimensional appearance, and this is something that digital projectors don't have yet. The reason is that there are spaces between the pixels in digital panels. Even though you can sit back far enough that you don't "see" the pixels, they are still there, in tiny blocks. The spaces in between the pixels take up finite space. If you stand back from a screen door so that you don't see the individual holes in the screen, the outdoor image that you see through the screen door still has a softened appearance. It's the same thing with digital panels. DLP is not as scalable as LCD and D-ILA are, but perhaps later, it will be. At some point, perhaps in a couple of years, the panels will approach a continuous appearance, but obviously, cannot get completely there, because there will have to be boundaries between pixels no matter how many there are. The "Fill Rate", meaning the amount of pixel picture vs. space in between, is best with D-ILA, followed by DLP. It is not very good at all with LCD. There are no pixels or spaces in between them with CRTs. The image is continuous, and that makes a big difference for the picture.
The problem of contrast with digital panels is solvable. One of the issues arises from light leakage around the panels. They need to be masked off with better techniques. Also, LCD is a transmissive polarization technology, and polarizing the pixels does not completely eliminate light coming through when they are dark. D-ILA is better because it is a reflective polarization technology, and light has to pass through the polarized pixels twice. With DLP, tiny mechanical mirrors tilt on and off, so that light is reflected towards or away from the lens. The light bulb always stays on, regardless of the pixels or mirrors, and that is a problem. What to do with the light when the pixels are dark. With CRTs, when they are off, no light is coming out, so the contrast remains high. Perhaps around 1000:1. Digital projectors have trouble generating this kind of contrast. Our Sony 10HT has a contrast ratio of 130:1 (we measured it). No wonder shadow areas look muddy. In spite of this, digital projectors have a good future. The problems will be resolved, but it will take time. Plasma screens look pretty good already, but the price needs to come down and the size availability increased to 72" wide, and even more. They are up to 61" already, so it's getting there. They have excellent brightness and contrast.
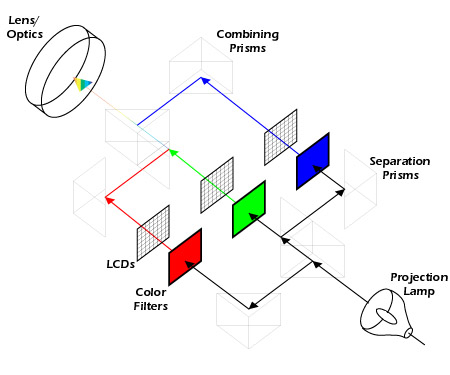
Here is a diagram of a generic 3-panel LCD projector (shown below). Notice how the light has to pass through many glass prisms in order for the three colors to end up coming out of a single projection lens. At each air-glass or glass-air interface, light scatter occurs, and this reduces contrast. With 3-panel DLP and D-ILA, the technology is reflection rather than transmission, but numerous prisms are still required. With a CRT projector, the light from the CRT face goes directly to the lens. No prisms.
I could show some Pro 1200X screen shots from movies, but jpg compression and inadequacies of cameras make this pointless. Let's just say that the image quality of the Pro 1200X took my breath away.
With a picture this big and beautiful, I had to use a big sound system. A Theta Casablanca drove Balanced Audio Technology VK-500, MacIntosh MC602, Sunfire Cinema Grand Signature, and Cinepro 2k6 SE Gold power amplifiers, using Nordost and BetterCables balanced interconnects. Speakers were Carver Platinum Mark IV in front, Carver Silver Mark IV in the rear, and Monitor Audio Studio 20SEs as the center, with Nordost speaker cables. Velodyne FSR-18s took care of the shudder factor. The sound with a system like this is almost beyond belief. The entire room soared. While the review sample is still here, I plan to bring over some showroom managers so they can see what is really achievable in a home theater.
Conclusion
If I were building a new home with a home theater room, I would put this CRT projector in there. The image is unquestionably better than any digital projector I have ever seen. Color depth and contrast give it tremendous life. However, this may be moot. Digital projectors are less expensive, compact, easy to set up, and have brightness that works in just about any room situation even if some light is coming in through the blinds. These things, plus the fact we live in a digital world, mean that digital projectors will take over. Manufacturers are already halting production of the CRTs and lenses. It truly is a shame. Maybe like the old collections of LPs that have gone through the roof in value, old CRT projectors someday will be even more costly than they were when they were new. There will be small shops to repair them. There will be small custom factories that make CRTs or recoat them with new phosphors. Custom lens manufacture and repair will be an emerging business.
If you have a chance to sit down in a showroom with a good CRT projector, do it soon. You will see a world that is likely to disappear before too long.
- John E. Johnson, Jr. -
Links to digital projector technology:
LCD Technology - http://sharp-world.com/sc/library/lcd_e/s2_1_1e.htm
DLP Technology - http://www.mitsubishi-tv.com/dlptech.htm
D-ILA Technology - http://www.jvcdig.com/technology.htm
![]()
© Copyright 2001 Secrets of Home Theater & High Fidelity
Return to Table of Contents for this Issue.
Magazine Publishing Solutions by