DIY Project # 9 - Woodworking Tools for the Do-It-Yourselfer - October, 1998 by Louis Lung
(If you would like to have your DIY project published in Secrets, please E-Mail Ralph Calabria at [email protected].)
Table of Contents (Click on the
section you want to see)
- Introduction
- A Note on Safety and Maintenance
- Motors & Horsepower
- Grades of Tools
- Table Saw
- Router
- Portable Circular Saw
- Jig Saw
- Drill
- Saw Blades
- Other Saws
- Soldering Iron
- Other Tools
- Buying Tools
- Internet Resources and Links
- Closing Thoughts
About the author - by Ralph Calabria
When I asked Lou to write this article,
I was well aware of his knowledge of woodworking skills, both
in furniture making and speaker building. Lou has been a woodworker
for some time now, and the fine craftsmanship seen in his work
is testimony. Lou's many speaker-building projects include:
a 3-way tower design using an ACI AC-10 woofer, Focal 5N313 mid,
and Scan Speak D2905/9000 tweeter; a design of the NHT 1259 that
looks more like a decorative pedestal than a subwoofer; and a
budget 2-way using a Vifa 5" mid and a SEAS 1" tweeter.
His furniture-building credentials include a bunk bed made from
cherry, an armoire, and a mahogany nightstand.
Speaker building is not just an exercise
in audio engineering; it is also a construction project. For the
beginner, obtaining the proper woodworking tools can therefore
be as daunting a task as driver selection. This article will attempt
to shed some light on basic woodworking tools. Each tool will
be viewed primarily from a speaker building perspective, although
any do-it-yourself project may be substituted. I will try to look
at:
- Features and Functions - variations, features, and functions typically available.
- Speaker Building Uses - how useful is this tool in our pursuit?
- Add-Ons - related accessories that make this tool work even better.
- Usage Tips - making the most of this tool for our projects.
- Cost - always a factor!
Of course woodworking tools are not limited to speaker building. These same tools can be used to build speaker stands, stereo cabinets, room treatments and traps, even complete sound rooms. For simplicity, however, the term "speaker building" will be used throughout this article to denote all of the above possible uses.
This article will not attempt to cover all aspects of tool usage or woodworking in general; nor will it address tools and techniques necessary for building exotic shapes and compositions. It is an article geared toward the beginner, and basic rectangular boxes are the assumed goals.
Since I'll be merely scratching the surface on tool usage, it's essential that readers take the time to read and understand each tool's user's manual. Taking the time to understanding the fundamentals of each tool, how it works, what its limitations are, and most important of all, how to use the tool safely, is the first step to building a successful project.
There is no way for me to cover all details of each tool. Manufacturers are constantly upgrading their wares with better features and innovations. My goal is, therefore, to cover most of the important points that I consider relevant to speaker building. As always, there will be exceptions to every rule, so keep that in mind.
Tool prices provided are approximate and reflect the market as of this writing. Prices are intended to give readers a feel for the relative and absolute costs of the tools. Some brands and models may cost significantly more or less than others. All prices are in US Dollars and do not include any taxes, shipping or handling charges.
I've tried to avoid using brand names except in the URL section. The intent is to concentrate on the characteristics of the tool, not the actual commercial offerings. Woodworking magazines regularly review tools and are the best source for up-to-date side-by-side comparisons.
A Note on Safety and Maintenance
All tools are potentially dangerous. They should be treated with a healthy dose of respect and care. Always read and understand the manufacturer's directions on both safety and usage before using a tool. Always use appropriate safety equipment including eye (safety glasses), respiratory (mask), and hearing protection (earplugs). Always maintain the proper work environment, and give your tool and work your undivided attention. Remember - safety first !
Proper care and maintenance is required on all tools. Refer to the manufacturer's directions for such information. Keeping tools in tip-top shape not only maintains tool life and maximizes performance, it also helps prevent accidents and potentially dangerous operating conditions.
This section is a very simple look at power tool motors. I won't go into great details - just enough to guide you through some of the numbers you'll likely see when shopping for power tools.
There are two basic types of power tool motors: induction motors and universal motors. The induction motor is typically found on large tools and can deliver fairly consistent and reliable power. It is characterized by its single speed and large cylindrical case. Induction motors are usually used on drill presses, table saws, jointers, and other floor standing machinery. Changing speed, when allowed, usually means moving belts between pulleys of varying sizes. By comparison, the universal motor is small and loud. Its size and weight makes it ideal for handheld tools like portable drills and routers. With no load, the universal motor usually spins at a rather high rate. Under load this rate drops dramatically, and the motor heats up quickly.
Both types of motors are rated in horsepower, but the actual numbers can be deceiving. For example, a typical 115 VAC induction motor in a contractor table saw drawing 14 amps may be rated at 1.5 Hp. The same 14 amp in a router with a universal motor might be rated at 3 Hp. Suffice it say that universal and induction motors should not be compared with each other. When comparisons of any sort must be made, make them when they are of the same type, and use the motor's current draw for comparison, not the horsepower rating. Avoid making judgements based on small differences in current or horsepower draw. Large differences in horsepower or current rating are more likely to be accurate on a relative basis. For example, a 3 Hp router is likely to be more powerful than a 1.5 Hp router, though not necessarily twice as powerful.
Induction motors come in various flavors. The best are Totally Enclosed Fan Cooled (TEFC) motors. Most large power tools from respectable companies come with such motors. Less expensive tools often come with Drip-Proof motors. These offer less protection from the environment than TEFC motors. In some applications, explosion-proof motors are required. Typical uses include exhaust fans used in handling combustible gases.
What differentiates a consumer grade tool
from a professional grade tool aside from price? Are these differences
worth the extra cost? Let's take the easy question first and identify
some differences between consumer and professional tools. Typically,
professional tools:
- Are designed for long life under tougher environmental conditions. This may include motors capable of withstanding higher temperatures, use of better dust seals, bearings and lubricants, and stronger, more durable construction.
- Deliver better overall performance, including motors that provide smoother power with less vibration.
- Tend to have more accessories, options and features.
- May use more advanced and expensive materials such as light-weight alloys or use of cast instead of stamped metal parts.
- Are designed with serviceability in mind.
Should the hobbyist invest in costlier tools? This is a personal
question, and the answer will vary with each individual. Variables
to consider include the predicted amount of actual tool usage,
the care one puts into proper maintenance, the desired accuracy
from each tool, the desired work efficiency, and of course cash
flow, to name but a few. Consider such variables before spending
any money. In many instances, a pro-sumer or consumer level tool
is all that's needed. In other instances, professional tools are
a worthwhile investment.
Note: In the various tools discussed below, my comments assume a "decent" level of tool quality. Poor quality tools usually lead to poor results no matter how hard one tries. This does not imply top-notch tools, but rather, just good enough, relative to the user's expectation. This is obviously a tricky statement to make, and impossible to quantify in a general sense.
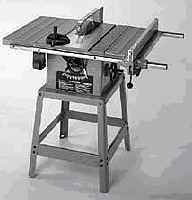
It's easy to understand why so many consider the table saw to be the indispensable saw in the shop. With a table saw, one can make an abundant number of cuts, most with a high degree of precision. Jigs and accessories can make the table saw invaluable.
 Features and Functions
I group table saws into three categories: the bench saw, the contractor saw, and the cabinet saw. The cabinet saw is the largest and most accurate. It usually comes with a full-size polished cast iron top, a totally enclosed base, a large and accurate fence, a large 230 or 460 VAC single or three phase TEFC motor, a 10 to 12 inch blade capacity, and plenty of working surface. It is used primarily by professionals, and by hobbyist standards, is quite costly.
On the other extreme is the bench table saw. This is usually a small device designed to be clamped onto a benchtop or mounted onto an optional floor stand. It operates off a regular outlet (~115 VAC in North America) and consequently is limited in motor size. The blade is usually 8 to 10 inches in diameter, and the fence may need some tweaking to get that great cut. Bench saws are great for the hobbyist with limited space or needs. Because of their portability, bench saws are also a great professional job-site saw.
Between the cabinet saw and the bench saw is the contractor's saw. Like the bench saw, these saws usually operate from regular household outlets. They also offer some of the added size, weight, and stability of the cabinet saw. The contractor's saw typically has a cast iron surface with an open frame. The typical blade size is 10 inches. Fence quality varies, though after-market fences are usually available as upgrades.
There are many qualities that makes one
saw better than another. Here are a few in no implied order:
- Cast iron top - a well-made saw is ground and polished flat. It will take lots of abuse, and with proper care, will last a lifetime. Stamped steel or aluminum, while lighter, do not provide the mass needed for stability and accuracy.
- A straight, easily adjustable fence - the job of the fence is to keep a parallel surface with respect to the blade. Some believe that the fence should be slightly off parallel - the rear being further from the blade than the front, thus ensuring that the rear will not touch what's already been cut. No matter what you believe, it's important never to let the rear of the fence be closer to the blade than the front. Some fences have micro-adjustments that make small incremental fence changes easier to make. Some fences lock only on the front rail, while others lock on both the front and rear rail. Most of the quality fences lock only in the front.
- TEFC motor - for 115 VAC, the most you'll get is about a 1.5 Hp induction motor. Anything larger is usually wired for 230 VAC operation. Universal motors are not common in table saws and are not a good choice.
Speaker Building Uses
Table saw uses should be fairly obvious.
Some typical uses are:
- Cutting large sheet goods down to size.
- Cutting dadoes and grooves. This is usually done for nice, strong, clean, tight fitting joints.
- Cutting miters for corners and other "odd" angled panels. One or more jig or accessory may be needed to perform these tasks accurately.
Add-Ons
Here are some useful accessories:
- One potentially very useful and important safety accessory (when not standard equipment) is a magnetic switch. A magnetic switch consists of a pushbutton on/off switch that engages power via a relay. It operates like a regular switch except when power is interrupted. Should a partial or full power failure occur, the relay opens and power is cut to the motor. When power comes back on, be it a split second or hours later, the relay does not re-engage until it is turned on again. This prevents sudden restarts caused by brown-outs, thus preventing dangerous kickback.
- A better after-market fence can dramatically improve the performance and accuracy of a saw. Not all saws can accept after-market fences, so check availability before buying.
- Dust collection does wonders to air quality in a shop. A table saw is capable of throwing an enormous amount of dust into the air. Dust collection removes most of the small and troublesome particles. Some saws come with built-in collection hookups, while others require some user hack.
- Hold-downs are a great safety and precision addition to a saw. Most hold-downs clamp onto the fence and provide downward pressure to the tabletop and sideways pressure to the fence. Should kickback occur, the hold-downs limit the amount of travel on the stock, preventing it from going airborne.
- Stand-mounted rollers placed on the side and rear of a table saw can effectively extend its capacity when cutting large sheet goods. These rollers are not expensive and normally have many other uses around the shop.
- A panel cutter is a jig that rides in the saw's T-slot, which provides right-angle cuts for large sheet. This jig differs from the standard T-slot miter gauge mainly in size and purpose. While the miter gauge allows you to set any cut angle, the panel cutter is usually made just for right angles. Most woodworkers make their own panel cutters.
- A tapering jig forms a wedge between the stock and the fence resulting in an angled cut. This jig is useful for making panels with non-parallel sides. A speaker with a sloped baffle might require such a panel on each side of the cabinet.
- Zero clearance insert - The insert is a plate through which the blade rises on the table. A zero clearance insert starts out as a solid piece of material through which the blade is slowly raised. The result is an insert that has a minimum amount of clearance all around the blade, thus maximizing support for the wood as it is cut. This is easily made in the shop from scrap hardwood.
Usage Tips
Many of the items listed below are usually
mentioned in the user's manual:
- Use the anti-kickback device supplied with your saw whenever possible.
- Use the splitter supplied with your saw whenever possible. Splitters are usually temporarily removed or displaced when cutting dadoes or grooves. Be sure to reattach them after completing the cut.
- Use a zero clearance insert when working with small items that may require extra support near the blade.
- Always wear eye and ear protection.
- Never stand in line with the blade.
- Never force stock through the blade; let the blade do the cutting.
- Wear a full face shield (in addition to eye protection) when cutting particle board or similar material. Flying chips can strike the exposed skin on your face.
- Use dust collection when cutting medium density fiberboard (MDF). MDF releases a lot of very fine dust when cut. A respirator can keep this dust out of your lungs, but won't keep the dust from coating your shop surfaces.
- The blade should rotate down into the stock meaning that any tearout occurs on the underside. It is, therefore, good practice to put the good side of the stock up. If tearing on the bottom is a problem, try adding another layer of scrap stock on the underside and cut through both layers. Masking tape along the cut line can also be used so long as it does not damage the stock when it is removed.
Cost
- Bench saws: usually under $200
- Contractor's saw: $500 to $1,000
- Cabinet saw: $1,000 and up
The router is a portable, multi-purpose power tool. Functionally, it's a very simple device, but with the proper jigs and/or attachments, a router can perform a variety of tasks. For example, routers can cut dadoes, mill moldings, cut biscuit slots, create dovetails, drill holes, join edges, and even plane surfaces flat.
Features and Functions
There are fundamentally three types of routers
- fixed base, plunge base, and D-handle:
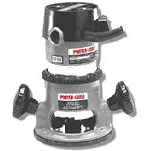 Fixed-base
routers are the most basic. They usually have a pair of handles
near the base of the unit. The extension of the bit (the depth
of cut) is set before use. Depending on the make and model, the
fixed base router may be easier to use when mounted in a router
table.
Fixed-base
routers are the most basic. They usually have a pair of handles
near the base of the unit. The extension of the bit (the depth
of cut) is set before use. Depending on the make and model, the
fixed base router may be easier to use when mounted in a router
table.
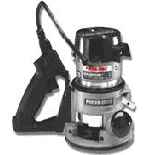 D-handled
routers are similar to fixed-base routers except that the router
is controlled mainly via a D-shaped handle. These are probably
the least common of the three types.
D-handled
routers are similar to fixed-base routers except that the router
is controlled mainly via a D-shaped handle. These are probably
the least common of the three types.
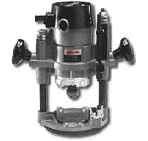 Plunge
routers are the most popular and allow the bit to plunge into
the wood, hence their name. The plunge depth is adjustable, often
in very small increments. This is clearly the most useful of
the three types, but also the most expensive. Most high power
routers are plunge models, and not all plunge routers are suitable
for table mounting.
Plunge
routers are the most popular and allow the bit to plunge into
the wood, hence their name. The plunge depth is adjustable, often
in very small increments. This is clearly the most useful of
the three types, but also the most expensive. Most high power
routers are plunge models, and not all plunge routers are suitable
for table mounting.
Routers fall into two groups based on their power. Low power units range from just under 1 Hp to about 2 Hp. High power routers range from 2.5 Hp to about 3.5 Hp. From a current draw basis, all routers typically draw from 10 to 15 amps. High power routers tend to be bigger and heavier. From a capability standpoint, the rated power of a router does not, by itself, define what it can do, or how quickly it can do the job. However, advanced features, options, and accessories are more likely to be available on larger, pricier, and more powerful models.
Some features that differentiate routers
from one another include:
- Soft start - reduces the kick produced when the router starts up. In applications where the bit must make contact with the stock when the router is turned on, this feature helps reduce the likelihood of gouging the stock.
- Variable speed - a typical router can spin a bit (with no load) upwards of 20,000 rpm. This can be very dangerous with larger diameter bits since the wider the bit, the faster the perimeter of the tips travel at a given rpm. Variable speed is a "must-have" when using large diameter bits. Slowing the bit speed also reduces friction and thus reduces the likelihood of burning the stock from friction.
- Collet size - router bits come in 1/4 and 1/2 inch diameter shanks. The larger shank offers more stability and is therefore used with larger bits. Smaller bits are offered either in 1/4 inch shank only or in both sizes. Some routers only have a 1/4 inch collet, thereby limiting bit selection while others provide both 1/4 inch and 1/2 inch collets.
- Micro-adjustment - Some routers make fine depth adjustments very simple and accurate. The micro-adjustment feature is very handy when attempting to get precise cut depths.
Speaker Building Uses
There are many important uses for a router.
Some typical ones are:
- Cutting circular holes for drivers in a baffle.
- Milling cabinet edges. This is usually a roundover or chamfer.
- Cutting grooves and dadoes inside cabinets to accept shelf bracing.
- Cutting rabbets to cabinet side panels for panel joinery.
Add-Ons
Because the router is so versatile, there
are many accessories available. Many can be made in the shop.
- A circle-cutting jig is a popular homemade jig due to its simplicity. The concept is straightforward, and can be made in a variety of ways. One example is to use a board that has a router mounted on one end, and pegs placed some distance away from the router's bit. The assembly's peg is inserted into a hole in the stock to be routed and acts as the center of a the circle. By varying the distance between the router and the peg, the radius of the circle that the router will mill is changed. Commercial circle cutters may be mounted to the router in place of the base plate or may be mounted to some other point on the router's lower section. Radius adjustments should be easy to make, and may contain a fine-adjustment feature for precise settings. This is a "must-have" accessory for speaker building.
- An edge guide is useful when milling dadoes and grooves that are parallel to one edge of a panel. The guide follows the edge of the panel, maintaining a parallel and repeatable cut. Some edges can also ride in an existing groove, thus allowing one dado or groove to be cut parallel to another. Never try to cut a dado or groove freehand. Always use a guide or follow a straight edge.
- For some users, a router table provides a more secure and stable platform for routing. A router table holds a router upside-down with the router mounted from the underside. The bit sticks out of an opening through the table. The depth of cut is preset before milling. It's not practical, or safe to plunge up from below while the stock is sitting above the bit. The stock is moved over the router in full view of the bit. The benefit of the router table is in the added stability provided by the table, more precise control, better visibility of the bit, and increased contact area between the stock and router. Many router tables have fences, dust collection attachments, and clear polycarbonate plastic shields that cover as much of the bit as possible for safety. More advanced tables provide features found in large shapers such as a T-slot. Router tables can be stand-alone or built as part of a table saw surface. Many of the parts needed for a home-made router table are readily available at woodworking stores.
Usage Tips
Here are some tips for using a router:
Never try to remove too much material at once. It's better to use multiple passes, each removing a little more material. How much is too much? This is partly a matter of experience and partly a matter of common sense. If the stock offers a lot of resistance, or if your bit clogs up with sawdust forcing you to stop, you may be trying to remove too much stock at once. Also, check the grain of the stock and see if it's likely to tear with the bit rotation. You can minimize tearout by removing less stock per pass. As a rule, I like to make at least two passes on each cut, with the last one removing a minimal amount of material to clean up any aberrations left over from previous cuts.
Whenever possible, move the router in the direction such that the bit's rotation is against the direction of motion. This forces the bit into the wood instead of allowing the bit to pull the router along. The user's manual should diagram this since it's one of the most important points to remember when using a router. Make sure you understand this.
For our uses, this translates to the following:
- If you're milling the inside edge of a driver hole (e.g., milling a recess for the driver flange with a rabetting bit), move the router in a clockwise direction inside the cutout.
- If you're milling the exterior of the box (e.g., milling a roundover on the baffle edges), go counterclockwise.
- When milling end grain, it's easy to tear the wood at the edges. One simple way to avoid this is to clamp scrap wood of the correct size to the end of the stock and mill it with the stock. This causes any tearing to show up on the scrap, not your stock.
- When using a router to mill a round driver's opening in a baffle, do all your baffles together. Setup is crucial, so take your time, set it up right, and then do all baffles the same way.
- If you have spare stock, mill one or more extra baffles. These need not be full size - just large enough to hold the driver's opening. The purpose of these spare baffles is to let you test your setup when you have multiple routing steps. Use the spares when proceeding from one step to the next to test your setups without risking your real baffles.
- If you're flush-mounting the driver, be sure to allow some extra depth for the mounting gasket.
- When cutting the hole for the driver's basket, make sure not to cut through without taking some precautions. The circle cutting attachment is mounted to the center of the driver's opening and will be loose when it's cut free of the baffle.
- Two ways to solve this problem are:
- Mount some scrap on the underside of the baffle temporarily to secure the center waste to the rest of the baffle. Remove it after you've routed the circle and separated the center waste from the baffle.
- Don't mill all the way through the baffle, leaving about 1/16 inch holding the center in place. When you're done routing, cut through the remainder with a jig saw or hand saw (a keyhole saw works well). The cut may not be perfect, but since it's on the inside of the baffle, it's not visible and won't affect performance.
- If you wish to bevel the inside of a driver opening, use a pattern-following bit. This bit has a bearing that rides along the inside rim, and removes stock evenly around the circle.
- When possible, get 1/2 inch bits instead of 1/4 inch bits. They do tend to cost more than 1/4 inch bits (all else being equal) but are more stable.
- Carbide bits are a worthwhile investment. Wood products such as Medium Density Fiberboard and particle board eat High Speed Steel (HSS) bits. There are many advanced bit designs including anti-kickback features, low friction Teflon ® coating, and modular construction. Invest in these bits if your budget allows.
Cost
- Professional high performance, high power plunge router: $200 to $300
- Professional fixed base low power router: $100 to $200
- Consumer router: under $100
The circular saw is probably one of the two most basic and common power tools around (the other being the drill). It is the ultimate fast cutting tool - portable, capable, flexible and affordable. It can be used in the shop or on a job site, and may be used for rough as well as highly accurate cuts.
Features and Functions
Circular saws tend to look more or less
the same. Yet there are differences in their designs.
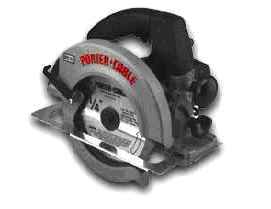 The majority of circular saws on the market today
have side-mounted motors. These are the familiar saws with the
blade directly in-line with the motor shaft and housing. Power
is typically delivered from the motor to the blade via reduction
gears. Less common are worm-drive saws often used by professionals
needing higher torque and a narrower saw profile. The motor is
mounted behind the saw blade, parallel to the direction of cut,
and connected via worm gears.
The majority of circular saws on the market today
have side-mounted motors. These are the familiar saws with the
blade directly in-line with the motor shaft and housing. Power
is typically delivered from the motor to the blade via reduction
gears. Less common are worm-drive saws often used by professionals
needing higher torque and a narrower saw profile. The motor is
mounted behind the saw blade, parallel to the direction of cut,
and connected via worm gears.
- The grip on a saw is either on top or behind the motor. Professionals often prefer the latter design since it gives them more reach. Either design offers a second grip or knob on the front of the saw for two-handed operation.
- Many saws come in both right and left-handed versions.
- The depth of cut is controlled either via a drop foot or a pivot foot. The pivot foot is easier to use, but changes the angle of the handle relative to the stock.
- Some advanced saws have an electronic brake to quickly stop the blade when power is cut. This can be a valuable safety feature as well as a time saver when making many consecutive cuts.
- For keeping dust in check, some saws have adjustable dust ports that can be aimed away from the work or even attached to some sort of dust collection system.
Speaker Building Uses
For serious DIYers, the circular saw can be seen as a poor man's table saw. But like its bigger and more expensive brother, this saw can make excellent cuts with the right jigs. Even dadoes are possible, though they require much more care in setting up the cuts. Cutting small stock is difficult with this saw, so use a hand saw for safety.
Add-Ons
I tend to think of the circular saw as a straight cutting tool without a fence. The flat blade of this saw dictates a straight cutting path, yet the saw is really free to go anywhere, thereby risking binding and kickback. So, the most important accessory to this saw is a straight edge. A straight edge can be anything from a pre-made commercial unit with built-in clamps, to a piece of plywood with a factory edge. The important thing is that the saw has a surface to ride against, thus keeping it in a straight path.
Usage Tips
One notable difference between a table saw and a circular saw is the direction of the blade's rotation. As mentioned earlier, the table saw blade rotates down into the stock. The blade on a hand-held circular saw rotates up from the bottom and through the stock. This means that tearout occurs on the top side of the stock. You should, therefore, cut your stock with the good side down. To avoid tearout on the top side, use masking tape along the cut line (assuming the material will not be damaged by tape). Adding a second layer of scrap stock on the top side may be done if the layers are properly supported and secured.
To cut a straight line, use the aforementioned straight edge. Clamp the straight edge down as solidly as possible. Some saws have accessories that make ripping parallel sides easy. Check the manufacturer's catalog for these accessories.
Cost
- Professional heavy duty, high performance saw : $150 to $200
- Professional saw : $100 to $150
- Consumer saw : under $100
Functionally, the jig saw is very similar to the circular saw except that it cuts much more slowly and can cut curves. This saw is sometimes referred to as a sabre saw. Jig saws are very portable, relatively quiet compared to their larger circular bladed cousins (important to apartment dwellers !), and safer in many respects. What they lack in cutting speed, they make up in flexibility.
Features and Functions
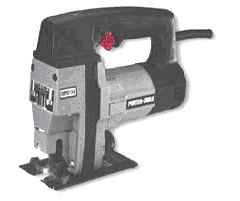 There
are several types of blades, not all of which are supported by
all vendors. The universal blade is the most common. It has a
straight shaft with a hole at the mounting end. The hook mount
is supported by Porter Cable, and as its name implies, has a
90 degree hook for mounting. The 'T' or tang or bayonet mount
has a mounting system shaped like a small sword. Each blade type
does the job well. The main differences are in the ease of changing
blades. Whether such ease is worth the distinction of one make
and model over another is a personal matter. If you change your
blade often, a one-step, toolless changing system can be a time
saver. But if you're a rare user of a jig saw, it's probably
not worth much as a unique differentiating feature. What is important
is that any tool needed to change a blade (if any) be readily
available.
There
are several types of blades, not all of which are supported by
all vendors. The universal blade is the most common. It has a
straight shaft with a hole at the mounting end. The hook mount
is supported by Porter Cable, and as its name implies, has a
90 degree hook for mounting. The 'T' or tang or bayonet mount
has a mounting system shaped like a small sword. Each blade type
does the job well. The main differences are in the ease of changing
blades. Whether such ease is worth the distinction of one make
and model over another is a personal matter. If you change your
blade often, a one-step, toolless changing system can be a time
saver. But if you're a rare user of a jig saw, it's probably
not worth much as a unique differentiating feature. What is important
is that any tool needed to change a blade (if any) be readily
available.
- Simple and inexpensive jig saws have a single reciprocating stroke. More advanced saws offer two strokes - reciprocating and orbital. The reciprocating motion is a simple down and up stroke. This offers the smoothest but slowest cut. Orbital motion causes the blade to push down in a straight motion, but pull back up with the blade angled forward. Since jig-saw blades cut on the upstroke, this has the effect of cutting more aggressively. Saws that offer orbital motion usually allow more than one orbital setting. This setting varies the aggressiveness of the up-stroke.
- Simple jig saws have only an on/off switch. Costlier models allow control of the stroke speed either by the amount of trigger pressure (as in a drill), by a dial setting, or both. If a dial setting is used, it should be mounted in an easy-to-reach place so that speed adjustments can be made during the cut. Some models allow a number of fixed speeds, but offer no continuously variable settings.
- Jig saws remove waste slowly and do not tend to throw large amounts of dust. However, since they cut on the up stroke, dust usually accumulates on the cut line. Some saws have small blowers that push this dust aside while you cut. Others provide dust collection hookup.
- Almost all jig saws offer a base that tilt up to 45 to the left and right. Usually a 90 stop is provided, as well as possibly other common angles. At least one manufacturer provides a rigid non-tilting base. Fixed-base jig saws offer a more stable platform and remove the possibility of accidental tilting.
- Most jig saws have a top-mounted D-shaped handle. This handle may be placed almost on top of the blade assembly or it may be placed further back on the body. Another grip style is the body grip, where the unit's body is used to hold the saw. This grip places the hand closer to the work surface, usually offering more accurate control of the saw.
- Blades - Some are made for specific uses such as wood or metal cutting. Blade materials and teeth specifications also vary with application and cost. If the jig saw is your primary tool, invest in quality blades. If this is an occasional tool more likely to be used for rough work, you can be less selective with your blades.
Speaker Building Uses
There are several ways to think of the jig saw. For someone on a limited budget, it can be the one and only power tool. With care, it can cut holes, curves, straight lines, and even bevels. Its accuracy is almost entirely a function of the user; and any resulting ragged edges can often be sanded down.
Where one's budget is not an issue, the jig saw is more useful supplementing other power tools. Its ability to cut curves and bevels make it ideal for roughing out holes for surface-mounted drivers, especially those requiring odd shapes.
Add-Ons
Jig saw accessories are few, and tend to
be very manufacturer specific. Below are some possible accessories.
If any of these are important to you, be sure to check with the
manufacturer or dealer before you buy:
- Dust collection hookups (when not standard equipment)
- Edge guide to cut lines equidistant from an existing edge
- Circle cutting guide similar to that used on a router but made specifically for a particular jig saw
- Rail cutting system where the saw rides on a clamped rail to cut straight lines
- Anti-splintering device that keeps the stock down just in front of the blade
Usage Tips
- Blade support and deflection - A jig saw blade is mounted only at the top and may be influenced in its path by the stock. Saws provide varying levels of blade support either from the rear of the blade, from the side or both. The goal is to keep the blade as straight and stable as possible. Cutting tight curves, especially on thick stock, will always place strain on the blade. The greatest strain and deflection will occur at the tip (bottom) of the blade furthest from the saw body, and will tend to cause the blade to bend towards the inside of the curve. Be aware of this and cut slowly to minimize blade deflection.
- Starting a hole - One of the jig saw's greatest assets is its ability to cut inside an enclosed region such as cutting a rough opening for a driver in a baffle. There are two basic ways to start the cut. The simplest is to drill a hole large enough to insert the blade of the jig saw. If a hole cannot be drilled, the jig saw can be used to cut a slit into the stock. This is done by leaning the saw forwards at a steep angle such that the tip of the blade is barely making contact with the stock. With the motor running, slowly tip the saw back towards its normal position, thus pushing the blade down into the stock. Do this slowly. The drawback of this technique is that it will not work in tight spaces.
- Cutting straight line - A jig saw can be used to cut a straight line with the use of a straight edge guide. A dedicated guide made specifically for the jig saw is best but any straight edge clamped to the stock may be used. Straight cuts are a good use of orbital strokes.
- Cutting curves - The sharper the curve, the less likely an orbital stroke will prove suitable. When in doubt, use a reciprocating stroke t.
- · To help limit splintering - Use masking tape and draw your cut line directly on the tape. This is no panacea, but should help. Test first to make sure the glue from the tape will no stain the stock you're using.
Cost
- Professional high performance jig saw: $100 to $175
- Consumer jig saw: under $100
The other highly popular home power tool, the drill, is an incredibly simple tool that should require little explanation to anyone interested in DIY.
Features and Functions
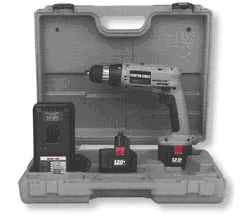 Cordless
or corded - While the cordless drill has replaced the corded
drill in many applications, a corded drill is still a valuable
tool in any shop. Corded drills still offer much more power and
torque than their battery-powered counterparts. They also tend
to be cheaper and you never have to worry about dead batteries...
just power failures! For the hobbyist on a limited budget, a
basic corded drill is a good investment whose only drawback is
its umbilical to the wall. The more advanced hobbyist with lots
of uses around the shop and home will probably find the cordless
drill more useful. Ultimately, your possible uses will dictate
what to buy. Heavy vs. medium vs. light duty, features, and portability
are probably the key considerations, though by no means the only
ones.
Cordless
or corded - While the cordless drill has replaced the corded
drill in many applications, a corded drill is still a valuable
tool in any shop. Corded drills still offer much more power and
torque than their battery-powered counterparts. They also tend
to be cheaper and you never have to worry about dead batteries...
just power failures! For the hobbyist on a limited budget, a
basic corded drill is a good investment whose only drawback is
its umbilical to the wall. The more advanced hobbyist with lots
of uses around the shop and home will probably find the cordless
drill more useful. Ultimately, your possible uses will dictate
what to buy. Heavy vs. medium vs. light duty, features, and portability
are probably the key considerations, though by no means the only
ones.
- Keyed or keyless - Traditional drills require a key to tighten a bit or shaft in the chuck. Keyless chucks only require hand tightening. For the most part, keyless chucks have become standard equipment on most cordless and many corded drills. From my experience, a quality keyed chuck will always hold tighter than a keyless chuck. In some applications, this may be important. For the audio hobbyist, this is not likely to be an issue except in some extreme cases.
- Built-in clutch - A drill with a built-in clutch becomes a very useful screwdriver. Clutches are usually adjustable over a wide range of torque settings, typically by turning a ring near the chuck. The clutch allows the drill shaft to rotate only when pressure is applied and only up to the chosen torque setting before disengaging. This is very useful for driving applications - clutches can prevent the overtightening of screws or the stripping of screw heads.
- Variable speed and reversible - Variable speed reversible (VSR) is standard today. It may not be possible to settle for less! The reverse direction can be used for extracting screws or for removing stubborn drill bits from their hole. The reversing switch should be easily reached by the hand on the trigger.
- Voltage and torque - Cordless drills are usually listed by their operating voltage. Voltages are usually multiples of 1.2 V - the voltage of a single Nickel-Cadmium cell. Most of the units less than 12 volts are better suited for general home use. For serious hobby use, go with 12 V or higher. Torque is sometimes advertised along with voltage. Most cordless drills have a two speed range that trade speed for torque. Typically, torque is not that big a factor when comparing drills of similar voltages.
- Handle location - There are two types of handle arrangements for drills - pistol grip and T grip. Each has its proponents and detractors. The T grip provides better balance while holding the drill. Users who are physically weaker will likely find this shape more comfortable especially when drilling in an awkward positions. In my opinion, the pistol grip provides better directional force and control when drilling and driving. The uneven weight distribution is countered by the support provided by the drill bit biting into the stock, while the angle of the pistol grip allows more force to be exerted. If you are unsure when buying, try both styles, but remember to try them with real bits and real wood. Simply holding it for balance doesn't mean much since it's the act of drilling that actually is important. Try different drilling positions if possible, such as holding it sideways or overhead.
- Kits - Cordless drills are often available in kit form. This is largely due to the need for a second battery while the first charges. Kits usually contain two batteries, a charger, drill and case. If you must buy a cordless drill, a kit is usually worth the investment if cost is not an issue. If funds are tight, most drills are also sold with a single battery and charger.
- Brakes - Some drills stop on a dime via an electric brake. This can be a very useful feature when doing many consecutive operations. For normal use, it's a nice feature but not a necessity.
Speaker Building Uses
The obvious use in speaker building is drilling holes (pre-drilling is a good idea to avoid splitting stock), and driving screws. Do not use portable drills with bits intended for the drill press. For example, it's possible to mill very accurate circles with an adjustable one-armed T-shaped circle cutter. However, this is strictly a drill press tool and using it on a hand held drill is very dangerous.
Add-Ons
- 1/4 inch hex extenders - Most driver and socket bits are very short. An extender chucks into the drill while its female end magnetically holds the bit firmly in place.
- Drill/driver units - There are several jigs on the market that allow the user to switch from drilling to driving very quickly. They vary in design, price and usability. Each typically allows the user to drill a hole with a countersink, then switch to the driver without having to touch the chuck.
- T-square - The visually challenged may want a small T-square or other right angle tool to guide the drilling angle.
Usage Tips
- If available, choose the correct speed setting. The slower setting gives more torque.
- Excessively high drill speeds can burn wood and dull bits unnecessarily.
- · Reversing the bit direction makes bit extraction easier.
- Countersink screws to hide the screw heads.
- Start with a low setting when you're unsure of the torque needed to drive a screw into a particular stock.
Cost
- Professional high performance, high voltage cordless drill kit : $200 to $250
- Professional high quality cordless drill kit : $150 to $200
- Professional high performance corded drill : under $100
- Consumer corded drill : under $50
I've decided to place saw blades in its own category in order to highlight the possible choices. The simplest shop can get by with a single all-purpose combination blade. On the other extreme, the professional shop might have many highly specialized bladed in addition to the general purpose ones. For the speaker builder, it's possible to get by with one blade, but having one or two special blades can be very handy.
Blades come in various sizes. The two most common sizes are 10 inches for table saws, and 7-1/4 inches for hand held circular saws. Both are typically made for a 5/8 inch arbor thus the smaller 7-1/4 inch blade can be used in a 10 inch table saw though the reverse does not apply.
Features and Functions
- Stack dado head blades - One very important accessory for a table or radial arm saw is the dado blade. Whereas a typical circular saw blade cuts a path as wide as its teeth allow (the kerf), a dado blade cuts a wide path through the stock. The stack dado head cutter usually consists of two full size blades sandwiching a number of chipper blades. The chippers are usually not full blades and their job is to remove the stock between the two edge blades. By varying the number of chipper blades and their widths, the width of the cut is changed. The typical stack dado head set is 6 to 8 inches in diameter.
- Wobble dado blades - The wobble dado blade performs the same function as the stack dado blade but has two very important differences:
- 1. The wobble dado is a single unit, not a number of blades that are stacked to perform the task. Wobble blades usually have one or two blades that are tilted to carve out the full width of the cut. The side affect of this action is that the bottoms of the dadoes cut are not flat; but are curved. Furthermore, the lack of full contact side blades means the edges of the dado are not often as crisp as that made by a stack dado head cutter.
- 2. The width is continuously adjustable. It is not limited by the width of the chipper blades. Thus, fine tuning the width is much simpler with a wobble dado than with a stack dado blade.
- Thin kerf blades - Thinner blades remove less material as they cut, and therefore require less power to use and produce less dust. They are also not as stiff as their regular kerf counterparts, so they must be more carefully designed to avoid warping with heat buildup. Blades often have expansion slits to avoid such warping.
- Ripping blades - Blades made specifically for ripping tend to have fewer teeth (24 is typical on a 10 inch blade). This allows more room between the teeth for waste removal leading to a faster cut.
- Crosscut blades - In order to avoid tearing the wood fibers during a crosscut operation, these blades tend to have many teeth (60 to 80 is not unusual for a 10 inch blade). The high number of teeth means there's less space between teeth for material removal. These blades cut more slowly but more cleanly.
- Combination blades - To strike a balance between ripping and crosscutting, a combination blade typically sports 40 to 50 teeth. As expected, it is slower than a ripping blade while ripping, and rougher on crosscuts than a crosscutting blade. If your budget only allows for a single high quality blade, a carbide tipped combination blade would be a good investment.
- Other specialty blades - The blades I've mentioned above are the more common ones. For special applications, there are blades for cutting all types of materials including Corian ® , plexiglass, non-ferrous metals, plastics, laminates, decking, plywood, etc.
- Carbide - Standard blades are made from steel. These will dull very quickly especially when cutting composite materials such as particle board or medium density fiberboard. Carbide blades are a worthwhile, if not a necessary investment.
Speaker Building Uses
The better the blade, the better the cut. Dado blades are very useful for milling rabbets or grooves. A shelf brace inside a speaker or stand could easily be made to fit snugly by milling a dado on all side panels in which the shelf sits.
Add-Ons
Blade stabilizers - The typical table saw clamps the blade on either side of the blade, near the center spindle. A blade stabilizer consists of two round metal plates that clamp the blade further away from the center of the blade thus reducing blade chatter. There are three major side affects to be aware of when using such a stabilizer:
1. The stabilizer moves the blade away from its regular position relative to the fence. This means all distance markings are now wrong.
2. The slot in the table saw insert may no longer match the blade position. A custom insert can be made from some hardwood much the same way a zero clearance insert is made.
3. The maximum blade height is reduced.
Dado blade shims - Shims may be plastic or metal, and come in various thicknesses. They are inserted between dado head chippers to fine tune the cutting width.
Usage Tips
- Follow regular maintenance on your blades as you should with all your tools. Remove any burned-on residue and never use a dull or broken blade.
- Because dado blades remove much more material than conventional blades, feed your stock more slowly. As with a router, make multiple passes, removing a little more each time rather than trying to remove too much material at once.
Cost
- Professional high performance specialty blade : can be over $100
- · Professional high performance 10 inch blades : $40 to $60
- Typical 10 inch blades : under $40
- High quality 8 inch stack dado blades : under $150
Before we continue through other essential
tools, let's take a brief side trip to visit other saws. Depending
on your interest, skill, and resources, some of these saws might
serve you very well in many uses. Needless to say, this list could
easily get as large as the rest of this article, so I am only
listing a few select items:
- Radial arm saw - The radial arm saw is a very useful and flexible saw. It excels at crosscutting stock at various angles. It can also be used to rip stock by rotating the head 90 degrees. For an only saw in a speaker builder's shop, this is not the tool to get.
- Chop or miter saw - I am actually referring to several types of saws here. The simplest miter saw provide a simple chop action and is usually capable of providing a miter in the range of +/- 45 degrees to the left and right by rotating the saw head relative to the saw fence. The more sophisticated compound miter saw allows the head to tilt, thus cutting two angles at once. For larger cutting capacity, the sliding compound miter saw has a rail system on which the saw head rides. This allows the head to extend forward, increasing the cutting capacity that would otherwise be limited by the blade diameter. This latter miter performs many of the functions of the radial arm saw and can be quite costly.
- Band Saw - Some woodworkers consider this saw to be the most useful of all saws. The band saw can rip, crosscut, and re-saw. It can cut straight lines as well as curves. Best of all, it is very safe since kickback is non-existent. One thing it cannot do is mill dadoes. For the speaker builder, this is not the first saw to get, but for the woodworking junkie, it is a highly desirable and indispensable tool.
- Hack Saw - The interchangeable blade make this the perfect low cost tool for cutting all kinds of materials.
While this article is about woodworking tools for the DIYer, the soldering iron is a necessary tool when considering soldering your own crossovers and performing mods to your existing equipment.
Features and Functions
- Grip style - soldering irons are either pencil shaped or pistol shaped. For control, I personally prefer the pencil shape, but this is obviously a matter of personal taste and preference.
- Power (watts) - hobby soldering irons are sold for many purposes. They range from low power devices such as those for electronics to high power units for use with stained glass. It's important to use an iron of the correct wattage to avoid excessive or insufficient heat. For speaker building, a small iron suitable for soldering crossovers and other electronic parts would be in the 30-watt range. Some irons have selectable temperature settings, which, while not necessary, might be of use to the more experienced user.
- Tips - Irons typically have replaceable tips. Tips are either steel plated or copper. Irons featuring steel tips cost more than copper tipped irons, but are well worth the extra expense. Copper tips degrade and lose their shape quickly making them almost useless for fine work. The cost of standard fixed-wattage steel tipped irons is low enough to make them worth the investment even to the infrequent user.
Speaker Building Uses
The soldering iron is used in building crossovers and other electrical assemblies.
Add-Ons
- Stand - avoid burning your bench top by getting a decent stand to hold the hot iron.
- Sponge - wipe the iron's tip with a wet sponge prior to each use. A sponge made for soldering irons is preferred over a household sponge.
- Clip-on heat sink - use these between the soldering area and any heat-sensitive components to prevent heat damage.
- De-soldering tool - vacuum tools are popular. Solder wicks also work well at absorbing and removing molten solder.
- Extra tips - these come in different shapes and sizes. Select the size and shape depending on your use.
Usage Tips
- Be sure to use the right type of solder for your work. Check the solder's label before using. Never use acid core solder for electronic work.
- · Always make sure the tip has reached its operating temperature. Check by touching some solder to see if it melts quickly.
- Make sure the physical connection is secure before the solder is applied. The solder should not be used as a mechanical means by which the joint is held.
- I like to get the iron, solder and parts together at the same time and place. (By "part", I mean wire, lead, pad or anything that requires soldering). This instant merging will melt the solder onto the components at the right spot. Removing the solder and iron quickly reduces the chance of excessive heat buildup which can damage sensitive parts. In essence, my goal is to use the iron to melt the solder onto the parts. I have seen some directions that instruct the user to heat the target parts first, and then melt the solder onto the part using the part to heat the solder. While this method is preferred for high heat applications such as stained glass and plumbing, it can easily overheat sensitive electronic parts.
- The secret to great soldering - practice, practice, practice!
Cost
- Professional high quality soldering iron station: upwards of several hundred dollars
- · High quality 30 watt iron plated pencil iron with simple stand : under $50
- Consumer grade 30 watt soldering iron : under $20
Here's a small list of other tools, both
large and small, some essential, others optional. Much can and
has been written about each, and readers are encouraged to further
research tools that interest them:
- Dust collector - This is a stationary item specifically designed to move large amounts of air. They are usually powered by an induction motor and are best for collecting dust from table saws, jointers, and other large floor standing power tools.
- Shop Vacuum - A shop vacuum is a portable device often capable of wet and dry use. It uses a small, noisy, high-speed motor and does not have the volume capacity of a dust collector. However, it is readily available at home centers and department stores, and the typical hobby shop can benefit greatly from this tool for both cleanup and dust collection.
- Clamps - No matter how many you might have, you won't have enough! Pipe clamps are best suited for large projects. Bar clamps exist in both heavy duty (similar to pipe clamps) as well as light duty. Lengths vary from about 12 inches to several feet. C-clamps are extremely handy and secure, but can be a hassle to use. One-handed clamps are much friendlier. These usually have some sort of squeezable handle that quickly move the jaws onto the stock. Band clamps are straps that wrap around an item to hold everything together. Right angle clamps hold parts together at right angles, allowing fasteners to be inserted. This is a very handy device to use on boxes.
- Glues - regular (yellow) woodworking glue is the most common for use on wood and wood products. Gaining popularity as an all-purpose adhesive is polyurethane glue. This glue expands as it dries thus requiring some care in handling. Stock to be glued should be securely held to avoid being moved by the glue's expansion. Epoxy is always a favorite for gluing just about anything. And then there are the construction adhesives. Their thick consistency makes them suitable for filling gaps. In all cases, avoid glue fumes, and don't expose components such as drivers to these fumes to avoid chemical reaction damage.
- Fasteners - Particle board and drywall screws are popular for holding composite materials together. T-nuts are often used to fasten drivers to baffles, though I've had no problems with drywall screws. Pre-drill and countersink to avoid tearing the stock when driving in screws. Avoid placing fasteners too close to the edge of wood products to avoid splitting the material.
- Framing square - Most basic boxes consist of right angles, and a large framing square is the simplest way to get this with a decent amount of accuracy.
Here are some beginner's tips to buying tools:
Before buying any particular class of tool
(router, drill, etc), make sure you need this tool. Budget your
purchase and return on investment with other possible tools that
may perform the same function. Do a little research on each tool
in your price range. This article should provide you with some
basic points of interest, but ultimately, each model will have
its own features and functions to consider.
- Consider your working environment - Do you have neighbors that might object to the noise? Do you have allergies that might be exasperated by wood dust?
- Are there outside sources of tool time such as those in a community center or adult education program?
- What other uses for each tool might you have aside from your hobby?
Like all things, it often makes good financial sense to buy things on sale. Aside from the year-end holidays, tool sales can often be found around Father's Day. Many regional or national chains also have frequent sales. Mail order suppliers are common in this business, and many offer very competitive prices. Be sure to check their return policies and shipping charges. Buying from a local dealer may appeal to those looking for more personal service. Many mail order and retail outlets have web sites and advertise in leading woodworking publications.
Other factors that often affect a purchase include brand loyalty, product quality, and availability of replacement parts and accessories. Do some research on the manufacturer, their service department, dealers, and repair history if these items are important to you.
Recently, refurbished tools have become increasingly popular. These tools are usually sold by the manufacturer through outlet stores or through dealer special purchases. Such tools usually have a manufacturers' warranty, but be sure to check the warranty duration.
Here are some URLs relating to tools:
(Disclaimer: this information is provided as a service to the reader, and does not represent an endorsement of any kind of the companies represented by the URLs.)
Tool manufacturers
Mail order tool sources
- Tool Crib of the North
- Trendlines Woodworkers Warehouse
- Constantine's
- Woodcraft
- The Woodworkers' Store
- Highland Hardware
- Garrett Wade
- Lee Valley
Publications
I've tried to keep the focus of this article in the speaker building domain. The experienced hobbyist will no doubt notice the vast amount of missing information. It's possible to write an entire book on each tool, and many such books already exist. Readers wanting to know more are encouraged to visit their local library, bookstore, or Internet sites.
As a woodworker, I feel obligated to mention that power tools are not absolutely necessary for speaker building (or most other DIY projects). Craftsmen with hand tools have practiced the art of fine woodworking long before the advent of power tools. Some of the finest furniture made today is still made with hand tools. Hand tools are capable of performing the same cutting, shaping and drilling operations with no electrons present. And like all tools, the only limitation is one's experience, patience and imagination.
Hand tools offer some significant advantages over their powered counterparts. Outfitting a beginner's shop is usually cheaper than with power tools. Other benefits are the lower dust levels, the absence of loud motors, the smaller floor and bench space for tools, and more "feel" for the material. While this article was not intended to cover hand tools, many resources exist for those interested in learning more. Readers are encouraged to consider hand tools in their woodworking craft.
Louis Lung ([email protected])
We express our appreciation to Porter Cable, and Delta Tools, for the use of their product photos.
Return to Table of Contents for this Issue.
Magazine Publishing Solutions by