Installation
Installing the projector was a snap. BenQ provides an easy to use throw
calculator in the instruction manual and provides a few built in test
patterns that come in handy. I used the built in cross hatch pattern a few
times. The powered zoom, focus and lens shift also made lining up the image
and getting the tightest focus possible quite easy.
For
this review I ceiling mounted the projector using BenQ’s universal mount.
The mount uses a plate that is essentially a cross bar mesh and you bolt on
the projector using four simple arms. From there you level the projector in
both directions and you’re good to go. From there you simply connect power
and your video inputs (for this review I used component and HDMI) and select
ceiling mount from the setup menu for proper image orientation.
Setup and Calibration
As I
mentioned before, the W10000 may be one of the best projectors I’ve seen to
date from a calibration standpoint. It offers an awesome amount of flexibility
for calibration and can be dialed in to near perfection.
The
W10000 uses three completely different menu systems to achieve this. There is
the standard users menu, an ISF menu, and the service menu. The standard users
menu is what most people are used to when it comes to projectors. Here you’ll
find standard picture controls like contrast and brightness, refined picture
controls like color temperature, and a few advanced picture controls.

The ISF
menu system goes a bit further. It requires a code to enter but unlocks a host
of options that are required to make the most of this projector’s image. Here
you’ll find adjustments for color primaries AND secondaries (I’d be happy if
most projectors on the market offered adjustments for just the primaries!),
gamma, color temperature and all of the cursory adjustments that can be made
in the standard menu. All of these settings can be saved to the various user
settings or the ISF Night and Day presets. This enables a calibrator to tweak
the projector in for both dark rooms and lighter rooms and lock the settings
in with a password so your Uncle or neighbor don’t mistakenly erase all your
settings. Each mode is available from a push of a button on the remote.
The
service menu is another beast entirely and isn’t the place for the novice to
go messing around. Controls for the DLP chip are here including timings, color
wheel speeds, gamma, and more. Unless your working with a calibrator that
REALLY knows what he is doing I’d stick to the previous two menus. You can
still achieve an almost perfect calibration and don’t have to worry about
literally screwing up the projector for good.
When I
first received the projector I did a cursory calibration using mainly the ISF
menu. Using an assortment of custom HD test patterns I was able to get a
decent grayscale by eye, and get all of the cursory settings dialed in
accurately. The ISF menu provides several different pre-set gamma options and
color temperature options.
Later I
employed the help of calibrator Michael Chen for a full calibration. Michael
Chen is one of the owners of Lion Audio/Video Consultants (www.lionav.com)
and is a very respected calibrator. I’ve used his service before back in the
CRT days and he’s always done a tremendous job.
This
projector wasn't too far off the mark to begin with but a little bit of
dialing in did tighten the image in to reference quality. This projector
really dials in well with great grayscale tracking, gamma, and color accuracy.
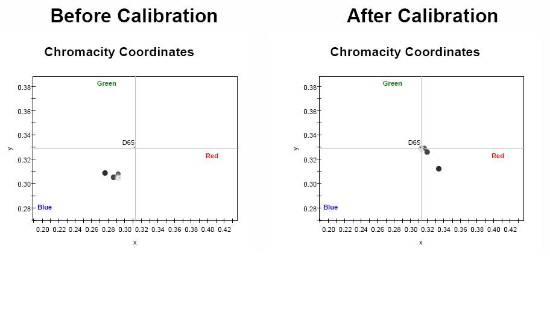
As you can see, color coordinates weren't too far off the
mark to begin with but we managed to get them almost all dialed in to D65.
Some of the lower level IRE's were a bit difficult but most meters aren't
nearly as accurate below 30 IRE as you would hope them to be anyways.
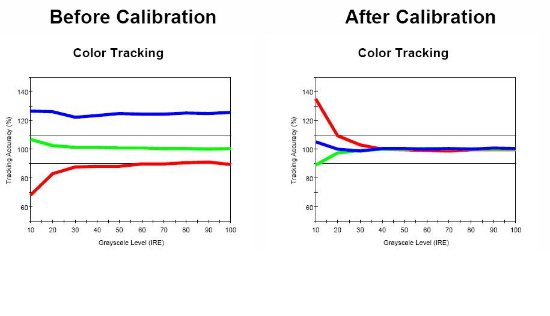
Color tracking was also excellent after calibration. With
BenQ's flexible color management system we were able to dial in both primaries
and secondaries to almost perfection. Green was just a bit low which also
pulled in Cyan a tad. The only real fault we found with the BenQ in relation
to color was its decoder. Since this is an HD projector it should use a color
decoder that is accurate with REC 709. Unfortunately the color decoder is
setup for an SD colorspace. We tried to dial in the decoder a bit more to
resolve this issue but found it ultimately frustrating. The projector should
look at the incoming video signal and switch accordingly, which is what we've
seen from other HD projectors. I've informed BenQ of the issue and hopefully
they will resolve it with firmware and in future models.
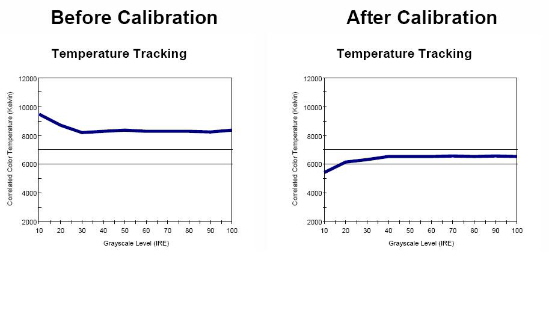
Grayscale performance was excellent after calibration
with only a slight dip in the lower IREs (again this is more of an issue with
the meter than the projector, even the high priced Minolta meter that was used
starts running out in the lower IREs). We managed to get a nearly perfect
grayscale from the W10000 and a gamma of 2.38, which is exactly what we want
to see from a digital projector.
The W10000 had no problems at all with clipping luma or
chroma with our HD test patterns. I was able to dial in the image to near
perfection with no obvious banding on a luma ramp, which is a rarity in the
digital projection world. There is no image cropping at all with this
projector either.
Like the other 1080p DLP based projectors I've reviewed,
the W10000 resolves the full resolution of 1080p with no obvious roll off or
distortion. This includes single pixel bursts and nyquist patterns for both
luma and chroma in the horizontal and vertical planes.
One of my favorite features on the W10000 is its variable
iris. The BenQ employs a motorized iris that can be controlled from the remote
allowing you to dial in contrast and brightness to your liking. The iris has
nearly 30 steps available. At first I tightened the iris all the way down
maximizing contrast as much as possible. With the projector in low lamp mode
and fully calibrated we measured out an impressive 4200:1 On/Off contrast
ratio and 610:1 ANSI contrast. This is nearly the best contrast ratio that
we've measured yet from a DLP design.
The flexible iris can also be used to dial in the overall
image brightness you want from the projector. There are a lot of people out
there that would glady sacrifice a bit of contrast to get more lumens from
their projector. This iris allows you to start with the iris closed down and
open it up until you find a comfortable brightness level that works for your
environment. As the bulb wears, you simply open the iris up a little more. I
kept the iris closed down to about 90% of its range. This provided plenty of
contrast and deep blacks, but still enough punch in the image to give the
picture some snap.
Video Processing
Video processing is probably the weakest area of this
design and its Achilles' heel if you are depending on it for HD video
processing. BenQ went with a two chip solution for its video processing
employing a Faroudja/Genesis chipset for I/P conversion and filtering and an
O-Plus solution for scaling.
We've tested all of the Faroudja based video processing
solutions and while they offer impressive performance for SD video sources,
they haven't been as impressive with HD performance until the recent "Cortez"
line was released, which was before this projector's time.
The W10000 does a fine job with SD video content such as
DVD sources. Feeding this projector a 480i feed from a DVD player resulted in
a very good image with proper de-interlacing of both 2-3 and 2-2 sources. The
O-Plus scaler did a commendable job with scaling with only a small amount of
ringing added to the image. You could improve performance by feeding this
projector a fully progressive image from a higher end DVD player and get a
slightly better image, but I think most consumers would notice little
difference.
The HD side is another story. This projector cannot do
proper inverse telecine de-interlacing of 1080i sources to its full 1080p
resolution. It essentially does a "Bob" style weaving which results in several
artifacts and an apparent loss in resolution compared with a good 1080p feed.
While this might not be as apparent with a cable broadcast or home videos from
a camcorder, it is quite noticeable with higher end sources such as HD DVD and
Blu-ray. If you are using these sources and don't have a player that supports
a true 1080p output, I would recommend coupling this projector with a more
capable outboard video processing solution.
With true 1080p60 and 1080p24 sources, this projector
shines. The BenQ will accept these resolutions and pass them straight through.
For 1080p24 sources the projector frame doubles and displays them at 48Hz
resulting in a very clean, judder-free image that is exceptionally film like.
Click Here to Go to Part III