Introduction
It wasn't so long ago that if you had a DVD
player, a receiver and a large screen TV, you thought you had an amazing
home theater.
Standards have changed, and now you need a really big
screen TV or projector, at least two good video sources, a PVR/TiVo, STB
(Set top Box) A/V receiver, a streamer / HTPC / XBOX / PlayStation, and a
few other gadgets to get into that club. All these toys mean you probably
have a box to put all those remotes in.
I, for one, had an LCD remote for quite a few
years. My first so called "home theater" had a TV, DVD player, and A/V
receiver. In those days, three remotes were an annoyance to me.
I found out that
a new product was on the market by Philips called "Pronto". I was torn
between that remote and a joint venture between Microsoft and Harman/Kardon
– yielding a humongous remote called TC1000 (TC= take control). I ended up
purchasing the TC because of a nifty jog dial that allowed you to
(theoretically) surf channels by simply rotating it.
Why bother with an LCD remote? First, no
matter how many hard buttons you have in a universal remote, it is never
designed exactly how you want it. I needed something that I could control
100% in terms of how it looked and how it did things.
The TC1000 turned out to be a horrible
purchasing decision. The Pronto series of products was continually
evolving, while the TC1000 was abandoned and was a mediocre product to begin
with.
The greatest power of the original Pronto was
also its greatest weakness. It required a combination of a graphics artist
and a programmer to build a half decent remote design. In those days, you
only had tiny graphics and only two shades of gray (and, of course white and
black) to work with. But still, the Pronto presented you with a completely
empty pad of paper. You could end up designing anything you saw fit with it.
It was a product that was priced for end-users, but gave you more power than
a custom installer had with other products.
Pronto models continually improved during the
last decade, adding more features, larger screen areas, more shades of gray,
more hard buttons, and more recently . . . color LCD.
The basic idea behind the Pronto has been that you receive an empty slate. You then decide what each
button will look like and what it can do. Each button can link to
another button's code, output I/R codes, add a delay, a beep or even jump to
another screen.
Ultimately, with the critical help of
www.remotecentral.com, some of the nifty features in the
Pronto became much more powerful. Users were able to figure out I/R codes
and share them among themselves. This even included codes that were not
available on the original remotes. The Pronto code format became so popular
that some companies give you a limited remote for their products, while the
full functionality is simply in downloadable discrete codes on that
product's website, and you put them on something like the Pronto.
People also started sharing Pronto screen designs.
With each product generation, Philips continually supported older formats
and allowed users to upgrade and improve their designs. Add an occasional
Remote Central Pronto design contest, and you have some amazing graphical
designs that you can adopt and use.
That really means that anyone with some
technical know-how can now program a Pronto. You never really start from
scratch anymore – you typically take an existing design, drop in some
discrete codes, and start connecting the dots.
Philips tried another route with the RC9800
remote (not in the Pronto line of products) that basically asked you quite a
few questions and ultimately created a design for you. The benefit of that
product was that it connected to your wi-fi network, was able to stream
content, and had bidirectional control.
The TSU9600
 Philips
has now introduced the newest item in the
Pronto lineup – the Pronto TSU9600. This remote enhances the Pronto
experiences in quite a few interesting new ways.
Philips
has now introduced the newest item in the
Pronto lineup – the Pronto TSU9600. This remote enhances the Pronto
experiences in quite a few interesting new ways.
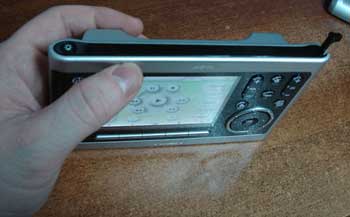
The design of the unit is completely flat and
streamlined, and there isn't even an indentation around the touch screen. That's
really an amazing achievement, and it does take some getting used to. The
benefit, of course, is that dirt does not tend to bunch up after a few
months at the corners of the bezel.
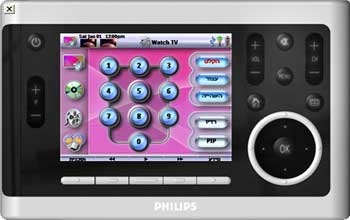
The screen itself is 640x480, using a new TFT
LCD design that is much brighter and more attractive than other models. In
fact, it has the best screen I've seen on a remote or even a PDA in quite a
while. The images are crisp and amazing, and you find yourself often longing
that the remote also showed the video itself.
The screen has a landscape orientation, which
does get some getting used to. We're so used to elongated stick-like remotes
that a landscape remote does feel strange in your hand.
There are several
hard buttons (as opposed to software or "soft" buttons that you design on
the LCD screen) to work with. The buttons are in shaped with the same slick
texture as the rest of the remote, but are slightly raised and transparent.
This gives the remote a very slick and streamlined look and feel. However,
the downside to this approach is that any tactile markers that were
available on the hard buttons in previous designs are now gone. Previous
designs had small lines and grooves designed into them, allowing you to play
with the remote without missing a split second of watching your home
theater. With the new design, you will find yourself looking at the remote a
lot more and awkwardly pressing the wrong button now and again.
Click Here to Go to Part II.