|
|||||||||
Introduction Comparing budget receivers used to be a
relatively straightforward process of seeing which manufacturer had pushed
furthest in bringing premium features from more expensive models to their
budget line. This has been happening for a number of years now such that
many reasonably priced receivers have nearly reached high end feature
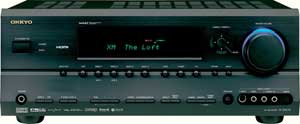
parity. The TX-SR674 also
features Audyssey 2EQ room correction, which allows one to optimize the
sound for your room, based on two measurement positions. The Onkyo also has one of my
favorite features on a receiver, namely an integrated XM radio tuner.
Finally, besides the standard compliment of Dolby and DTS surround modes,
the TX-SR674 also adds the Neural surround mode which is used in conjunction
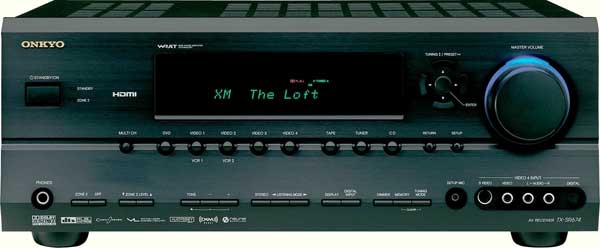
with certain XM radio channels. The front panel is rounded out with the "Video 4" input which features an S-Video, composite, analog stereo, and optical digital input. The buttons and the volume knob had a substantial feel that gave the impression of excellent build quality.
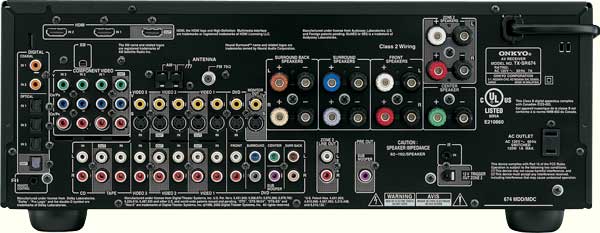
Moving to the back panel, one finds the two HDMI inputs and oen HDMI output that were mentioned previously. It is worth noting that these HDMI inputs offer repeater switching and not the lesser pass-through switching. Repeater switching means that the output voltage is boosted back to a proper level (5 volts), if it has lost any voltage on its way to the receiver. HDMI repeater switching also allows the receiver to use an audio signal from the HDMI input and simultaneously send an HDMI video signal to the display. Through HDMI, the Onkyo takes full advantage of the new high resolution audio formats available on Blu-ray and HD DVD. The HDMI inputs are complimented by three component video inputs and one output for other HD sources. The video inputs are completed with composite and S-Video inputs for all of the video input options. On the audio side, there are three optical digital inputs and two coaxial digital inputs. There are stereo analog connections for all of the inputs and a 7.1 channel input for DVD-Audio, SACD, or HD-DVD players.
The speaker outputs consist of 5-way binding posts, even for the Zone 2 speaker outputs. There are also line outputs for Zone 2. I was somewhat surprised that the TX-SR674 offers a preamp output only for its subwoofer and not for all of the remaining seven channels. Most other manufacturers in this price range offer a full complement of preamp outputs. The rest of the back panel consists of antenna inputs and IR inputs for control. Setup You
assign the HDMI and component video inputs through the setup menus. The
Onkyo allows you to assign any of the five inputs to the four possible video
sources, DVD, Video 1, Video 2, and Video 3. Finally, you can drill
down into the input setup menu where you can assign a preferred sound mode
for each input for various input signal classes, like PCM, Dolby Digital, or
DTS. I found these setup options to be very useful. With them I was able to
assign the Opt1 input to both the DVD and CD input, but I was able to custom
tailor the surround modes for each input. The DVD input had all of the
standard surround modes assigned as the defaults, while the CD input had
everything set for the stereo Direct mode. One thing that I could not
change was an input's name, and thus I was stuck with the generic Video 2
for my TiVo.
|
|||||||||


Magazine Publishing Solutions by