Now it was Time to Actually Install
this Stuff
I am not very good at construction projects, but as
it turned out, this was easy, although time consuming.
So, I had all these things to stick on the wall and
ceiling. I needed adhesive. After getting a recommendation from SONEX, I
went to our local Home Depot and bought some Liquid Nails®. I
had no idea how much I would need, so I got six tubes to start with. I
ended up using about 20 tubes. Fortunately, the product is less than $2
per tube. I started out with the Small Project version of the adhesive,
but then switched over to the Heavy Duty version, which requires a
caulking gun (about $5).
This adhesive smells terrible and will make you
cough and wheeze. It has several volatile solvents in it, so be sure to
have good ventilation. Also on hand were some paper towels, plastic bags
to throw away empty adhesive tubes, a sharp tool to puncture the
adhesive opening, tape measure, a roll of thread, and some pushpins.
You have to be careful with the Melamine panels, as
they are delicate and easily torn or punctured (polyurethane panels are
sturdier). I thought I might put a
few up temporarily with pushpins, but that just tore small holes in the
panels. Pushpins will work fine as temporary mounts with the
polyurethane panels though. So, I just held them up on the wall with
some tape to see where I wanted them. You could also put the pushpins
into the wall at the bottom and set the panels on them temporarily.
I started with the front of the room. The panels
come in pairs, with the two panels facing each other. You peel them away
and set them aside. Each member of the pair is a mirror image of the
other, so they are not identical.
Being the compulsive person that I am, I decided to
arrange them geometrically, alternating the mirror image units rather
than just putting them up in a random fashion. I don't think this
affects the absorption, but it is a more pleasing appearance, because
the mirror image differences are noticeable.
I set them on the floor against the wall to see how
the spacing would come out across the width of the wall, and ended up
spacing them about 6" apart and at different heights, since the wall is
angled.
I used one of the SONEX gray panels (2'x2') that I
had previously, to add some color to the wall, breaking up the monotony
of the white panels. I began at the ceiling, and worked my way down,
stacking two 2'x4' panels one above the other.
Next, I did the side walls, followed by the rear
wall.
One tube of adhesive was enough for about three
2'x4' panels, making a box with an enclosed X on the rear, and a 1/4"
bead of adhesive, as shown in the diagram on the right. The glue pattern
is shown in red.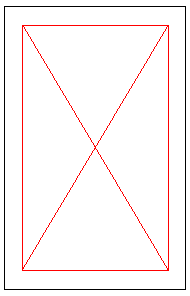 Put the glue about 2" in from the edge of the panel so that it does not
seep out on to the wall when you apply the panel on the wall, or when
you have to slide the panel around a bit to get it into final position. Once the panel is applied to the wall, it is stuck
tightly after only about 30 seconds, so you can't dilly dally in getting
it into final position by sliding it an inch or so to one side or
vertically. I used black thread strung out with the pushpins, to make a
straight line across the wall so I could line up the panels when
sticking them on the wall.
Put the glue about 2" in from the edge of the panel so that it does not
seep out on to the wall when you apply the panel on the wall, or when
you have to slide the panel around a bit to get it into final position. Once the panel is applied to the wall, it is stuck
tightly after only about 30 seconds, so you can't dilly dally in getting
it into final position by sliding it an inch or so to one side or
vertically. I used black thread strung out with the pushpins, to make a
straight line across the wall so I could line up the panels when
sticking them on the wall.
Then came the bass traps. They are 2' high, so I
used several of them in each corner to reach the ceiling. I had to cut
the finishing section, using an electric knife, so that the last one
would fit.
I also used bass traps along the soffit angles.
There are angled traps available that are specifically for this purpose,
but I wanted something deep, and the bass traps were perfect. I had to
cut a corner section from the rear of each bass trap, so that it would
fit over the molding that was already there. Using the X enclosed box of
adhesive pattern on each rear surface, I held them against the wall for
about a minute such that the adhesive would stick enough to the wall
that they would not fall off after I removed the pressure.
Finally came the ceiling diffusors. Velcro®
pads are included, and I was so irritated with the bad smell from the
adhesive, I decided to use the pads instead of glue. All you have to do
is remove the protective sheet from one side of the pad, stick it on,
and do the next one. I used four pads, one in each corner. I had my
black thread and pushpins to mark a straight line, removed the
protective sheet from the other side of the pads, and stuck them on the
ceiling.
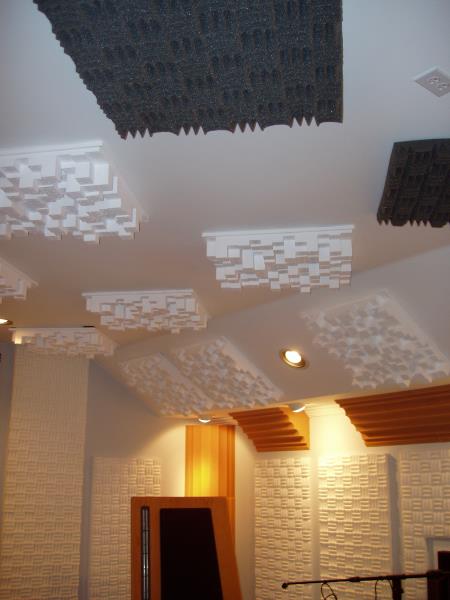
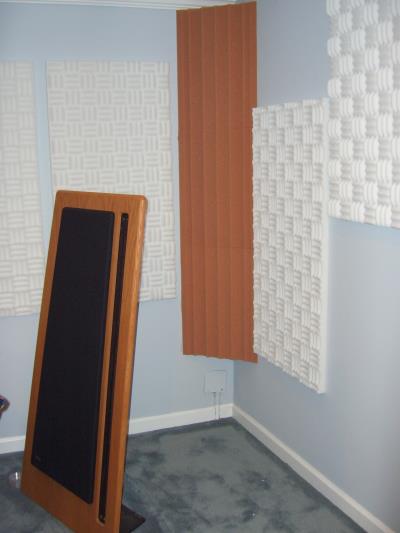
Here is a photo of the front wall, after the
panels, bass traps, and diffusors were installed. Diffusors are on the
angled part of the ceiling as well as the horizontal part of the
ceiling. They were spaced 10" apart, except for where the recessed
lighting was located, where I left more space open. On the angled
ceiling, the diffusors were placed side to side, while on the horizontal
ceiling, they were placed corner to corner. The underside of the soffit
on the left is not covered with panels. The computer on a roller cart is for bench
testing, as is the microphone stand seen on the right.
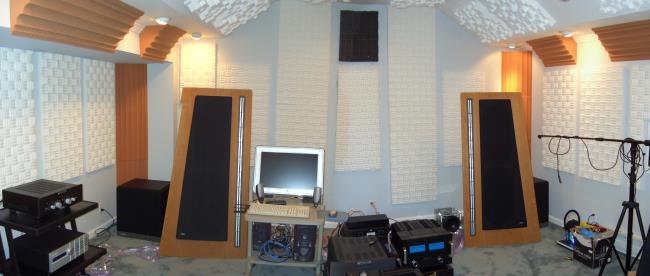
You can see the panels on the walls, bass traps in
the corners and soffit angles, and diffusors on the ceiling. I would
estimate that about 65% of the surfaces were covered with panels or diffusors, leaving
35% of the wall and ceiling surface uncovered.
The rear of the room now looks like this. Notice
that the panel and trap placement are not symmetrical. This is because
the room is not symmetrical.
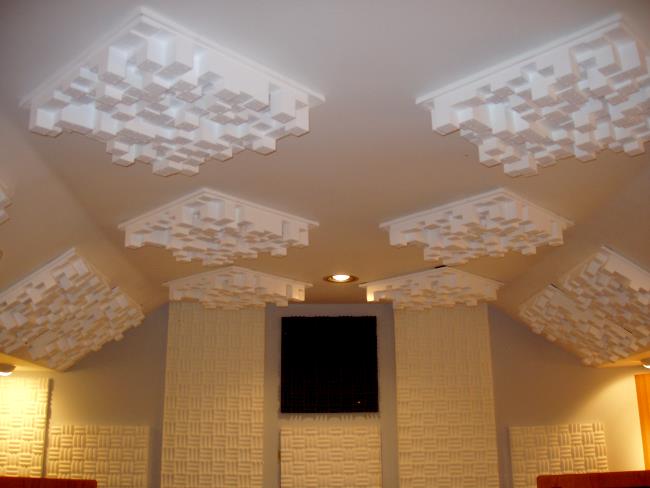
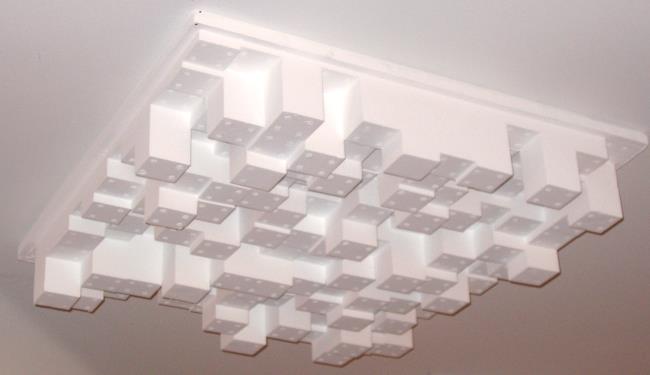
Here is a view of the front ceiling, and you can
see details of the diffusor panels. They consist of small blocks of
different heights. A close-up of a diffusor is shown in the second
photo.
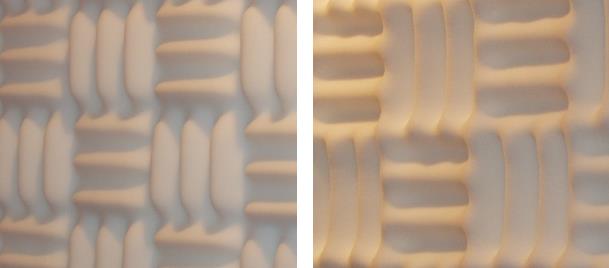
The photo below shows the SONEX panel mirror images
of each other. In a box of eight panels, you get four of each.
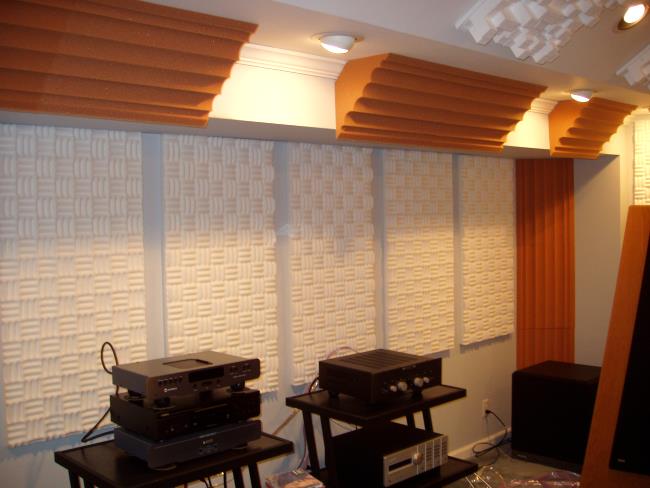
The left wall has foam panels up to the soffit, and
the panel texture is evident. You can see the bass traps in the soffit
angle, and how they are trimmed on the rear so that the corner molding
will fit behind them.
In this photo of the front right corner, ceiling,
and part of the right wall, you can see that the diffusors are side to
side on the angled ceiling and corner to corner on the horizontal
ceiling. There are several gray 2" thick SONEX absorption panels on the
ceiling at the rear of the room, as I plan to put slate tiles in front
of the doors. The SONEX here will help to absorb sound reflected from
the tiles. In the bottom right corner of the photo, you can see how I
cut the SONEX panel to fit around the air conditioner. I used a sharp
knife to do this.
A photo of the right rear corner (right when facing
the front, as in the right rear surround), is shown below.
You can see that the panels are not the same
height, and the corner bass traps do not come all the way to the floor,
as there is an electrical junction box at the bottom that I did not want
to cover up. I put in the wall panels before the bass traps, so I made
sure that I was leaving enough space for the corner traps to fit in. I
glued the first bass trap against the soffit at the top, then put two
more underneath the first one.
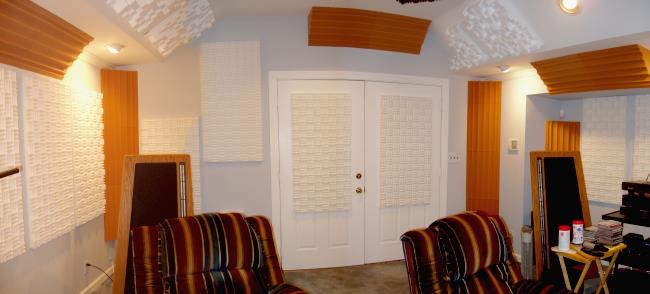
Now, the left rear corner.
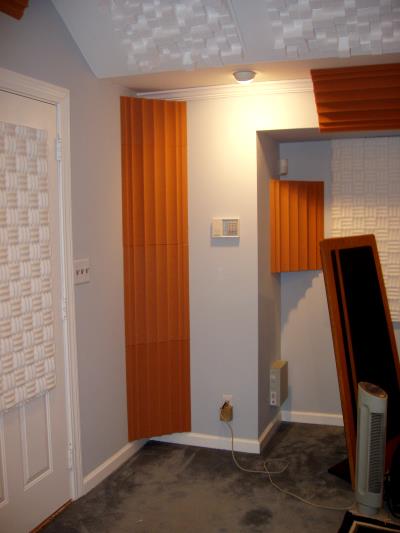
There are actually two corners here. I placed bass
traps fully in one of them and only part of the other corner where the
burglar alarm and motion sensor are located. You can see that I also
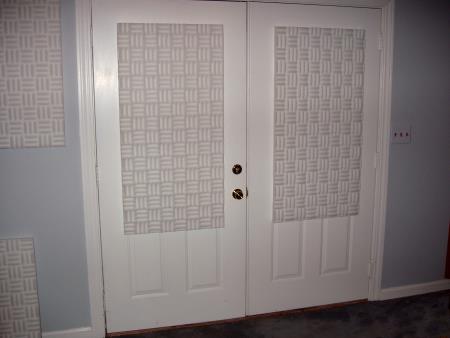
placed foam panels on the doors, as shown below in more detail.
The Resulting Sound
There was a huge sound change as a result of the
room treatment. I can hear details in the music that were masked before
by the multiple arrival of the sound. Bass is now very tight, and it is
much more localizable to where the subwoofers are sitting, and this
surprised me. I knew it would be less boomy, but did not realize I would
be able to tell where those low frequencies are coming from.
The soundstage is now much narrower, and this may
seem like a downside, but all it means is that the walls adjacent to the
speakers are no longer a significant part of the sound that is arriving
at my ears. It is mostly direct from the speakers.
The clap echo is completely gone, yet the room is
still alive.
I have to turn the volume control up more than
before, because the treatment is absorbing a significant portion of the
sound. This I consider a bit of a downside, because the amplifiers and
speakers are working harder now, to give me the same loudness I was used
to. It means you had better have a big power amplifier if you treat your
home theater and like to watch movies at high volume.
I am left with a bit of a hump in the 80 Hz - 150
Hz region that I could reduce by putting in something like ASC Tube
Traps, which are designed just for this sort of thing. However, I am
expecting to receive the new card for my Lexicon MC-12 that auto-EQs the
room up to 220 Hz, so I will wait to see if that does the job.
Conclusions
Room treatment may be last on your list of things
to do for your home theater or audio room, but it is something you
definitely should get to sooner or later because it really makes a
difference.
It can be expensive, but you don't have to do
extensive treatment to get results, and you don't have to do it all at
once. There are other options for those who prefer something a little
less industrial in appearance, such as using curtains, and DIY projects
with things like Corning fiberglass panels that you can cover with
material of whatever color that suits you. We will include all these
ideas in subsequent articles.
- John E. Johnson, Jr. -
Supplementary Reading:
http://www.eckel.ca/artfpan.html
http://www.ambiophonics.org/Ch_5_ambiophonics_2nd_edit.htm
http://www.learn.londonmet.ac.uk/student/resources/doc/acoustic_notes.html
http://www.regjamesarch.freeuk.com/acoustics.htm
http://www.studiotips.com/term.html
http://www.acousticalsurfaces.com/acoustic_IOI/101_16.htm
http://arts.ucsc.edu/EMS/Music/tech_background/TE-01/soundAbsor.html
http://www.soundonsound.com/sos/sep98/articles/acoustic_3.html