Introduction
Winters here in Idaho are very cold. With the Jet-Skis winterized,
and the Corvette convertible put away for the season, it's a depressing time for me.
In late fall I sold my reference equipment after several years of
service, in hopes to acquire something new and different.
Here
is what I previously enjoyed:
Main Speakers: Klipsch KLF-30
Center: Klipsch KLF-C7
Surrounds: Klipsch Dipoles
Processor: Pioneer Elite 27TX (120x5) 5.1
Subwoofers: SVS CS-Ultra Pair
Now, don't get me wrong. I loved that system. It was set up and tuned for
my bonus room. I loved it. But, I also had been tinkering with the idea of
front projection, and moving away from horn speakers.
Planning
Every project is only as good as its preparation. Everyone who worked with
me on this project was driven nuts by my constant planning. I knew that
I wanted to do it "right", and for me that was front projection.
Many condos come with what contractors call a
"Bonus Room". It is basically some additional space that they don't call
a bedroom, bathroom, den, etc. It is an extra room . . . a bonus room. With a
bonus room comes interesting challenges: limited floor space, slanted ceilings,
unusual shaped windows, and many more.
I started by digging out the blueprints for the house, and specifically
the bonus room where I would put my home theater.
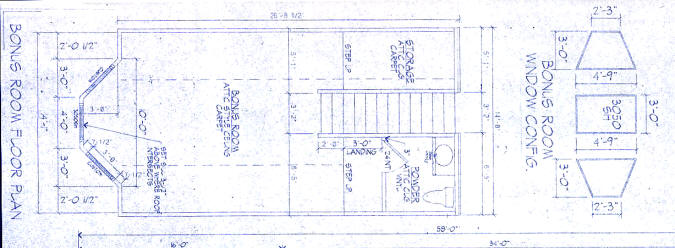
Since I had a large set of windows in that room, I knew that to achieve 95% light
control, I would need black out blinds. Of course, I still wanted to use the
windows for looking out (they overlook the mountains you know), so I needed a
motorized drop down
screen. The question of the hour was, how much space is there in the
ceiling? I called up my builder and got the plans for my ceiling
trusses. I also measured the actual truss width to determine that
they were 2x8 trusses over the bonus room.
Using geometry and measuring, I discovered that, at the
ceiling, I had 102.5" worth of width where I could place the screen. A quick look on
the internet indicated that Stewart Screens makes a drop down electric with
outside case measurement of 102". This tensioned screen with minimized
black borders gave me a 100" diagonal 16:9 screen . . . just what I was
shooting for.

The Projector
Now that I knew a motorized screen was feasible, I
moved on to selecting the projector. This
is where individual budgets come in. (In any case spend the $$$ for
a nice screen from Stewart . . . they are among the best there are.) I wanted a film-like experience
and capability for HD. Even though I
love DLP and LCD they just don't look like film yet. What I really wanted was a CRT
projector. They still have the best color saturation (because of their
blacks), and can show 1080 x 1920. I
knew buying a new one was out of the question, but what could I get for
under $7,000?
I hung around the CRT forums on
www.AVSforum.com, to learn as much as I
could from the CRT gurus. I then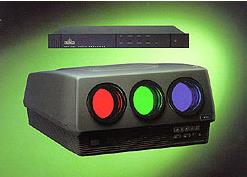 shopped around the used market and made
a few contacts. I settled on a used Runco DTV-933
which is a rebranded NEC 6PG, a popular projector on the forums. It had
700 hours on it, and came with a Runco line-tripler. I was lucky to get
mine local.
shopped around the used market and made
a few contacts. I settled on a used Runco DTV-933
which is a rebranded NEC 6PG, a popular projector on the forums. It had
700 hours on it, and came with a Runco line-tripler. I was lucky to get
mine local.
The 933 is HD capable and has 7" CRTs, plenty for 720p. I scoured the
internet and made a few calls to Runco, and after some patience had the
install and user manuals.
All projectors have a throw ratio, and CRTs
are no different. With a 1.33 throw ratio (the distance between the lens
and the screen divided by the width of the screen), I knew that the projector
would need to be [screen width]*1.33 = [Distance] from the center of the
screen to the center of the green lens. Using that with the projection
angle and mounting heights, I figured that the top of the screen needed to
be about 13" from the ceiling, Since I am using a ceiling projection
configuration, the ceiling becomes the reference for everything. With a
screen case height of 6.5", that gave me a 7" drop for my screen. I
rounded and ordered the screen with an 8" drop, as you can always adjust
out 1-3 inches of drop using the screen stops.
So with a 100" screen ordered, and my projector sitting on the floor, it
was time to make some changes to the room.
Lighting
The house was built with track lights in the bonus room. This presented
a problem. How to project onto the screen without the track lights in
the way. So I ripped out the track lights :->. I chose to put in six 75 watt
halogen recessed can lights with adjustable direction. I got them for $50 each at
Home Depot. I pulled the wire from the existing track lights, and
connected the new can lights. The 5" holes in the ceiling were a daring
move, but nothing compared to what would come.
Screen Install
I cut a two foot wide swath out of the ceiling in the front of the room,
all the way across. I then framed in the supports to hold the screen,
leveled it, measured, leveled, measured, leveled . . . you see a pattern?
I utilized a low voltage switch box to control the screen, and mounted
that above the projector. With a few wires connected and some juice, we
lowered the screen to make sure it wasn't binding. Out of the way it went now, until
we were done.
It took a lot of time to reframe in around the projector, drywall,
retexture, and paint. In the end, only the ones who did it know how
painstaking we were about the details.
Paint
During construction, painting everything white seems like a good idea.
Unfortunately, white is the worst color when it comes to light control. The
goal was to pick a color other than black that would control light
reflections, yet not make the room appear to be a cave. We chose a dark
blue, flat enamel, as shown on the right. It took a colored primer, and two coats to cover the
white. The trim remained white for contrast. Talk about a dramatic change.
Equipment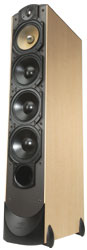
Since I kept nothing other than the 36" TV and the SVS subs, it was time
to go shopping. After having Klipsch horns for several years, I wanted a change
to dome tweeters. Some very good if not the best speakers I have heard
(in my price range) are the Paradigm Studio series. They are very
clean, and simply one of my favorites. So, I bought myself the set.
| Mains: |
Studio 100's V3 |
| Center: |
Studio CC-570 |
| Surrounds: |
Studio ADP-470's |
| Rear Surround: |
Studio 20's V3 |
The AVM-20 from Anthem has won our SSP of the Year award
(2002) for good
reason. It is one of the best
processors out there.
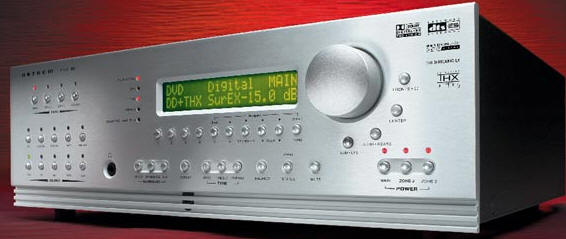
Anthem's continued support and upgrades were one of my
largest deciding factors in buying the AVM-20. Where previously I was in
an all-in-one mind set, this time I would go with separates. I bought
matching Anthem MCA-50 and MCA-20 amplifiers to round out my 7.1
experience. To date I could not be more happy with my equipment choice.
The AVM-20 and the MCAs go so well together sonically.
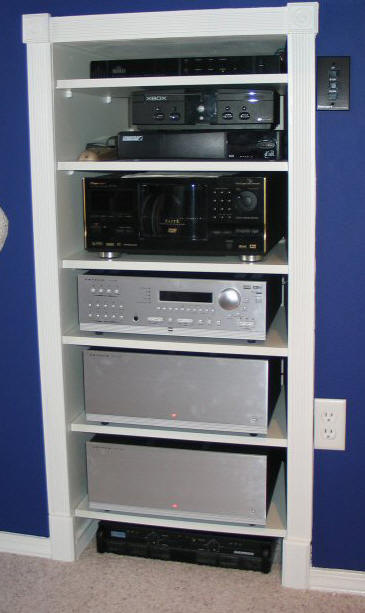
Now that we had the components, it was time to build a closet to hold
them. I'm a little put off by $1000 racks for stereo gear. That money
should be spent in cables and equipment. So I built it myself. I cut a two
foot by four foot opening in the side of my room, and framed in a
closet, I used melamine board (plywood with a plastic surface for use in
shelves) from Home Depot, and I drilled it every
1" for the adjustable shelves. I then trimmed it out to match the room.
All in all it turned out fantastic. I placed the screen controls next to
it so that it would be easy to later wire in an IR trigger for the
screen when my budget allowed.
On another note, each of the MCAs drew too much current for the power
loops in the bonus room. I paid the $200 and had three thirty amp
circuits pulled to the new closet. This way the power-hungry amplifiers
wouldn't be in contention for any current.
As you can see in the photo above, from top to bottom we have:
- Runco Line tripler
- Xbox
- Dish Network Receiver
- Pioneer 300 disk DVD changer
- Anthem AVM-20
- Anthem AVM-50
- Anthem AVM-20
- Sampson 1000 Watt Power Amp for the SVS
Subwoofers
The Results
So how did it turn out? With the screen up we can
watch the 36" Sony XBR by using Zone 2 of the AVM. Notice that the
ends of the screen enclosure are recessed into the diagonal ceiling.
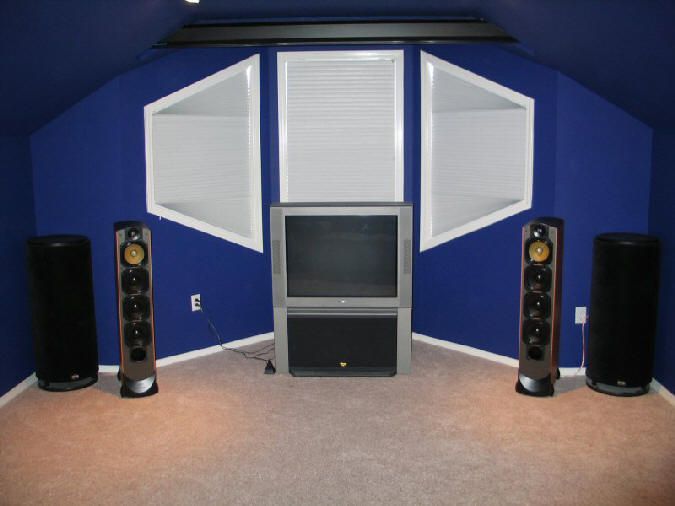
You can see the screen is a tight fit. Planning and measuring were key
factors in making this all work. With the screen down it's a
dramatic change.
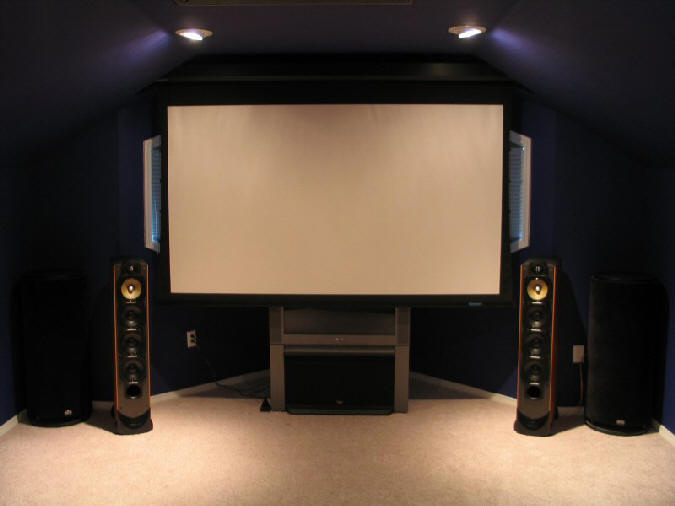
Here is a shot of the screen in all 100" of
its glory through
the Runco, line-tripled, with the dimmer all the way off.

The picture is fantastic. The colors are vibrant, the
image is film-like with no pixilation.
Conclusions
After four weeks of drop dead weekends, and late nights,
not to
mention the copious amounts of beer and pizza for my helpers, it was
done. I learned a lot about CRT projectors and how to set them up. I couldn't
have done it without the tips from AVS forum (or the instruction manual).
Now it's time to watch the rest of the movie . .
.
- Brian Weatherhead -