Introduction to the ChromaPure 2.2 Video Calibration System and Lumagen Radiance Mini-3D Video Processor
If you’ve read the previous DIY calibration articles here at Secrets of Home Theater and High Fidelity, then you’ve seen us cover ChromaPure and CalMAN calibration systems, and the DVDO Duo video processor. This time we’re going to look at the newest release of ChromaPure, version 2.2, as well as the Lumagen Radiance Mini-3D Video Processor, both individually and together.
ChromaPure has been through a few revisions since we first looked at it, with a lot of new features added. Some of the main new features we are looking at are:
– Auto-calibration for DVDO Duo and Lumagen Radiance users
– Quick Reports
– 5% measurements in addition to 10% for White Balance
– Advanced Color Management that measures saturations and intensities in 25% increments
– Contrast and Brightness Patterns
– Updated Contrast Measurements
– Support for RGB in addition to HSL for Color Management
– New Pro and Plus versions of the software for professionals
Some of these features were things that we asked for in our previous review. Some were certainly things that other users have asked for, and Tom Huffman has done a great job of listening to everyone and improving the product as quickly as he can.
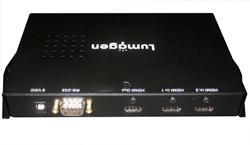
Lumagen is a company that many people have heard of, as their Radiance external Color Management System (CMS, a.k.a., Video Processor) has been a category-leading product for a number of years now. They now have a new lineup of video processor models that includes support for 3D image formats, as well as a more compact model, the Mini-3D. All of the Radiance models have the same ability to correct your colorspace, gamma, and grayscale but vary in the number of inputs and outputs that they provide. For this review I used a Mini-3D as it, like all current Radiance models, supports the new Auto-Calibration feature in ChromaPure.
ChromaPure 2.2 and Lumagen Radiance Mini-3D Specifications
- ChromaPure 2.2 Calibration System
- MSRP: Software Only: $200 for Standard, $300 for Plus, $999 for Professional; Standard with i1 Display Pro Meter $575; Auto-Calibration License $149, Auto-Calibrate Bundle with Radiance Mini-3D, ChromaPure Standard, Auto-Calibration License, i1 Display Pro meter, and USB-RS232 Adapter $2,199, $2,299 for Manually Calibrated i1 Display Pro
- ChromaPure
- Lumagen Radiance Mini-3D Video Processor
- Inputs: 2 HDMI 1.4a
- Outputs 1 HDMI 1.4a
- Features 10-bit Processing, Full CMS, Grayscale and Gamma Correction, Anamorphic Lens Support, Noise Reduction, Scaling, Cadence Detection
- Dimensions: 1″ H x 8.5″ W x 5″ D
- Weight: 3 Pounds
- MSRP: $1,999
- Lumagen
- SECRETS Tags: Calibration, DIY, HDTV Calibration, Auto Calibration
Auto-Calibration of the Lumagen Radiance Mini-3D using ChromaPure 2.2
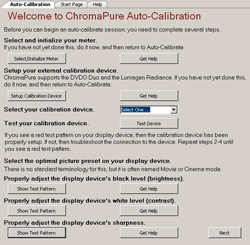
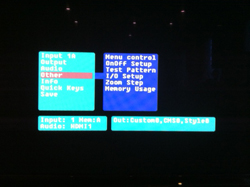
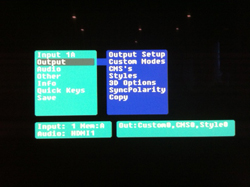
The most interesting new feature in ChromaPure is the ability to auto-calibrate when paired with a Lumagen Radiance. Without any knowledge of how a CMS system works, you will essentially be able to completely calibrate your display. ChromaPure starts out the standard way, in that you initialize your meter for use, and then you have to perform three settings on your own: Brightness, Contrast, and Sharpness. The settings for the Radiance also let you select between windows for fields for test patterns, and if you want 100% or 75% intensities. ChromaPure will use the internal patterns on the Lumagen Radiance to assist you in doing this, so it should only take a minute or two. Beyond those three settings, typically everything else in your display CMS should be left at default. It is a good habit to check the different color temperature, gamma, and color gamut settings in your display before beginning the calibration. Talking to Lumagen, they recommend selecting the following choices:
– The color setting that is closest to 6500K
– The gamma setting that is most-linear
– The color gamut that is larger than the desired final result
The most confusing one here is choosing the color gamut. While the Radiance can correct for color errors by reducing Luminance in a color, it can’t add Luminance beyond what the display is already doing. So, if you pick a color setting that is under saturated, there is no way the Radiance can ever correct for that, so make sure to pick one that is larger than the color gamut you are calibrating for.
In some displays, such as the Panasonic VT25 series, you might have a trade-off to make with your display setting. In this example, the VT25 can only do a pixel-perfect display mode when in THX mode, but THX mode also has a color gamut that is smaller than the desired Rec. 709 HDTV gamut. In this case, you have to choose between a loss in resolution and detail by not having pixel-perfect, or a loss in color accuracy. In this example, Lumagen recommended going with the pixel-perfect display instead of the small color error.
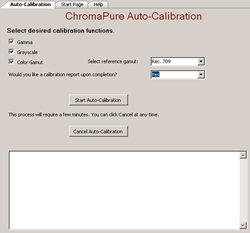
After you have set these, you tell ChromaPure what you want it to calibrate: Grayscale, Gamma, and/or Colorspace (with options for SMPTE, Rec. 709, and EBU). After you have selected these, you can get up and leave the room for a while if you would like to. ChromaPure will reset all values in CMS0 on the Radiance, and then begin to take measurements of the grayscale in 10 IRE steps. ChromaPure aims for a dE below 2.0 at all measurements and continues to refine the settings in the Radiance until it gets there. If it manages to get stuck at a dE higher than 2.0, it will save the best value and continue on, though I only had this happen when trying to set my Blue value, never with grayscale or gamma.
After the grayscale is configured (this can take a while as well), it will make another pass to make sure it’s still good across the spectrum before it begins to fix the gamma. Since I was after a Gamma of 2.22, it kept adjusting and raising the gamma level until it was 2.2 or above. If the value started higher, such as 2.5, then it lowered it until the value was in the range of 2.2-2.3. Once it was corrected, ChromaPure moved onto the colorspace values. This time we are aiming for values below a dE of 1.75 starting with Red. The only value that didn’t get fixed perfectly was Blue, but since on my display Blue starts with a far higher dE than anything else, and is the color where we notice any error the least, this was not a major concern.
Once all of the colors are corrected, ChromaPure will go through and make a final set of measurements and then give you a final report showing the pre-calibrated and post-calibrated values. I ran this through multiple times using many displays (a plasma, an LCD, and an LCD projector) and every time I managed to get a nearly perfect grayscale, perfect gamma, and spot on color. My plasma has a CMS that works pretty well, and I cover using in the next section, but I’ve never been able to nail the gamma on it. Using the Radiance allowed me to finally get that gamma perfect, and I have to say the image just popped off the screen. I was surprised how much of a difference it made, but watching Cars from Pixar, the images had far more pop than ever before and it was almost like having a new display. I didn’t realize just how much effect the gamma had on the rest of the image, but it was a difference I could clearly see.
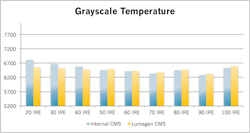
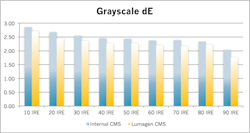
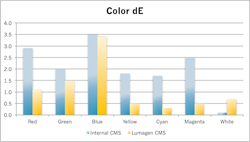
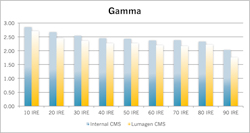
Below are some results obtained both using Auto-calibration with the Radiance, and doing a manual calibration with my Samsung’s CMS by hand. The results here might seem closer than you would expect, but I spent multiple nights and attempts at the Samsung to get it this close in the end. With the Radiance, I just reset the Samsung to factory settings on an input, set the brightness and contrast, and let ChromaPure do the rest. Had I actually spent a little more effort on it (and started with a more linear gamma setting, for example), and tweaked the Radiance further after it finished, it would have produced even better results. Despite all that, it still produced a better image than the Samsung with none of the effort.
During my use of auto-calibration, I really only ran into one issue. During a run it accidentally set the 80 IRE grayscale to be very red compared to every other value for some reason. I’m not sure if the meter returned a bad value, or my USB to Serial adapter was acting up, but that one value was way off the mark. I was able to go into the Radiance and easily correct that single value, and then everything else was fine. The one other thing I wished for was the ability to set a dE below 2.0. Talking to Tom Huffman, it sounds like doing this caused the auto-calibration to take an incredibly long time. What he’s planning to do in a future release is keeping the dE of 2.0 in there, but then allow you to fine-tune it on your own afterwards. I did some fine-tuning myself using the Radiance and was able to get a dE below 1.0 consistently, but it did take a lot more time to do so.
The last thing I want to add about the Auto-Calibration is that if you’re planning to do it often, investing in the fastest meter you can is worth it. I did 25-30 calibrations in a month using a calibrated i1 DisplayLT to perform them, and after a week I was really wishing for the new i1 Display 3 Pro.
ChromaPure 2.2 Features
Beyond the Auto-Calibration feature, ChromaPure has added a lot of new features since we last used it. I tested it out using the Radiance as a pattern generator to make the calibration process as easy as possible.
One of the first things that I noticed was that ChromaPure now had patterns to help you set the Brightness and Contrast of a display correctly. This is one of the few things I felt was really lacking in the previous version, so I was glad to see it was fixed.
The other main addition that assisted in my Samsung PN50B650 plasma calibration was the addition of an RGB mode for color management. The previous version had HSL, which I was able to use to get my display correct but it was not as easy, and the new RGB mode worked perfectly. Unfortunately even better controls still didn’t let me dial in Blue correctly, but that’s the fault of the display and not ChromaPure.
One new feature is the Advanced Color Management section. Virtually every review you see of a display or projector shows the calibrated results for the CIE diagram: 100% saturations of Red, Green, Blue, Cyan, Yellow, and Magenta. ChromaPure will allow you to measure the intermediate saturations (25%, 50%, 75%) and intensities (25%, 50%, 75%) to see how your display performs with those. This is also an area that the Lumagen Radiance can really improve upon the CMS inside of your display.
While many display CMSs can let you get the 100% value correct, they don’t perform the internal calculations for the values between 100% and 0% correctly. Color math is really a 3D model and not a 2D model, with lines that can curve instead of being a straight line. As people that looked into this online at the AVS Forums found out, even if your display seems to calibrate perfectly with its internal CMS, your picture might still look a little off since it is not getting those other values correct. Most content that we view isn’t at 100% intensities as well, so having the midranges be more accurate is often desirable.
What some people have found is that calibrating using 75% values instead of 100% values can lead to a more accurate overall color spectrum with their internal CMS. While the 100% values might be further off, which makes the calibration report look worse, the 25%, 50% and 75% values are far more accurate, which results in a better overall image.
However, previously the only calibration software that I had worked with that easily supported this was ColorHCFR, which is now very outdated in terms of meter support. ChromaPure now supports these readings with the Advanced Color Management module and will let you see a much better overall representation of how your display does with color than the traditional CIE graph does. Right now you can’t do these measurements with an automated method (The Radiance contains the saturation patterns, and the AVS HD 709 Calibration disc contains the saturations as well), but in the next version it will support the Radiance for this measurement. Below you can see the results from this module using both an internal CMS in my Samsung on top and the Radiance below. While both have errors, those on the Radiance tend to be smaller across the different saturations.
Another feature that was added to ChromaPure were new Professional and Plus editions. These versions add support for higher end meters, signal generators such as the AccuPel 5000, and other options that are utilized by ISF and THX professionals. These are likely outside the scope of the average DIY calibrator, but ChromaPure has all the features these and can grow if your interest in calibration expands.
Lumagen Mini-3D Video Processor Features
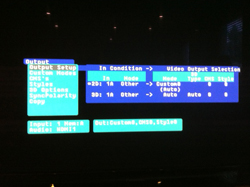
The Lumagen Radiance is a full CMS device that allows for you to do full grayscale and gamma adjustments (with 2, 5, 11, 12 or 21 points), color gamut, color, hue, and more. It also does colorspace conversions correctly, and supports scaling for use with anamorphic projectors and non-standard display resolutions (such as 1366×768). Even though most displays now contain some sort of CMS system, many can either be hidden in the service menus, or not contain all of the features that you need to get a correct calibration.
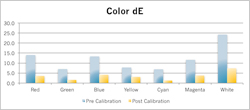
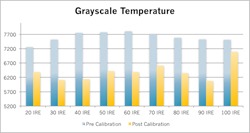
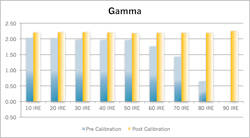
Recently I’ve begun to setup my basement to work with a front projector setup. While I decide what I want to install, I built myself a simple screen and borrowed a friend’s older Panasonic AE-900U projector. While the 900U was a very well regarded projector when it was released, it’s now a bit long in the tooth as it’s only 720p, and lacks a decent CMS system. To see how this would benefit from an actual CMS, I hooked up the Mini-3D and performed an automatic calibration. The charts below will show you the results before, and after, the Radiance and its auto-calibration. Had I desired to further tweak the Radiance, I’m sure I could have achieved even better final numbers.
After it was complete, the results were nothing short of stunning. While pixel structure was still visible if I looked carefully as it was still only 720p on a 96” screen, the picture now had a ton of pop to it. Since screen surfaces are also all very different in terms of color reproduction, it’s hard to impossible to copy the settings for a projector from someone else. Even something as simple as the wall color in your room will affect the image that is reflected back to you, making a calibration even more important than with an LCD or Plasma display.
Watching Cars (my son is in love with Cars, so I get to watch it multiple times a week now) the improved grayscale, color, and gamma all made a huge difference. As much as I hate to use the same term over and over, everything just popped off the screen; with shadow detail as good as I can get for this projector, and Lightning McQueen now a bright, vivid red that really stands out. Seeing how much of a difference this can make with a projector that was this old, I’m pretty sure I’d take the combination of a cheaper projector and Lumagen Radiance over a more expensive projector any day. Most displays don’t put out nearly as good an image as they are capable of, and the Lumagen made even an old 720p projector put up an image that almost anyone would be perfectly happy with.
When I put on the first part of the final Harry Potter film to show my wife, skin tones were very natural, and shadow detail was far superior to what it has been before the calibration. The color palette for the film is muted at times, and can be a little blue tinted, but it looked fantastic running through the Radiance. The recent Matt Damon film The Adjustment Bureau had a pretty good transfer that really looked nice in my theater. The image had a very natural look to it, not overly processed after it was completed, and simple details like a shirt texture really came out. Swapping between having the Radiance in the signal path and removing it made a huge difference, and really brought out everything that was on the disc.
Configuring the Lumagen manually without the auto-calibration from ChromaPure was of course more difficult, but still not too challenging. The manual that Lumagen includes goes through the process that you should use for doing a calibration. Just like with the auto-calibration you should set Brightness and Contrast in the display before you do anything in the Lumagen. You also should measure the different color temperatures available in your display (Often labeled Cool, Neutral, Warm, Natural, or a combination of those) and determine which comes closest to the D65 standard.
Once those are set, you can then begin using the Radiance to correct the grayscale, gamma, and color gamut. Here you will go color-by-color, and then by IRE levels to set these values correctly. As I mentioned earlier, if your display is lacking Luminance in a color, the Radiance can’t add any additional luminance to a color, it can only take it away. There have been a few displays and projectors that haven’t been able to produce a fully saturated image recently, and the Radiance can’t correct for that. However, you might be able to adjust the color control, or the individual CMS color controls, to account for this before calibration. While not ideal as you’d prefer to do all the color gamut corrections inside of the Radiance, it’s better than having an under-saturated image.
Another ability of the Radiance is to have quick access to four different image settings. When most people calibrate their display, they usually aim for a color temperature of 6500K with a gamma of 2.2. In most cases this would be correct, but in some cases you might want something different. If you have a truly pitch-black theater, you might want a gamma closer to 2.4 or 2.6, as many films are mastered using this gamma target in virtually pitch-black room. If you watch a lot of Black and White films, those were typically shot for a temperature of around 5400K instead of 6500K, and possibly a different gamma though I am not sure. If you watch sports a lot on this display, you might want a gamma closer to 1.9 as shadow detail isn’t that important to us while watching football. Finally, if you are doing 3D content, since the glasses can reduce the amount of light reaching you then you also might want a lower gamma level, or to account for the color shift of the lenses.
With the four quick access modes in the Lumagen, you could easily do four separate calibrations and assign them to the different slots, letting you change between image modes at the press of a button. It’s a good amount of work to try to do four different calibrations, but it’s a feature that no display that I know of offers.
Lumagen could improve upon their literature for the Mini-3D to make it easier to read and use. For example, in the manual there is a line saying, “The gamut calibration command usage is described in a Tech Tip on the Lumagen support web page.” It would be nice if this Tech Tip was included in the manual so the user didn’t need to reference back and forth from the manual to the web site. Additionally they have no images or diagrams that show the menu system or adjustment screens in the manual either. I would also like to see them possibly offer some video examples on their website showing the calibration steps to make it easier for someone to get started. The Radiance has all the power you can ask for, so it would be a shame if users weren’t able to properly utilize it.
Conclusions About the ChromaPure 2.2 Video Calibration System and Lumagen Radiance Mini-3D Video Processor
Initially, we were very impressed with ChromaPure and are happy to say that with the latest version that still holds true. The interface is still very clean and straightforward, making it easy to get started for anyone. The additional features offered in the new version have added more power and customization than was previously available, yet without added complexity. I did run into a couple of crashes in the software when using the Advanced Color Management section with the Lumagen as a test pattern generator, but this was only because ChromaPure 2.2 does not yet support the new Lumagen saturation test patterns. Support will be added in the next release. I have been told. Overall, ChromaPure is still my choice for calibration software and what I plan to continue to use.
When combined with the Lumagen Radiance, the results that I was able to achieve were even better. I had thought that an external CMS was somewhat outdated now that most displays and projectors included some sort of CMS, but I was certainly wrong in that regard. With the Radiance I was able to achieve results far beyond what I could do with the display controls, and a far better image as a result of it. Given all of the issues that we have found recently with Blu-ray players, receivers, and processors with how they handle colorspace information, adding an external CMS can resolve all of these issues, and give you a far better image to boot. It’s a piece of gear that I didn’t want to return, and that I hope to pick up for good in the future.


