Introduction
For the past three years or so, we have seen a tremendous surge in display technology. During this time, the last rites for the venerable CRT have been read, 50″ displays have become the new 32″, and 1080p has become the de facto standard for resolution. One thing hasn’t changed however and that is the need for precise calibration of your HDTV. Despite tremendous advances in consumer displays, the specifications for color, grayscale, and gamma have not changed since the 1950s. With all these new features available, it has become more confusing than ever for the typical home theater enthusiast to achieve a correct calibration and realize the best performance from your flat panel or projector HDTV.
The need for professional display calibration has been hotly debated in Internet forums for many years. Is it really necessary? Quite simply, it is if you want your TV to match the cameras and monitors used to create film and video content. The standards for display calibration are set by the Society of Motion Picture and Television Engineers (SMPTE). They specify precise numbers for a TV’s color gamut and grayscale. There is also a set range of values for minimum and maximum luminance (brightness) and gamma. We will explore each of these areas individually. Suffice it to say that the proper balance of all these areas makes for a display that performs at its maximum potential. As home theater enthusiasts, we spend a large amount of time and money to get the best experience possible. Calibration is a crucial step in that process.
Anatomy of a Professional Display Calibration
Let’s start laying the groundwork with levels. Brightness levels are expressed as IRE units from 0 to 100. This is a relative measurement. 0 IRE is the lowest brightness level, minimum black, and 100 IRE is the highest level, maximum white. These adjustments are made with the brightness (black level) and contrast (white level) controls. A calibrator will set these values using PLUGE patterns (photo below). These patterns display several bars on a black or white field. The bars are usually a bit above and a bit below 0 IRE and 100 IRE. When the below black and above white bars disappear, you have achieved the correct levels. One important note here: TVs are capable of 256 levels of brightness. Video levels as used on DVDs and broadcast content are from brightness levels 16 to 235. PC levels used by computers are 0 to 255. Video levels leave a bit of head and toe room to account for differences in mastering. Some sources and displays will clip the information below 16 and above 235. This is not necessarily a bad thing, but it makes the PLUGE patterns harder to use. It is very rare that actual DVD or broadcast content displays information below black or above white.

Now we move on to color gamut and color decoding. Pictured below is a CIE chart. Created by the International Commission on Illumination in 1931, this chart shows the range of color visible to the human eye. At its extremes are the three primary colors, red, green, and blue. You can see as the colors converge near the center of the chart, where they become white. All video displays are based on these three primary colors.
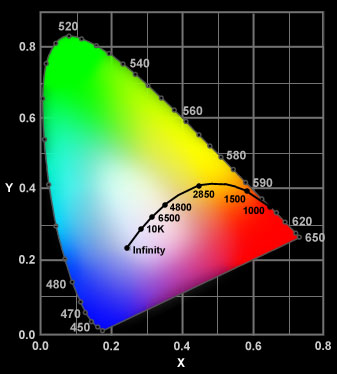
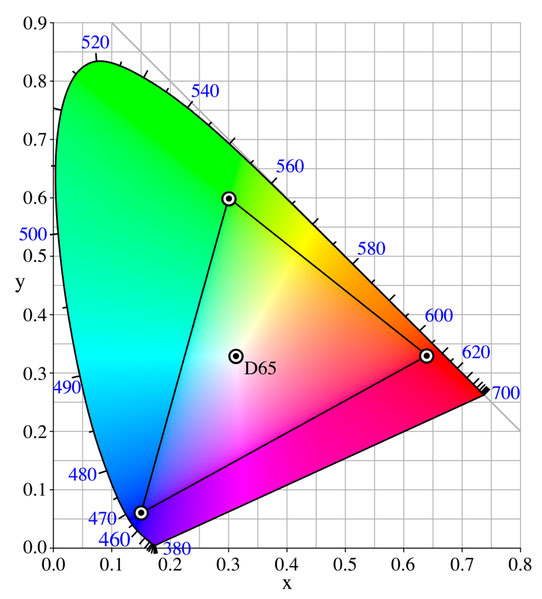
In the photo below, I have overlaid the color gamut that corresponds to HDTV, known as Rec 709. This is the colorspace used to master high-definition content. Most modern displays will come close to this standard. Some HDTVs, mostly in the front-projection category, have a color management system that allows adjustments to the primary and secondary color points.
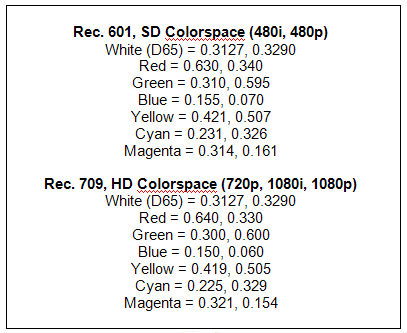
The next graphic (below) shows the x and y coordinates for the standard definition and high definition color gamuts. All displays have the means to control color saturation and phase or color decoding. These are the color and tint controls. The color control adjusts the overall brightness of the three primaries. The tint control will move the cyan and magenta secondary colors so red phases correctly to blue and blue phases correctly to green. You may have heard of the blue filter method of adjusting the color and tint settings. This is usually inaccurate, as the color of the filter and the TVs color primaries must be correct for it to work. The easiest way to adjust color and tint is to shut off the red and green primaries, leaving only the blue on.
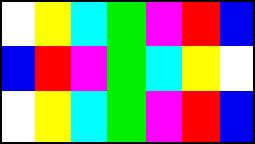
A split color bar pattern is displayed and the color and tint can be adjusted easily. Alternately, a color meter is used to measure the luminance of the primaries and the position of the secondaries can then be calculated.
The next major area is grayscale, or, the color of white. Since video is based on three color primaries, they must combine in a correct ratio to achieve a true white, so that white does not look slightly red, blue, or green. The SMPTE standard for color temperature or white balance is 6500 Kelvin or D65. Most modern HDTVs have at least one set of RGB controls to set the white balance. Ideally, there are two sets, one for the higher brightness levels and one for the lower. Again, a color meter is used with window patterns (photo below) of varying brightness to adjust the grayscale. It is important for the grayscale to track as closely to D65 as possible through the display’s full range of brightness. This is the area where consumer displays are the least accurate at their factory default settings. Whites will appear brighter if a bit of blue is added. Even the warmest or lowest color temperature setting will usually measure too blue. Getting the grayscale tracking correct has a huge impact on image quality. And it can only be done with instrumentation. There is no proper way to adjust white balance with the eye alone.

Now that we’ve covered the basics of levels, color, and white balance, let me highlight the other areas addressed by professional calibration. All displays have controls for edge enhancement (sharpness), options for video processing, and various aspect ratio choices. All these adjustments affect image quality. A calibration instrument has many test patterns that will determine the best values for all these controls. Some patterns include motion which helps determine the best settings for processing different signal sources. Since all incoming signals must be scaled and/or de-interlaced to match the HDTV’s native resolution, these video processing options are very important. A calibrator can determine which component in the signal chain has the best video processing and make the appropriate settings.
Aspect ratios are also a very crucial area. The best image quality is usually found with an HDTV’s 1:1 pixel mode. This means every pixel sent by the source device is mapped to the screen, there is no overscan. Overscan is only needed when there is unwanted material at the edges of the image. Some cable and satellite feeds will show this behavior. Since overscan means another video processing step, it should be used only when necessary.
What Will Professional Calibration Do For Me?
Now we arrive at the question: do I need to pay a professional to calibrate my display? The simple answer is yes, if I want to achieve an image standard that has been determined by decades of scientific research and the work of thousands of dedicated engineers. SMPTE standards are designed to create the most realistic image possible with the least eye fatigue within the limitations of display technology. A professional calibrator will also adjust your HDTV flat panel display or projector with respect to the viewing environment. Different lighting conditions can change one’s perception of levels and color. A professional calibration can compensate for the conditions present in your particular room. Since we’re talking about home theater, the movie experience is the most important thing. The idea after all, is to replicate a cinema in the home!
Filmmakers have a vast array of choices available to them with regards to film stock. These different films will allow for more or less grain, a certain color reproduction, or a particular range of light and dark values, just to name a few. The telecine process, by which film is transferred to video, allows more options in the post-production process. Add to this the possibility of an all-digital production with CGI graphics, and you can see that every filmmaker can easily achieve a unique look to his or her films. To faithfully reproduce this vision in home theater requires that the display match as closely as possible the monitors used to produce the film. Professional calibration will accomplish this.
Even the most accurate displays have a huge array of settings and modes that can easily confuse many users. It’s quite rare that any TV will have an out-of-the-box mode that does everything right. A professional calibration will strike a balance between all the areas discussed above. It is also a fact that many of these controls will interact. For instance, levels must be readjusted whenever there is a change in grayscale settings. And both levels and grayscale are affected by a change in the gamma setting. An experienced calibrator will recognize these situations and adapt to them.
Another important reason to consider a professional is that they will possess the proper instruments to calibrate a display. Every area of adjustment except for levels requires the use of a color meter. This most often takes the form of a probe connected to a laptop computer. The probe measures light output and color and is essential for any adjustments that are made. With the proper software, the user can see exactly what has changed on the display. There is no interpretation involved, it is simply science. A professional calibrator will also have the proper test patterns available. These will be both DVD-based and contained in a signal generator. A signal generator is a device which displays the patterns with great precision. It is a reference component which makes the calibration all the more accurate.
Professional calibrators are also an excellent starting point when choosing a display. If you are considering hiring a calibrator, it is important to know which displays are calibration-friendly before putting your money down. Some HDTVs lack the critical controls necessary. The calibrator community shares information on the newest models and consults with manufacturers. A professional can recommend displays based on their adjustability and their suitability for your particular viewing environment. Through this sharing of information, a professional calibrator not only has his own experience to draw on but that of others as well.
THX and the Imaging Science Foundation (ISF)
There are two major organizations that train and certify calibrators, THX and the ISF. Their training programs are similar in that they teach SMPTE standards and the theories behind video imaging. The THX course offers more hands-on experience with displays. The ISF however is the older of the two and has a large community of calibrators who share information with each other and manufacturers reps. Both require passing a rigorous test to obtain certification, and both require certified members to have the proper equipment for calibration.
It is important to remember that THX and the ISF are not standard-setters. They are standard-maintainers. Their goal is to bring professional standards for video reproduction to consumer displays. They do this in several different ways. Education is the first and most important factor. They have not only trained thousands of calibrators, they have also had a huge influence on display manufacturers as well.
Just ten years ago, it was nearly impossible to purchase a TV that was anywhere close to SMPTE standards. This feature was reserved for very expensive professional monitors. Televisions were made solely to stand out in packed showrooms. In the last few years however, it has become possible to buy a display capable of matching these important standards.
Sample Data from a Calibration
Below are some sample graphs from a Panasonic AE2000U LCD projector. These will give you an idea of what happens during a professional calibration. The calibrator can provide these charts to a client to show what has been done to the display. These graphs are produced by the color analyzer software. They are not specific to THX or the ISF. They are meant to show the before and after state of a display.
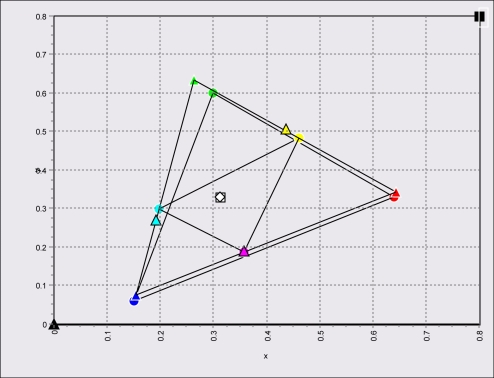
Here (below) are the measured primary and secondary color points from a Panasonic AE2000U front projector before calibration of the Color Management System. The triangles represent the measured points and the circles represent the SMPTE color space for HDTV. You can see that red and blue are close to the standard, but green is oversaturated. Also the cyan secondary is phased too much toward blue. While the color is not too bad, green will look a bit unnatural (like grass for example), and flesh tones will be a tad off because of the error in the cyan secondary.
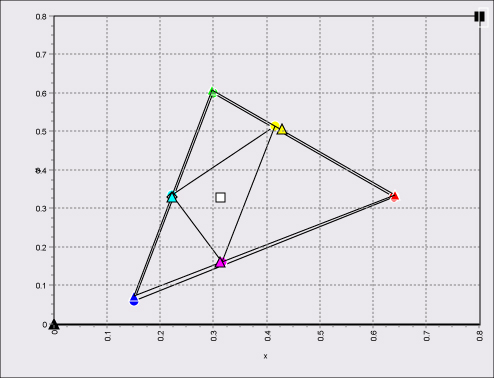
Now take a look at the measured color points from the same projector after calibration of the Color Management System. All points are nearly perfect except for yellow. In this case, getting yellow right meant sacrificing accuracy on cyan and magenta. This result represents the best compromise, getting the most points correct. It is not always possible to achieve a perfect CIE chart with consumer displays.
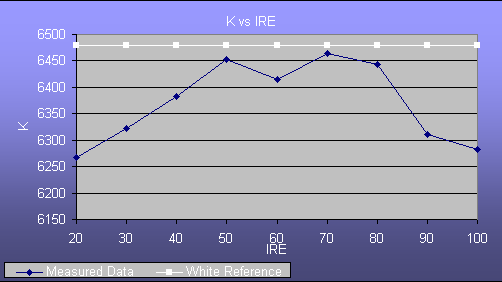
This graph shows the Panasonic AE2000U projector before grayscale calibration. This is the warmest color temperature preset. Not only is the tracking poor, it is too warm as well. This would show up as reddish whites in bright scenes and reddish blacks in dark scenes. Only the midtones are close to correct.
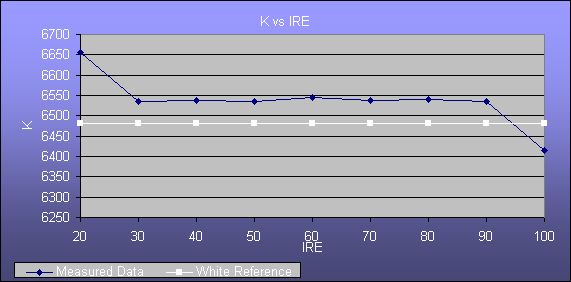
And here is the AE2000U after grayscale calibration. Now the tracking between 30 and 80 IRE is very consistent and only a touch above D65. The spikes at 20 and 100 IRE are not visible to the eye, only the color meter. Now all shades of white down to minimum black will have the proper neutral look.
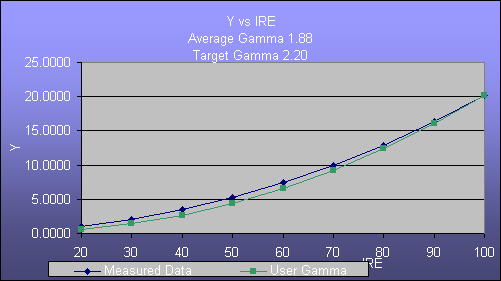
Once levels are set correctly, gamma is the next most important component in creating an image with maximum dynamic range. The AE2000U’s out-of-the-box gamma is illustrated below. The brightness increases too quickly out of black (the target gamma of 2.20 is shown in the green line, and the measured gamma is the blue line). This creates a washed out look in dark scenes. Even though the black level might be set correctly, the image will lack depth and dimension with this gamma curve.
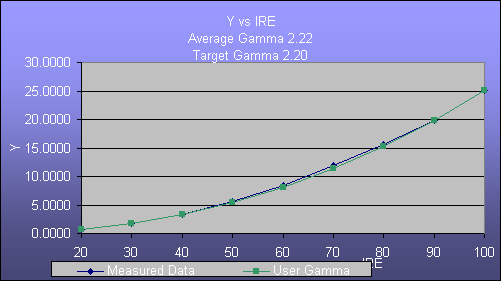
Below is the corrected gamma curve of the same AE2000U. Now the quality of blacks and dark scene material will be much better. Getting the gamma curve right really makes the image pop and look more three-dimensional.
Conclusions
So to answer the question posed by the title of this article: what professional calibration means to the home theater experience, it means you will have a display that matches the original film content as closely as possible. The only way to significantly improve upon a properly calibrated display is to install an actual film projector in your home! While some consumers have done this, video is the omnipresent product the majority of us own as part of our hobby. Thanks to organizations like the THX, ISF, and SMPTE, it is now possible for us to replicate the cinema experience in the home with affordable equipment and a visit from your local professional calibrator.

