Introduction to the Optoma HD33 3D DLP Projector
In the two years since 3D displays first became commonplace, I’ve seen many demos; and only a few of them really impressed me. When you watch for a few minutes and you get that “gotta have it” feeling, you know you’ve seen something special. So far I’ve seen exactly zero flat panels that affected me that way. They just don’t immerse the viewer the way a projector does. I’ve found for the 3D effect to be truly convincing, the edges of the screen have to be outside my peripheral vision. Front projection is, of course, the answer; but 3D capable models are only just now trickling down to the affordable level.
I’ve been dying to try a 3D projector for a while now, so when Optoma offered me their new HD33 for review, I jumped at it. Optoma has always been a leader in affordable front projection. With the HD33 however they’ve broken new ground – 1080p and 3D for only $1499! With an entry price below that of most 3D-capable flat panels, the HD33 is almost a no-brainer purchase. The question is, how much did they compromise? The answer is, not nearly as much as you might think.
OPTOMA HD33 3D DLP PROJECTOR SPECIFICATIONS
- Design: 3D DLP Projector
- Panel Type: Texas Instruments Single-chip DLP
- Native Aspect Ratio: 16:9
- Anamorphic Lens Support: Yes
- Native Resolution: 1920×1080
- Max Refresh Rate: 120 Hz
- Lens Throw Ratio: 1.5-1.8:1
- Lens Shift: None
- Light Output: 1800 Lumens
- Contrast Ratio: 4,000:1
- Iris Control: None
- Image Size: 38” – 300”
- Inputs: (2) HDMI 1.4a (1) Component, (1) Composite, (1) 15-pin VGA, (1) VESA 3D
- Control: (1) RS-232, (1) 12v Trigger
- Lamp Power: 230 Watts
- Rated Lamp Life: 4000 Hr Standard, 3000 Hr Bright
- Dimensions: 4.5″ H x 14.2″ W x 12.2″ D
- Weight: 10 Pounds
- Warranty: 1 Year, 90 Days on Lamp
- MSRP: $1,499 USD, 3D RF Glasses – $99/pair
- Optoma
- SECRETS Tags: Projectors, DLP, 3D
Design of the Optoma HD33 3D DLP Projector
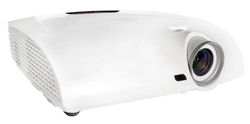
The HD33 comes in a white curvaceous case that looks quite elegant. It’s definitely a step up from some other more industrial designs. The exterior is all white with silver accents around the lens barrel. Ventilation is accomplished with an intake on one side and an exhaust on the other. A little light leaks from these vents and also from below the lens. In my black hole theater, I could only see it when the image was very dark. Fan noise is minimal; impressive, given the 230-watt lamp that powers this projector. There are IR receivers on the front and top of the chassis and I never had any trouble pointing the remote just about anywhere and getting a response.
Around back there is a complete jack panel with two HDMI 1.4a inputs, one each of component and composite, a VGA connection and a special DIN-style port for the 3D emitter. For control purposes, a 12-volt trigger and an RS-232 input are provided. Also on the back panel are a power button and lamp status LEDs. Should you need to secure the unit, you can use the Kensington lock port on the lower right. The lens is adjusted via exposed rings on top. Zoom and focus are the only controls available. You’ll have to plan your installation carefully because options are limited by the lack of lens shift. On the bottom are four independently adjustable feet to help get the HD33 perfectly level.
For watching 3D content, Optoma provided me with one pair of glasses and a sync emitter which is plugged in to the HD33 using a short cable. The glasses communicate with the projector through an RF connection which is more robust than the infrared used by other brands. You can place the emitter anywhere you want and sit anywhere you want and the sync will never be broken. As an alternative, the HD33 also supports DLP link which maintains the connection through signals projected on the screen between frames. This method doesn’t require an emitter. Optoma sells both types of glasses. I found them quite comfortable with a nice soft nosepiece and properly shaped ear hooks. They seem heavy when you hold them in your hand but on your face, they’re quite light. And they fit just fine over my prescription eyewear.
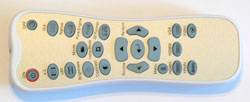
The remote is pretty basic but provides all needed controls with discrete buttons. Power on and off are separate, which I prefer. Then there are a series of toggles for things like picture mode, 3D format, aspect ratio and lamp mode. Brightness and contrast keys give you direct access to those adjustments. In the center is menu navigation and at the bottom are discrete keys for all the HD33’s inputs. The backlight is a soft blue which is much easier on the eyes in a darkened room than uncolored lights. The IR sender is quite powerful allowing me to point the handset lazily and still get quick command response.
Setup of the Optoma HD33 3D DLP Projector
Installation required a bit more planning than usual. Without lens shift and a large zoom range, I had fewer options for placement. I finally settled on a small stand just in front of my chair with the projector right-side-up. Image offset is fixed at 116%, meaning the projector has to be 16 percent of the screen height below the bottom edge to line up. Zoom range is also small at 1.5-1.8 to 1 so I had to set the distance carefully. It would be best to ceiling-mount the HD33 I think. Once I had the image lined up, focus was fairly easy with the large ring on top. The zoom and focus controls interact so it will take a bit of back-and-forth to get things just right.
After burning in the bulb for 60 hours it was time to see what’s on the menu. If you’ve worked with Optoma projectors before, you’ll be instantly familiar. The first section is called Image and contains all the picture adjustments. Everything you need is there except for a color management system. Gain and bias controls are present for all primary colors along with an interesting gamma adjustment. Rather than a multi-point system, you select from four curve types, then fine-tune with a setting called offset. It’s a unique approach to setting gamma but fortunately, I didn’t have to tweak too much to get good results. Also in the Image menu are the PureEngine options. These are PureDetail, a form of edge enhancement; PureColor, which appears to adjust overall saturation; and PureMotion, Optoma’s frame interpolation system. This can be set to low, medium or high. The HD33’s max refresh rate is 120Hz. If you leave PureMotion off as I did, 24p material is shown using a 5:5 cadence with repeated frames.
The next menu, Display, has the aspect ratio control. Besides 16:9, there is a mode for anamorphic lenses as well as Native, which turns off any scaling, 4:3 and Auto. There is also a SuperWide mode which requires a 2.0:1 screen. This will cause some information to be cut off the sides on 2.35:1 content, and the top and bottom with 1.78:1 content. It also softens things a bit; but if you really hate black bars, it’s a viable option. Also in the Display menu is edge masking, zoom, vertical shift and keystone correction which you should avoid if possible as it reduces resolution. Finally, there is a 3D section which lets you manually select side-by-side, top-and-bottom or frame-packed formats. You can also swap the left and right images if your glasses get out of sync. This never happened to me.
The final two menus, System and Setup, include convenience adjustments like input disable, lamp power, language and the like. You can choose where the menu will appear if you like. There is a Signal sub-menu which helps to sync up with a computer-based source. Turning on the high altitude mode increases fan speed to provide extra bulb cooling. There is an auto power-off option which will shut down the projector after a selectable period of no-signal input. Finally, the Reset option returns all settings to factory defaults.
Calibration was quite easy. In fact, it was one of the fastest installations I’ve ever done. I used the Cinema mode as my starting point as it was pretty close to the mark. After dialing in brightness and contrast, I adjusted the grayscale. It tracked so well, it literally took me five minutes to achieve the result you see in the benchmarks. Gamma was equally simple requiring just one click of the offset control to get the average number to an excellent 2.29. My only complaint was the green luminance. For some reason this was quite low even though the other primaries were nearly perfect. I could see in test patterns that green seemed a bit pale but in actual content, it wasn’t really a problem. The HD33’s prodigious light output is probably responsible for hiding this flaw. Even with the contrast set at -10, max white was a very bright 29fL. If you want better blacks, a neutral density filter would help since there’s some headroom at the upper end of the luminance scale.
The Optoma HD33 3D DLP Projector In Use

I was quite anxious to try a few 3D movies on the HD33 so I pulled out my trusty (and small) stack of titles and put on the glasses. I started with Cloudy With a Chance of Meatballs knowing it had a few scenes that would show crosstalk, if there was any. First off, the glasses synced up right away without any intervention from me. I used an Oppo BDP-93, which also switched into 3D mode automatically. The projector kicked into its 3D picture mode and the lamp clicked to the Bright setting. Light output was not an issue as I started with nearly 30fL of calibrated light output. I wasn’t able to measure output in 3D mode since I lacked 3D patterns but the picture was still had plenty of punch and brightness.
So was there crosstalk? Not a bit of it. In fact, the 3D effect was pretty much perfect. This is way beyond the gimmick-level 3D that flat panels generate. Having such a large image with no artifacts in front of me gave me a whole new appreciation for this technology. In the ice cream scene, there are lots of small dark objects against bright backgrounds like chocolate chips and kids running around. This is a prime candidate for ghosting artifacts and there weren’t any at all. Only if I tilted my head upward, thus mis-aligning the polarization of the glasses, did I detect the tiniest hint of crosstalk.

The two live-action titles I have, Imax’s Wild Ocean and Grand Canyon Adventure also looked amazing. The opening credits of Grand Canyon show CGI-generated water droplets floating in front of the screen. Since the picture was so large, they literally floated in front of my face. Flyovers of the spectacular landscape were breathtaking and I could feel my equilibrium being affected as I sat there. Undersea shots in Wild Ocean literally had me surrounded by schools of fish and other sea creatures. The well-saturated color from the HD33 made even monochromatic material pop.

I had a chance to check out two brand new 3D Blu-rays from Disney Pictures – The Lion King and Beauty & the Beast. Hand-drawn animation is a little different than CGI in that objects still appear two-dimensional. They just move and exist on different planes front to back. It’s a neat effect and I enjoyed it. I won’t say it’s better than watching it in 2D, just different. Once again, the color and image contrast were spectacular. Sharpness and detail were also first-rate. This is the best lens I’ve seen on a sub-$5000 projector.

For 2D viewing, I grabbed a few familiar discs. Seabiscuit is always a great film for its natural saturated color and beautiful landscapes. The movie looked fantastic with its bold bright colors and warm palette. Night scenes held up well too thanks to the HD33’s accurate gamma. Blacks aren’t the deepest I’ve seen but they don’t look murky or flat either. The extra brightness more than makes up for what the HD33 lacks in black level. I, Robot is a benchmark of image quality with the sharpest and most detailed picture of any Blu-ray I’ve viewed. The HD33’s excellent lens left nothing under the table. Whether the picture was a facial close-up or a wide shot, detail was razor-sharp. The Last Samurai is a great test for a display’s noise reduction abilities. The HD33 exceeded my expectations when I turned off the BDP-93’s video processing. Though I could see a little more film grain, it was far from objectionable. I finished up with a DVD of Nirvana’s performance on MTV Unplugged from 1994. It was pretty soft but I was impressed with the scaling of the HD33 when I set the player to source direct. Detail was only reduced by the smallest amount. The projector didn’t do that well in my video processing tests but actual content looked pretty good. Of course all this is moot if you hook up a decent player which will always give you a better image. Even projectors that have advanced processors like the HQV Reon look better when you let the player handle scaling duties
The Optoma HD33 3D DLP Projector On The Bench
Equipment used: EyeOne Pro spectrophotometer, CalMAN Professional 3.7 analysis software, Accupel HDG-3000 signal generator, Spears & Munsil Benchmark Blu-ray disc.
All measurements were taken off the screen (Carada Brilliant White, gain 1.4) from the seating position (10 feet back). Video processing tests were performed using an Oppo BDP-93 connected directly to the projector and set to Source Direct mode.
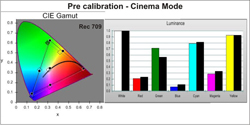
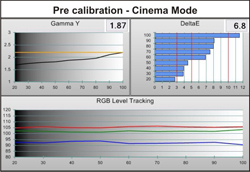
I used the Cinema mode as it provided the best starting point for calibration. All settings were at factory defaults. As I mentioned previously, PureColor was set to 1, which was more accurate than Off. Pre-calibration color measured fairly well with only small deviations from the Rec 709 spec. The only flaw in the luminance chart is green which is quite a bit below the correct level.
The below graph shows the grayscale using the Warm color temp preset and the Standard gamma setting. Even though it runs a bit too warm, tracking is excellent. The gamma shown here would result in grayish blacks and poor overall contrast.
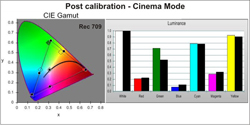
After calibration of the grayscale and gamma, secondary colors line up better with the exception of cyan. I was unable to correct this since the HD33 lacks a CMS. Also, since my pattern generator only sends RGB signals over HDMI, I didn’t have the color and tint controls available.
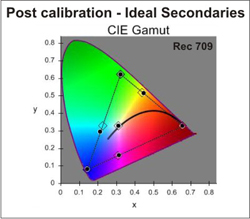
When the CIE chart is corrected for the Optoma’s actual primaries, yellow and magenta are spot-on. Cyan is still off though. I attribute this to the under-luminance of the green primary.
After literally 10 minutes of adjustment, I achieved the below grayscale and gamma measurements – fantastic! This is amazing performance for a projector that only costs $1499. All I had to do to correct the gamma is set the Standard Offset to -1, one click below default. This quality of grayscale tracking is usually found only in far more expensive displays.
The HD33 doesn’t do much in the way of video processing besides basic scaling and de-interlacing. Only the 24p cadence and the horizontal mixed content clips displayed correctly. This is not a big deal given the plethora of video processing solutions available in many Blu-ray players and AV receivers. The only other significant flaw was a failure to display above-white or below-black information. I tried every combination of settings and was unable to see these signals. I verified with Optoma that this is intentional.
Contrast performance was very good given the HD33’s high light output. Minimum black measured .006fL which is only fair though typical for a DLP. The deepest blacks are found in LCoS and LCD projectors. With a max calibrated level of 29.29fL, the contrast ratio is then 4881:1, which exceeds Optoma’s specification. Screen uniformity was very good with only a very slight green tint towards the right side of the screen in a full-field white pattern. This was not visible in any of the content I watched. The lens is quite good for a projector in this price range. I could see no chromatic aberrations in crosshatch patterns and focus was sharp from edge to edge.
Conclusions About the Optoma HD33 3D DLP Projector
The Good
- Grayscale and gamma performance is equal to much more expensive projectors
- High light output makes for a punchy image and bright 3D
- No-hassle 3D with zero crosstalk or other artifacts, best I’ve seen to date
- Excellent lens
The Not So Good
- Does not display below-black or above-white signals
- No way to fix green luminance error
To say the HD33 impressed me would be an understatement. Usually I like to say there’s no free lunch but Optoma has served up a quality steak at a fast-food price. With perfect 3D, lots of light, super-accurate grayscale and gamma, and an excellent lens; this projector could anchor a superb home theater. The glasses were not only convenient with their RF connection, they were comfortable too; no matter how long I watched. And at $99 a pair, they undercut most of the competition.
Even if its performance were merely OK, I would recommend the HD33 solely based on value. That it offers as much as projectors costing three or four times more is icing on the cake. If you’re trying to do front-projection on a budget, look no further. Optoma has hit this one out of the park.


