I have been a drummer for a very long time. I just turned 65 (August 21, 2010), and I started drumming in college when I was 20. At first, it was just four of us, one of my fraternity brothers played bass, I was on the drums, a singer, and a lead guitarist who had happened to live a few blocks from Jimi Hendrix. He was heavily influenced by Hendrix – of course – and he was only 16 when he joined our band. That’s him on the far right. I think this photo was somewhere around 1967.
At that age, I certainly did not have the money to invest in a big kit, not even a new kit. I had to rent one. I finally saved enough money to buy one cymbal, as seen in the photo. I continued to rent used drum kits for the two remaining years I was an undergraduate at the University of Washington, in Seattle. After about a year, an organist joined us, with his Hammond B3 and Leslie speaker, as well as a 12 string rhythm guitarist. He was skilled enough to play lead solo as well as rhythm backup, so we got to be pretty good. We played night clubs and bars, and if you wanted to know if we classified ourselves as a garage band, well, let’s put it this way. One weekend, we had to use Friday night’s wages to bail the rhythm guitarist out of jail so we could play on Saturday night.
Obviously, we didn’t make a lot of money at this, but it was fun. Because I had enough money to rent the used drums, but never seemed to acquire enough funds to get a few more cymbals, that lack of having a full cymbal set stuck with me over the years in the back of my brain. I graduated in 1968, got married, and moved to New Orleans for graduate school. That was the end of the band, for the time being.
During graduate school and for years afterward, I didn’t have the time to play drums with a group, and didn’t have enough room to set them up in our apartment, so active playing just wasn’t in the cards for me at that time.
I ended up in Baltimore, Maryland, doing research at NIH. I became disenchanted with bench science, left NIH, and started my own company, focusing on editing medical journals for John Wiley & Sons. Now, all of a sudden, I did have the space because we had purchased a house, and I had the time.
However, I still didn’t have a lot of money, so I bought (a step up from renting) a used set of Rogers drums for $150. I starting taking lessons, and bit by bit, I satisfied that old thing in the back of my head about never having a full set of cymbals.
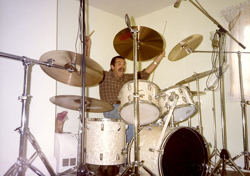
There was a local music store that had all their cymbals on a 30 foot long rack, and you could swing a cymbal out, use a stick to play a ride pattern, or crash it, swing it back in and try another one.
This was like a candy store for me. I found that I had a craving for cymbals. As you can see in the photo above, taken in 1987, I ended up in a short time with all the cymbals that I could handle.
Then we moved to California, and ding dang it, I didn’t have the room for a drum kit. So, I sold the drums, but kept the cymbals.
Jump forward to 2002. By then, I not only was editing the medical journals, but I had started Secrets of Home Theater and High Fidelity. I converted the garage to a test lab where I could test CD players, amplifiers, speakers, etc. I purchased a snare drum to practice rudiments, but that was about it.
Then, in 2009, during a visit to our local music store, which happened to have a huge drum department, I sat down at a Roland electronic drum kit, and it was love at first sight (and sound). Here was something that I could fit in the lab. So, I purchased it piece by piece and ended up with four drum pads for toms, and a pad for the kick, paired with a double bass pedal. Here is a photo taken in May, 2010.
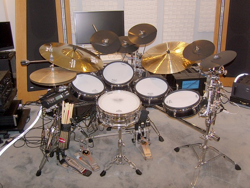
I had originally used three pads for toms and one for the snare, but I found that I could not get the dynamics from snare drum samples that I could with an acoustic snare, so I moved that fourth pad to being tom number 4 and purchased an acoustic snare (Tama, Stewart Copeland model). As you see in the photo, I also got five cymbal pads. Why five? I realized and accepted the fact that I was obsessed with cymbals, dating back to when I couldn’t afford to purchase them, and I decided to just let my obsession express itself. I bought Roland CY-8 cymbal pads because they were small and I could fit all five in a close arrangement to my sitting position. The kick pad is a Roland KD-8, again, small so it would not take up much space.
I ended up with a high hat stand (DW 9000) and three cymbal stands and I tied everything together with Gibraltar clamps and chrome tubing, forming a U-shaped setup. To move the kit when I listen to those big ribbon speakers you see in the background, all I have to do is loosen the clamps that attach each stand, and move the stands to the rear of the room, as all of the drums and cymbals are attached to the three cymbal stands.
Besides being obsessed with buying cymbals, I was also obsessed with the sound of the cymbals, and for a few months, I was happy with the sound from the cymbal pads (which are electronic triggers for the cymbal digital sound samples). I not only used the samples in the Roland TD-4 drum module (this stores numerous drum as well as cymbal sounds in digital sample format), I also recorded my own cymbal samples using laboratory grade calibrated microphones, and triggered them through BFD version 2 drum software. You can see the computer in the background of the photo, where I boot BFD. The computer is connected to the Roland TD-4 via a MIDI/USB cable. (MIDI stands for Musical Instrument Digital Interface.)
I used real ride cymbals and hi hat cymbals because I didn’t like the feel of ride cymbal pads or hi hat pads, but I was also beginning to notice something, and now we are coming to the point of this dissertation. The sounds of the crash cymbals seemed incomplete. They didn’t have the brightness or clarity that real cymbals have. There was a distinct difference between the real crash cymbals that I had and the samples of those exact same cymbals that I was triggering from the cymbal pads.
Now, keep in mind that I was (and still am) using my reference audio system to play the drum samples through. This consists of a Pure Class A tube preamplifier, two 1200 watt monoblock power amplifiers, and the two ribbon speakers, each of which has a 60” ribbon and four 12” woofers. So, I could not only hear everything in the samples, but also, what was missing.
The cymbal samples were recorded at 44.1 kHz, 16 bit, which is the same quality as found on a CD, and is the sample rate supported by the drum triggering module.
So, I expanded my horizons and began recording cymbal sounds at higher sampling rates, and discovered that cymbals produce frequencies well above 20 kHz (the limit on a CD is 22 kHz), and in fact, above 30 kHz. The recorded samples also sounded mushy, and when I looked at the spectrum of the recorded samples, I realized why. Cymbals produce what is probably the most complex sound of any musical instrument. When you hit a crash cymbal, the frequencies it is making all at the same time span 30 Hz up to beyond 30 kHz. That is very tough to reproduce with basic CD quality sampling.
I began recording and analyzing the spectra of all kinds of cymbals and noted that each one has its own distinct “fingerprint” that one could use to characterize the sound.
For the recording setup, I used two Earthworks M30BX condenser microphones, connected by balanced (XLR) cables to a Lynx L2 balanced sound card in my computer (these components are part of what I use in testing hi-fi products that I am reviewing). The sound card is capable of recording and playing up to 192 kHz samples at 24 bit word length. I used SpectraPlus software to record the samples in stereo, and I had two microphone calibration files such that the frequency response was 10 Hz to 30 kHz ± 0.5 dB.
I placed the two microphones at a 45 degree angle, on opposite sides of the cymbal, with the tip of the microphones pointing at a position about 40% in from the outer edge of the cymbal. The distance from the cymbals to the microphones was 4”.
So, using the cymbals I had on hand (I am going to be expanding on the variety of cymbals as time goes on), I recorded both crash and ride cymbals. I used a 5B hickory drumstick with a nylon tip, and when testing the ride cymbals, I hit a position about 40% in from the outer edge (with the drumstick perpendicular to a line drawn between the two microphones), and for the crash cymbals, I struck the edge of the cymbal at a 45 degree angle. Since I don’t have a machine that can deliver the exact same striking power on each test, I adjusted each recorded sample so that its loudest frequency was at 0 dB (on the recording scale, not an SPL scale) before saving it as a *.wav file.
I recorded the samples at 176.4 kHz (4 x the rate of a CD, which is 44.1 kHz) with a word length of 24 bits (CD is 16 bit). I also then chopped the sample so that the beginning of the recorded file was at the instant the cymbal was struck, and the total length of the sound was 2 seconds. For all of the tests, I removed the cymbals on the drum kit to eliminate any sympathetic ringing, and I placed two sound absorption panels around the computer to reduce any fan noise being picked up by the microphones. I placed the cymbal under test on a stand at the other end of the room, as far away from the computer as possible. The room has wall to wall carpet and sound absorption panels on all the walls and on the doors.
I played the recorded wav files using the SpectraPlus software, which plotted the wav file in a spectrum through a process known as FFT (Fast Fourier Transform) analysis.
Now, I purchase about one new cymbal per month (I really am trying to satisfy that cymbal lust buried in my brain 40 years ago), so I have a nice array to test. Let’s start with a Zildjian 16” K Constantinople Crash. Here is the spectrum.
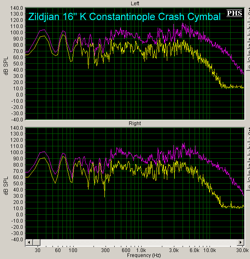
This is a stereo plot of the 2 second sample. The magenta line is the spectrum of the cymbal sound when it was struck (the “attack”). The yellow line is the “decay” in loudness 2 seconds after the cymbal was struck. Notice that the frequencies span from 30 Hz (!) all the way out to 30 kHz (actually they go a bit beyond 30 kHz, but we will limit the tests to a 30 kHz bandwidth because that is the limit of my microphone calibration file).There are peaks in the 400-600 Hz range as well as 2-5 kHz region. For the decay, we will use the differences in levels at 1 kHz and 10 kHz, and in this case, for 1 kHz, the decay (after 2 seconds) was 15 dB, while at 10 kHz, it was 40 dB.
This particular crash cymbal has a beautiful full bodied sound without any large peaks in the upper band that would make it too harsh, nor are there any big peaks in the low frequency range that would produce a humming-like sound that sometimes can overpower the wash of the cymbal (these low frequency peaks are not loud enough to be heard by the audience, but I can hear them because I sit close to the cymbals, and I find them to be very annoying).
Even after seeing just this first graph, you should be telling yourself, “Not all of my drumming is going to be heard on the CD we are producing.” Well, there may be an alternative, which I will get to later in this blog.
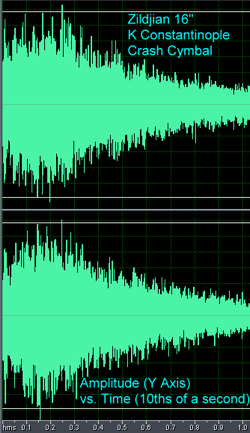
If we look at the spectrum in terms of level vs. time, shown below, we can see that the crash builds to a maximum at about 0.15 seconds, and then decays. The X axis is labeled in 10ths of a second, or 100 ms (milliseconds).
Now let’s take a look at a Paiste 16” Signature Fast Crash cymbal spectrum.

You can see that, compared to the Zildjia, the Paiste has higher levels of sound above 10 kHz at the initial crash, so it is “brighter”. The Zildjian would be described as a bit “darker” than the Paiste. The decay at 1 kHz is 20 dB and at 10 kHz, 28 dB.
The peak in sound level is at 0.12 seconds (120 ms), and then decays. So, compared to the Zildjian, it is a little ‚Äúfaster‚Äù (and that is why it is labeled as a Fast Crash). The 10 kHz measurement decays more after 2 seconds in the Zildjian at 10 kHz than the Paiste, so the Paiste would be said to have a longer high frequency “sustain”.
Notice that the initial crash spectrum (magenta) extends well beyond 30 kHz at a level near the rest of the spectrum. In fact, I was able to see evidence of sound all the way out to 60 kHz. This means that with CDs, we are not getting anywhere near what this particular percussion instrument is capable of delivering. In fact, cymbals may produce the highest frequencies of any instrument.

The way around the problem of missing out on so much of the percussion’s sound in a recording, is to record at a higher sampling rate. In this case, we need to be able to record out to 60 kHz, so that means 176.4 kHz. If the master is recorded at this rate, and 24 bit depth, it can be down-sampled to 44.1 kHz, 16 bit for CDs without artifacts, and the 176.4 kHz, 24 bit version of the recording could be sold on one of the new websites that are appearing which offer high resolution music albums, such as HDTracks, so that those of us who want all the music can get it. These albums are purchased and then downloaded to your computer. You can play them from your computer, or burn them to a DVD-A and play the high rez discs on a universal Blu-ray player.
Currently (August, 2010), I have gone back to using the real crash cymbals instead of the MIDI samples. However, I use the MIDI samples for the toms, because they do not go out to very high frequencies, and I can use the drum module to tune the drums for music in a particular key. The module stores 100 “Kits” in memory, so I can have the toms tuned to several different keys in the various kits. This way, the toms sound in tune with a soloist in a jazz recording that I play along with. This is something you can’t do with an acoustic set of drums.
To get more info on the differences between 44.1 kHz sampling and 176.4 kHz sampling, besides the extended frequency response, I down-sampled the 176.4 kHz file to 44.1 kHz, as would a producer who has 176.4 masters and is making the music files ready for CD production. Then I ran the 176.4 kHz audio file in SpectraPlus and subtracted the 44.1 kHz version from it in one channel.
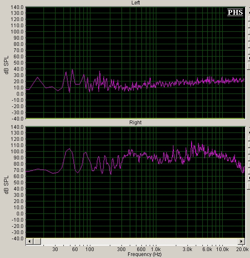
For the left channel (the top graph in the two sets of graphs shown below), the 44.1 kHz file has been subtracted from the 176.4 kHz file, so all peaks above 0 dB represent information that was in the 176.4 kHz audio file, but was lost when it was down-sampled to 44.1 kHz. Note that this audio information is all in the normal 20 Hz – 20 kHz audible band. The bottom graph (the right channel in the two sets of graphs) is the 176.4 kHz file with nothing subtracted. So, you can see that even within the normal audible band, there is lots of audio information that will be recorded at 176.4 kHz but not at 44.1 kHz.
The first graph has 24 bit 44.1 kHz info subtracted (I wanted to keep the bit depth the same so as not to introduce a second variable), and then the second graph is with standard 16 bit 44.1 kHz information (as it would have been on a CD) subtracted. If you look at the 6 kHz to 10 kHz range, you can see that for the 24 bit 44.1 kHz subtraction, the peaks are a bit broader than they are for the 16 bit 44.1 kHz subtraction. So, the dynamic range has an effect too.
Since the information that was lost in the down-sampling is all less than 40 dB, we can conclude that it is low level detail that 176.4 kHz sampling adds to the recording. Whether we can really hear this difference is another question, but obviously, there is a measurable difference in the quality of the recording between the two sampling rates, and I am not sure anyone has ever shown such graphs before.

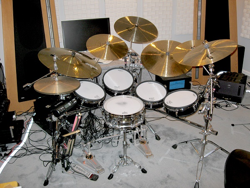
Here is my drum kit as of today (8/27/10). I don’t use digital cymbal samples triggered by electronic cymbal pads anymore. Too much sound is lost, because MIDI audio files are limited right now to 48 kHz sampling.
Here is the next experiment. I recorded a 24 bit 192 kHz crash (Paiste 18″ Giant Beat). I trimmed the original file to the 2 second test file as I did with the other tests. Then I down-sampled it to 24 bit 48 kHz and following that, I up-sampled it back to 24 bit 192 kHz. Shown below is the re-upsampled wave file analyzed in SpectraPlus. You can see that the re-upsampling process did not do anything to the signal above 24 kHz (half the 48 kHz digital sampling frequency) because there was no signal there to upsample. Down-sampling the 24/192 file eliminated everything above 24 kHz.
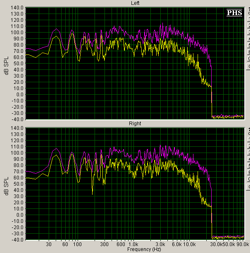
Shown below is a spectrum of the original 2 second 24 bit 192 kHz wav file, with the down-sampled and re-upsampled file subtracted from it. The small peaks in the 20 Hz – 24 kHz region are what was in the original 24/192 file, but were permanently lost in the down-sampling step. They could not be restored by simply re-upsampling to 192 kHz. The graph appears to go below 0 at the low frequency end, but I think this is just an error produced by having to turn off the microphone SPL calibration during the down-sampling and re-upsampling since I was dealing with voltages that had already been corrected in the initial recording. I think the actual value at the low end is probably around 5 dB. The spectrum is smoother than the one where I subtracted the 24 bit 44.1 kHz down-sampled file from the original 24 bit 176.4 kHz file, so it appears that up-sampling does improve the sound of a recording made at a lower resolution, but just like with up-scaling NTSC TV to HDTV, it does not create a signal that is the same quality as would have been recorded natively at the higher resolution.


